Leaderboard
.thumb.jpg.d599d4c13e08899474e0348bd9baed3b.jpg)


Popular Content
Showing content with the highest reputation on 03/04/2021 in all areas
-
I recently had my D14's instruments restored at D&M Restorations and they did a very nice job on it. I am happy with the outcome and it will look great when mounted into the dash! I hope they keep turning out good work like this for years to come. M Here are some pix. M

 11 points
 -
Pancho, 14 D25, 1947
 4 points
 -
Problem solved ? Time for a wobbly pop or even two. So I got to thinking about pulling the intake manifold off to check for the gasket to be blown and someone suggested it might even be a cracked manifold. So I decided to inspect the manifold with a super bright LED flashlight and a mirror. That's when I noticed the 5/8" plug on the firewall side of the intake manifold was missing. I got another plug, stuck it in and she purrs like a kitten. Begging me to take her for a spin. But the sun is setting and wouldn't you know it, but rain is setting in for a few days starting tomorrow. Soooooo, now I'm wondering could all that happened be related or was it all just a bunch of coincidences happening at exactly the same time???4 points
-
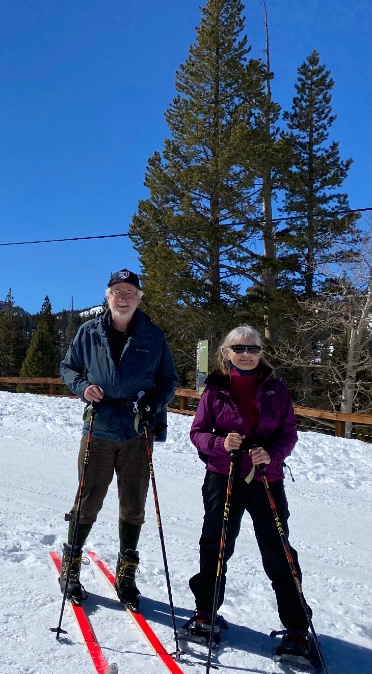
I think they forgot about you. The observation period is supposed to be 15 minutes if you don’t have a history of allergic reactions to vaccines and 30 minutes if you do. For what it is worth, my wife and I pulled rank by being volunteer first responders and completed our Moderna vaccination a while back. Word of caution for those getting the Moderna vaccine: The second shot put us both back a bit: Me more than my wife. The next day we both felt slightly under the weather, good thing we are retired as going into work would not have been possible for me. I don’t know if the second shot on the Pfizer vaccine is better or worse. My wife says the one lasting side effect that she has noticed is a revival of the desire to travel. We just got back from our first trip since the beginning of the pandemic. Here is what we were doing.
 4 points
 -
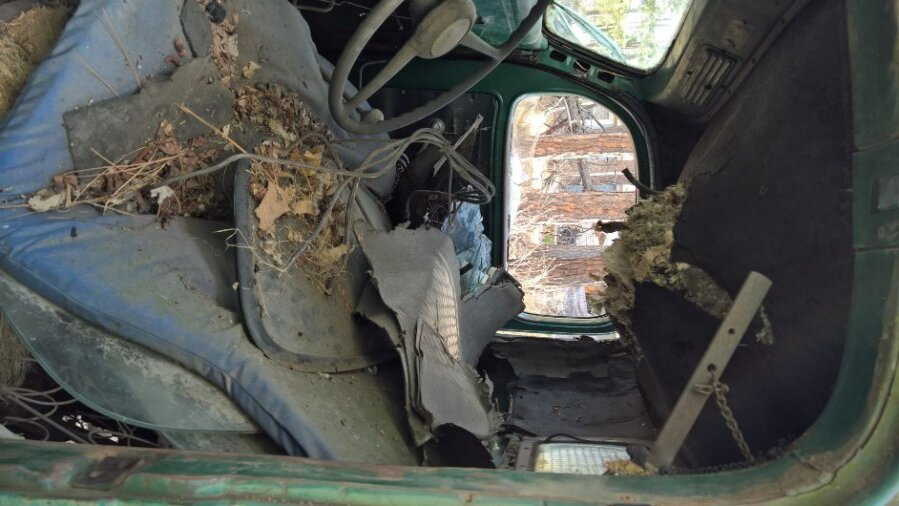
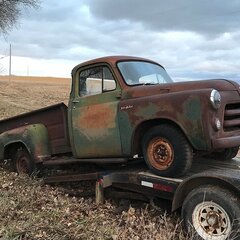
Today I went to evict the rodents nesting in the cab of my new treasure. Also removed the remnants of the rotten flatbed and sprayed PB Blaster on all the lug nuts. I ended up filling (4) 45 gal trash bags with the material from the rodent nests. Sorry about the sideways pics.


 2 points
 -
Yes, old website I took down. Basically the part is a stainless steel ball valve....having all my email since 1990 helps.... Item Ref. Price ea. Qty. Description 20-038 $17.10 2 3/8" Triac 2-Piece Ball Valve -SS-NPT I purchased it at https://www.thevalveshop.com/index.html The shaft size is the same as the arm on the existing heater control valve. What I did was take the arm off and used it in place of the handle on the new valve. It even has the same milled shaft for it to fit on. I then took the round part that the pull cable clamped into and welded it to a plate I made, and crude it is. Then the arm and the cable fit just like the stock one. I then made a steel "Y" for the plumbing. The only thing I did that is not in the photos is about 5 years ago, I made a stop so that then you pull on the cable the ball cannot go over center and start to close. Works great. I checked at the time with the manufacturer about anti-freeze and they said the ball seal would ignore it and it has for 15 years. I have a second one in my spares should I ever need it. One thing, it flows more than the stock unit so it gives better heat. One last thing. On the '49 I used the part that goes into the water pump that has the extended pipe in it. It was a MOPAR period part that take the water in the pump from lower in the pump which is hotter water. It does in fact work. At some point I am going to do it on the '47. James.2 points
-
I always keep some cash in the kitchen for when I hear the Ice Cream Man. 56 and I still turn into a kid when I hear the music.2 points
-
glad it was simple fix and issue. Also glad that you posted what caused the issue and how you solved the problem. Most posters only as the questions but forget to inform us on the real cause of the problems and how they fixed the pbm. This is known as passing it along. This small item might happen to another member and then we can tell them to look for a missing bolt inthat area. Knowledge is so important with these old vintage cars and trucks. The mechanics that worked on these on a daily basis are mostly dead so we need to help each other to understand them and how to preserve them for the next generation. You learn something everyday. Rich Hartung desoto1939@aol.com2 points
-
In the daytime I'm Mr. Natural, just as healthy as I can be, but at night I'm a junk food junkie, Lord have pity on me.. ?2 points
-
Got my first shot today. Appointment was at 2, arrived at 1:55. They had an army of volunteers directing cars, checking people in and getting shots. Hundreds of cars moving through the parking lot at any given moment. Didn't even have to get out of the car. I was finished and pulling out of the parking lot at 2:15.2 points
-
Just crazy times ... at the same time I think the "woke crowd" is being exposed and will be cancelled, by the "awake crowd" that is tired of the BS the woke crowd is trying. Just incredible to think a plastic potato head dolls gender is a issue today. Or that history is trying to be erased and replaced ... funny times indeed.1 point
-
I made the tubes out of plain steel. I purchased a tool to make the little bump on the ends like the factory so the hose would not slip off. For the hoses, go to an auto parts store and you can find a hose with 2 ninety degree ends within an odd ball shape. Buy it and cut the two nice 90's off. You will need two or three of them. Someplace I have a NAPA part number but it is not on my computer... James.1 point
-
1 point
-
Hahaha, the image of you pushing those kids out of the way to get at the front just makes me happy! ? hooray for men in their 50’s1 point
-
YOU GUYS ARE AWESOME The Ice Cream just stopped here and I got two dreamsicles. Now, start talking about winning the lotto, lol. Just no weather talk, please.1 point
-
you should post a photo of the truck (cause it makes us happy?) in my opinion, SS are indeed special but, if you’re asking if the value Is higher and more desirable. probably not to many folks outside of this community. You could sit on it longer looking for the right buyer, If you were happy with what you thought it would go for, sell it and move on.1 point
-
I might go with this one my self https://www.summitracing.com/parts/vta-50507-vua. My heater control cable needs replacing anyway so I can sub the rheostat in it;s place with an appropriately vintage knob instead. But a FOUR SEASONS 74683 is probably the best bet. verify the thread and hose size though,1 point
-
I would suggest checking here as it is more a site for modified cars than here. https://www.jalopyjournal.com/forum/1 point
-
I dont have the dual heater set up and retrofitted a #53 to my 52 coupe. I know its not stock, but the car wont be used in the winter and it does not have the huge plenum assembly that would have been stock sitting on the fenderwell which I personally don't like. What I found was an in line cable operated valve that was originally used on a dodge pick up or a van from the 80's or 90's. Might have a been a dakota or full size. Anyway, its made from black plastic and has the facility to attach the cable, and was cheap - $20 or so. You could install a pipe nipple or brass barb in the head go to heater hose for a short stretch, and then use one of these valves and then split the flow using an ABS tee or similar after the valve.1 point
-
I replaced mine with grade 5 bolts with a similar shank but with coarse threads and a helical spring lock washer + prevailing torque locknut (not nylon)...to get the shank I wanted, I had to go to a longer bolt, but had plenty of clearance so didn't cut off excess to preserve the zinc plating. After 10k miles, no problems and still intact1 point
-
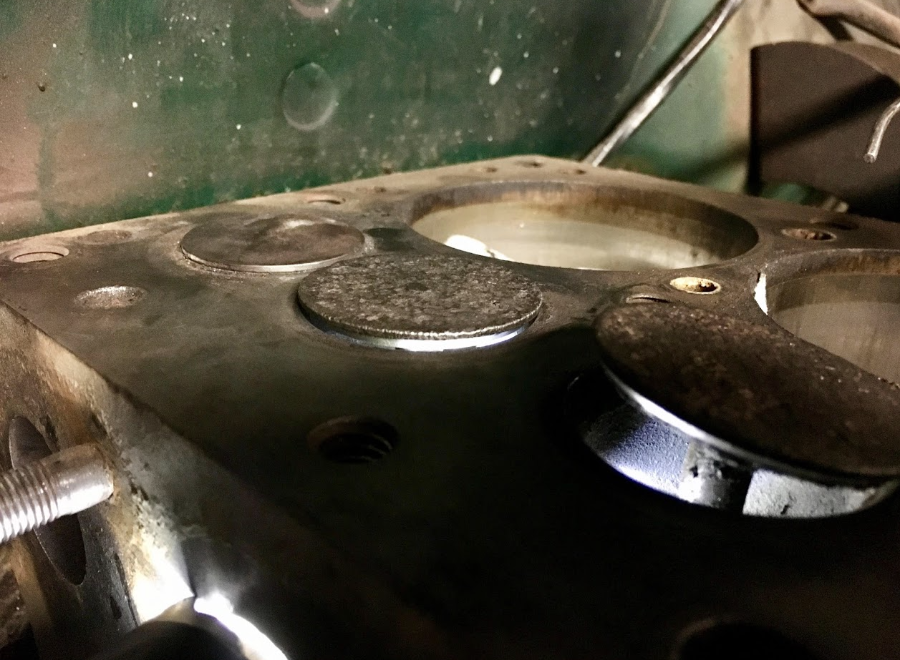
Hi all, found this great site when looking for info about my father in laws beater truck. It had sat for a long time and had all problems a vehicle has when sitting forever. Brakes,engine, fuel,cooling,wiring issues and of course RUST!! He just wanted it running and the brakes fixed, hahaha. We got it running with little effort for about 3 to 4 minutes until all the rust in the fuel tank clogged the fuel pump. The FUN then began. new fuel tank & hoses, rebuilt carb and cleaned all hard lines. New brake system (all parts except for the hard lines). New cooling system with recored radiator (had to dump the honeycomb style core) and rebuilt water pump. We tried to keep all original parts if possible. Cleaned and painted the oiling system with the remote oil filter can. Generator, voltage regulator & starter were cleaned and painted. Firewall was sanded and painted as well. Then the parts kept flying OFF the truck. Bed fenders,grille assy, etc. Only thing not removed was cab (decided to do at a later date (unfortunately). Soooo the big problem happened this weekend. Fired the engine and all was good until we decided to put water in the system. I had a drip coming off of the exhaust manifold nut that attaches to one of the long center studs. I figured that was a wet hole and we needed to just remove the stud and reseal since that was the one we had to replace because it sheared off when removing. I wanted to start it anyway to see if we had any other issues plus I knew there was still rusty crap in the block we couldnt flush when we tried to clean the system. Wanted to get it hot and flush the block a few times before adding coolant. We tried to start it again and nothing. Tried starting fluid even and nothing. We pulled all the spark plugs and they were dry. Points were still good. I thought maybe it was flooded cause I saw what looked like fuel in the intake manifold as I looked through the carb. So I removed the carb and soaked up the fuel. Unfortunately I saw a trickle of fluid coming from the #3-4 cylinder port of the block into the intake after I soaked it up.. As I shook the truck you can visibly see more fluid leak out the block into the intake. UGGGHHH! Cracked block? Water corrosion possibly rusted through? I though head gasket too. So removal began yesterday, took off the head and the head gasket surprisingly looked good. The seal marks were all good top and bottom of the copper gasget. The center port was moist but not like I would have expected. Heading over now with borescope to see if I see anything. Any suggestions on what to look for or maybe a similar issue has happened to you. Please Please let me know if you have any ideas or processes to check this aggravating problem. Thanks, Ted The frustrated son in law. Gardena, CA.

 1 point
 -
Glad it turned out to be so simple. _1 point
-
Thank you for posting this , a lot of valuable information just in this one thread plus a happy ending ! Perfect ! ?1 point
-
I believe that after market 1970 tanks are designed (pre-drilled mounting holes) to also fit 65-68 as well as its original design for the 1970. Ford guys like to increase the fuel capicity of the older mustangs. Like Ed mentioned, the top of the tank is the trunk floor (hence all the ribbing)....which is why those tanks sometimes come with foam cut outs for the perimeter of the tank to help the carpet lay flat. 48D1 point
-
Working at keeping the mice away!!1 point
-
Hi! New to the Mopar life. I have a question about the motor. If I want to replace the motor to something more newer, what would you guys recommend to get started
 1 point
 -
Woow! I'm always thinking about crud getting in the cylinder when pulling plugs because of that natural funnel in the head around the plug. I even got a tiny brush out of my tool box, to get as much stuff out of that recess before I pulled the plugs.1 point
-
I noticed a bad grind at a certain spot in the steering action, so I took the steering gear box apart and cleaned everything. The parts diagram makes it look intimidating, but there's only one way it can go together and is actually pretty easy to figure out. I omitted the gaskets, but RTV seems to be doing the job. FOR POSTERITY - On this Gemmer steering box, casting numbers 348 / 3DCO3: The pitman arm / side oil seal is a National 240356. The steering shaft / top oil seal can be a National 470954 - It's not quite as thick, but it's a perfect OD/ID fit and will keep dirt out and oil in. The original seal was unmarked and I spent way too long figuring out what to use.
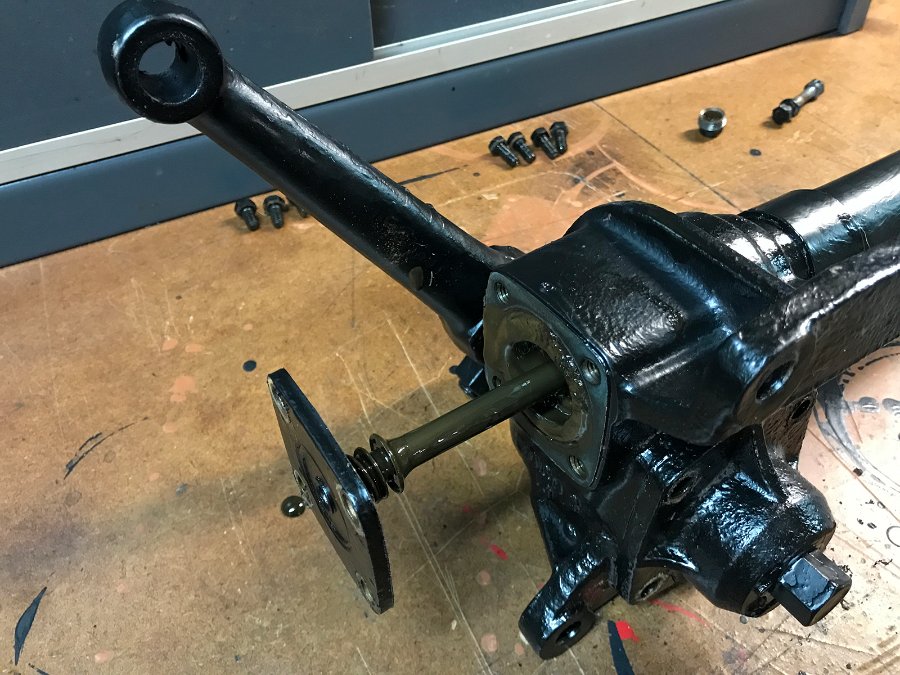
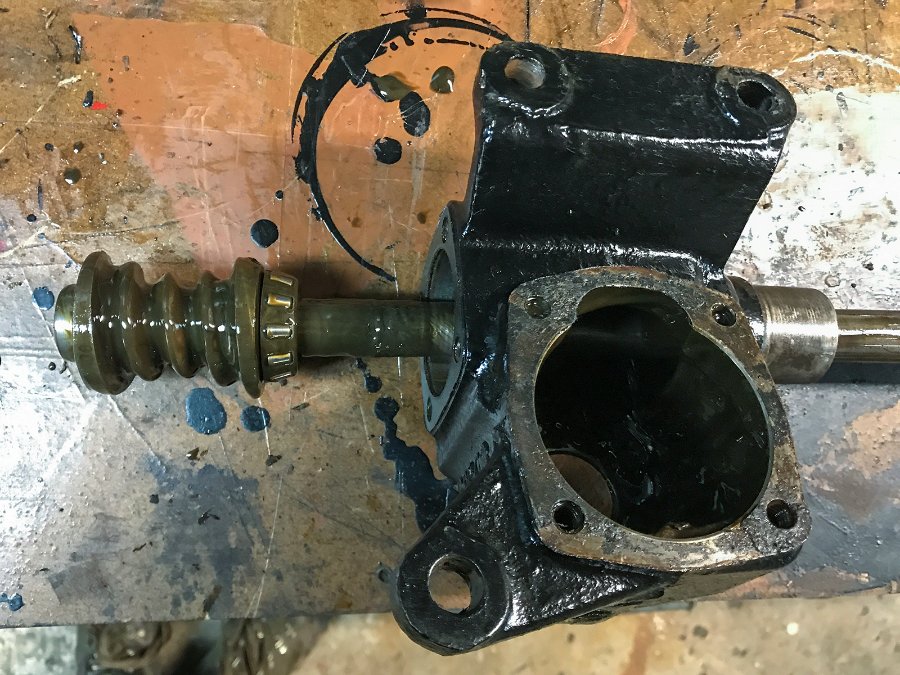
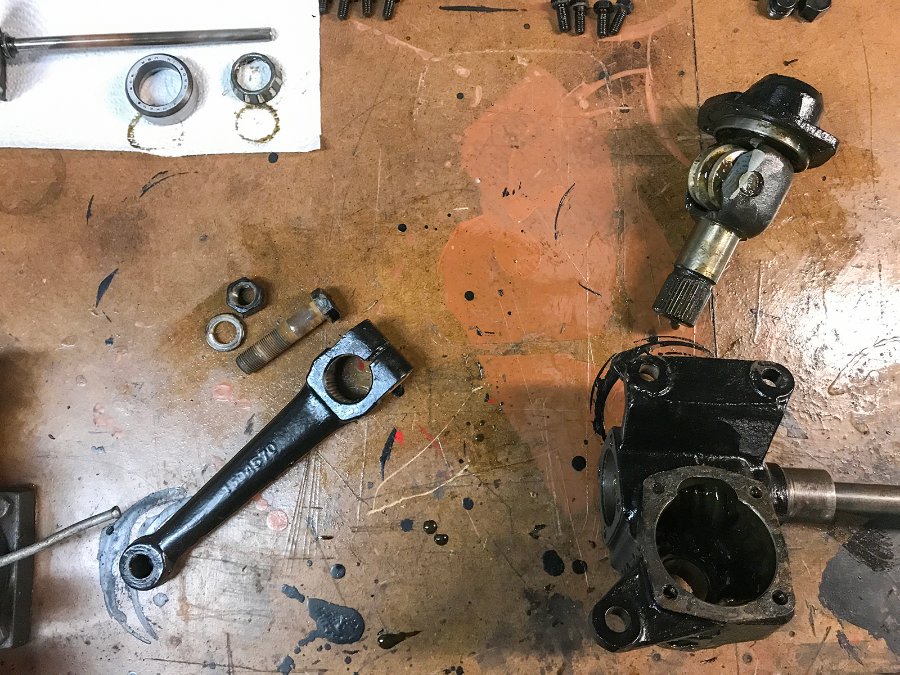

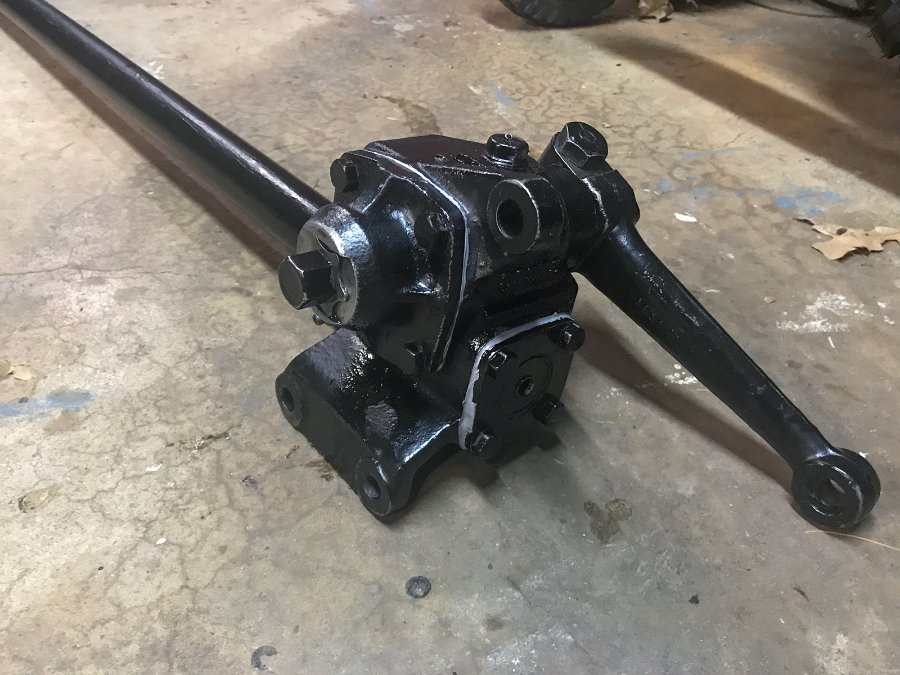 1 point
 -
Well if it runs goods, steers straight/ stops good- Drive it everywhere and enjoy! Minor repairs needed? Fix and repeat as before. DJ1 point
-
When I tore down my engine it was seized up tight. I had to pull the crank out the bottom with the FD still attached. Then I could start working the pistons down with a wood block and hammer. I could then clean up the cylinder bores enough to drive the pistons up and out of the block. Then my focus changed to the cam and valves. Pretty much all of the valves were seized too. With a large Channel Lock pliers on the cam gear I started rocking the cam back and forth until I got all of the valves to lift fully. I could then pull the cam and lifters out. I hammered the valves back closed so I could remove the retainers and springs, then I could use a long punch and drive the valves out from the bottom. The machine shop saved the block with a 0.030” bore job, all new valve guides and seats, decked the block, and milled the head. I reassembled with new valves and pistons. It’s been running great for many years.1 point
-
Frank...I have seen carboned up engines that would not turn over with the carbon fallen from the combustion chamber and down on the piston after sitting, getting damp drying out and then flaking off and down...simple pull the head, decoke....new gasket and many miles and smiles down the road....a piston, if more than one car cut rust to a certain degree then bind up again....seen this many times also. Would I suspect a bent rod...only if the lever used was quite long....would I suspect rust and frozen valves....you bet your sweet bippy I do...1 point
-
Reminds me of the old story about the man and the flood. A man was trapped on the roof of his house in a flood. He prayed to God for help. Shortly afterwards a boat pulled up. Get on they said. No he replied, God will save me. As the water rose a helicopter flew overhead, we'll lower you a rope. No said the man, God will save me. They flew away. The water now covered everything but the chimney. Another boat came. Get on before it's too late. The man said no, God will save me. He drowned. As he stood before God he asked God why he abandoned him. God looked at him and said" I sent two boats and a helicopter" The moral is, you also gotta help yourself.1 point
-
As someone mentioned, we're kind of flying blind here, but I suspect (coincidences happen, after all) that you have more than a single issue to identify/address. I was trying to think of whether there was any way possible for an accelerator pump to act up so badly that it would inject fuel briefly at start up (causing the brief spike in RPMs you mentioned) but then not deliver it upon acceleration (causing the backfires). However, given that you said both carburetors worked before, but neither does now, other than a possible leak at the mounting point, we might safely assume that component isn't an issue, which is why I think you're dealing with more than one. The inability to idle without constantly working the throttle and the 2K idle when holding the choke closed both speak to your air/fuel mixture - the likely culprit, as mentioned in earlier responses, being a vacuum leak. The good news is that the number of locations for a vacuum leak to occur is pretty limited on these old flatheads. Still, you need to diligently and carefully check them all. You're probably also looking for an electrical and/or timing issue. Worn or sticking distributor components can cause backfires, as can something as simple as a hairline crack in a distributor cap. It's just a matter of testing and eliminating one potential culprit at a time. On the subject of backfires: it shouldn't be too difficult to identify the source. Obviously, the direction from which the sound came is a major clue. If you're uncertain of that, think back in your mind's ear to how they sounded. A carb backfire is more of a popping sound (sometime pretty loud, to be sure). On the other hand, tailpipe backfires are typically more of the BANG! variety and can even sound like gunfire, an attribute I wouldn't associate with one emanating from a carburetor. Good luck! Let us know what you find.1 point
-
Things can happen unknown to us, causing bad symptoms that leave us scratching our heads. Try and erase all you have done, and start over like you have no knowledge of the work you did. Start fresh and begin trouble shooting. The recent work you have done is likely influencing and limiting your troubleshooting to solve this. Here is an example: I had a decent running engine. I took out the spark plugs to gap and clean them. Put them back in. All plug wires were labeled upon disassembly and put back in proper order. Car would not run right. Very hard starting. Misfiring bad. Would not idle. What the heck did I do? It was a simple task. I started tearing in and checking things. Ignition system, fuel, you name it. I was scratching my head like you are now. I was running out of things to check strictly related to the work I had just done. I was flustered. Finally I broke down and started over with a compression test. I found a couple of low psi cylinders, and 1 was completely dead. I took the head off and found a bent valve. WTH? Why? I dug around a bit with a flash light and a mirror and found the remains of a small hex screw. 1 piece was in the cylinder, another in the exhaust port. The screw sure looked like one that would mount a voltage regulator to the firewall. Which happened to have 1 of the 4 mounting screws missing. The car was new to me at the time. I had only owned it for about 3 weeks. The previous owner had probably dropped a screw and never found it. Seems that it landed down in the well of the sparkplug mounting hole in the cylinder head. Where it sat, until I lifted the plug out. Into the combustion chamber it dropped. Unknown to me, I had put the sparkplug back in and started the engine. A bent valve was the result. I learned a couple of good lessons from my example: 1. Be diligent in using compressed air around the spark plug base to clean out any dirt or other foreign objects 2. Asking questions on the internet will get you tons of different answers, leading you down various paths. Getting the right answer from someone, is like winning the lottery. Kind folks offering assistance are blind to what you are seeing there at the car, throwing out ideas to check. Also their responses are influenced by their personal experiences. 3. Open your mind to any and all options when troubleshooting. Don't zone in on the work you did. Old cars have about 1 million things that can go wrong and compound. 4. Study automotive theory. Read lots about it. Then lots more. A deep understanding of all automotive systems will improve your troubleshooting skills immensely. 5. I leaned how to do a valve grind by hand. Lol. That was the biggest lesson. My problem is likely not your situation at all. I used it as just an example how things can unfold with car maintenance sometimes. To maybe guide you to remove the blinders you may have on, due to the work you just did. Good luck. Keep at it and report back. We can help guide you. Just because we all like photos....Here was my eureka moment when I pulled the head. Doah!
 1 point
 -
Take the first vaccine you can get. The virus does not recognize prayer.1 point
-
Correct me if I am wrong but was not this article by our own former member Graybeard? A recommended read. Exhaust Heat Risers Debunked – Myth and Fact (dodgepilothouseclub.org)1 point
-
That bell housing doesn’t look deep enough for a Fluid Drive coupling. It may just be a regular clutch.1 point
-
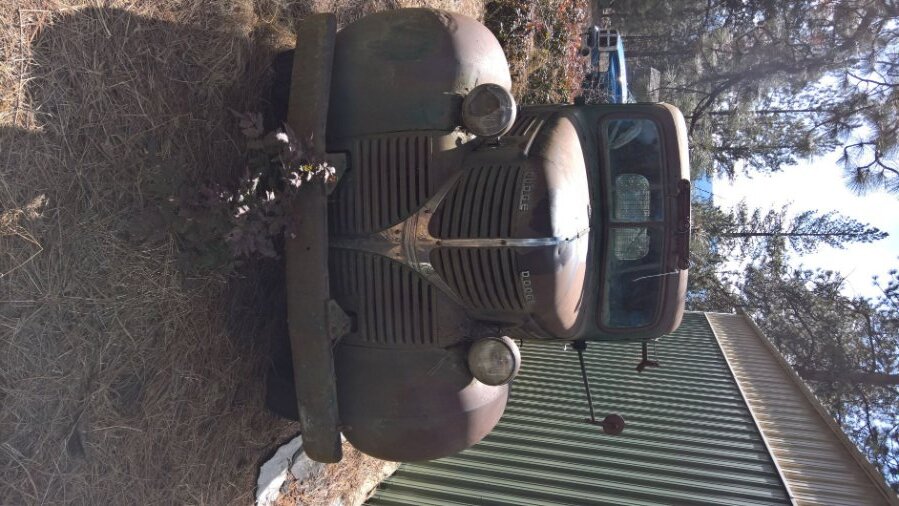
Well, it's going to have stay on the trailer another day or two. With schedules (pesky gainful employment), time is a bit short right now. I want to rinse the 300 miles of salty road spray off it at the car wash, but the warm weather has everyone flocking to the carwashes. Waiting will work out well since it will allow the roads to dry up. In the meantime, here's another pic of it. Makes that 1 ton Chev look little! (with some help from the proper perspective) A game of patience now.
 1 point
 -
A lot of the old guys I knew back in ancient times were big fans of tuning each engine to it’s individual best settings. They would start at the factory specs and start adjusting one thing after another (carb, timing, plugs, sometimes experimenting with hotter or cooler plugs to see if it changed anything). They would do this until it hit the “sweet spot” and they would pronounce the job done.1 point
-
In my oldest videos from over 10 years ago (geez) i show the front end broken down. It might help. 48D Estrada Motorsports Front End Series 1 Estrada Motorsports Front End Series 2 Estrada Motorsports Front End Series 3 Estrada Motorsports Front End Series 41 point
-
$1500 for dimply things on the sides of my tires...that'll make you reconsider how cool you want to look ?.1 point
-
Can't believe it's been so long since I was here but thought it was time to update. The plans have change a bit over the last several months and progress is slow(COVID made me crazy busy at work) but here goes. It has been completely disassembled and body and chassis have been blasted and primed. hopefully get some paint on the chassis in the next week. Everything is in great shape with very few surprises once stripped down. A couple minor body repairs needed but no rot anywhere so that was very lucky. Found a painter for the body who does nice work. Hopefully I can piece it all back together without ruining his handiwork. The motor has been cleaned and painted, only to decide that it is not going to be used. I've decided that the truck needs a hemi so I'm now on the hunt for that. I picked up an explorer rear end so that needs perches welded on and then installed. I will get a few pics this weekend when I get back in the shop.1 point
-
I bought some more 4x4s today to make the body cart. I screwing them together with 6" lag screws. And I bought four swivel casters heavy duty at HF. I will saw notches in the bottom 4x4 so the top 4x4 will not have a tendency to wrack. It will be 6 x 4 feet with some cross boards going from rocker to rocker and I will screw the body to the cart through the body mount holes. It will look something like this.
 1 point
 -
In 1996 I was 14 years old. My dad and I had been talking about finding a 5 window Chevy pickup to restore/modify for my first vehicle. I was always into old iron of all kinds - dad was into antique tractors and just went with it. We had barn/shop space and I was already doing most of the upkeep mechanical work on the farm equipment, antique tractors included. Anyway - one day we went to an estate auction where the individual had owned several John Deere dealerships. Tons of parts and literature from decades ended up his farm and that was really why we were there. Sitting in "junk row" in the fence line of the farm was dozens of old vehicles, mostly trucks, going all the way back to the 1920s. There were 3 B-Series trucks there.... all in rough shape, one clearly had a head on collision with something... one had a stack of junk in the bed, and the third was a well rotted flatbed. All 1 ton trucks. I looked them over close enough to know they were mostly good for parts, but there was a lot of good parts.... and I noticed something that no one else bothered to look at... under all the junk in the bed of that truck there was a porcelain sign - it could only be seen if you were under the truck looking up through the rotted wood. I bought all three of those trucks for less than $100 dollars that day. It took a couple of days to get them drug out, loaded up, and hauled home - and then some farm chores took precedent for a couple of weeks (I think we were baling hay at the time...). Once I cleaned out the bed of the truck I found there wasn't one porcelain sign... but 3 of them... one John Deere and two Caterpillar Tractor signs... all good size. I trade those signs for a fully restored 1934 John Deere GP, and enough cash to pay dad back and then some.... By the end of the year I had another Pilothouse truck that was a runner - and I spent some time fixing it up mechanically and drove it through most of high school. Along the way I picked up several other parts trucks, stripping them down and saving the good parts and junking anything that I didn't feel had value. This continued through my college years - but I stopped shortly after my dad passed away in 2003. Fast forward some to 2011 - I needed a change and liquidated most of the family tractor collection as it was just sitting without time to even properly maintain it - while doing so I decided I was going to sell all of my Pilothouse stuff and buy a finished truck to enjoy. I looked at a lot of trucks - and I almost bought one until the guy decided not to sell it.... now I am back to having a huge stash of parts and 4 trucks - two good for parts, one good "original" and one that is blown apart in the middle of a restoration/update. I also picked up Don Coatney's P15 before he passed away - partly because it was modified in a similar fashion to the Pilothouse I have been slowly working on - partly because of the memories of reading the build thread as he was building it and him and Blueskies bantering back and forth about The Big Race. I like all things old and vintage. I really like old Mopar. I love the old flathead six.1 point
-
I acquired several years ago an Autolite Service Traing Manual that is approximately 6 inches thick. This manual and technical training manual was used by the Autolite Company to officially train any car dealership service technician on the proper ways to diagnose issues and how to service a car or truck that was equipped with Autolite components. I took two small sections today and scanned these for your reading. The first section covers the Sission choke and the second section covers yes the lonely Brake light switch. I also scanned a larger section that just covers the Autolite Sparkplugs adn the approximately 25-30 pages of detail training regarding how the plugs were made, hot/cold plugs, gapping, condition very interesting reading. So baically this school is similar to the Certified Mechanical school that our new mechanics have to go through to be certified. Enjoy the reading with the snowy weather that we are having so you can gain more knowledge before we start using the cars in the spring. Rich Hartung Desoto1939@aol.com Autolite Stop Light Switches.pdf Autolite Sisson Choke Training.pdf1 point
-
Here is the sisson choke testing stand with the choke inthe starting position set at the Zero marking. Here is the sisson choke with the pin removed and the pointer is now set a 65 which is the temperature on the thermometer So the choke is working correctly. I have just come across a send testing stand but is missing the thermometer any thermometer can be used to get a base temperature. Here are pictures of the original sisson tool and setup kit that came in a leather pouch. Here is the information on each tool: I have had this testing stand and original tools for over 15 years. Most of the Airflow owneres have never seen the adjustment tool for the setup of the ones onthe airflows and Chrysler straight 8 engine that is tool AC-620. I found this whole setup on Ebay. So keep always looking. Rich Hartung Desoto1939@aol.com1 point
-
Of the 84 vehicles I've owned, six have been Mopars (eight if you count an original-style Caravan and a new Ram P/U). They were/are, in order: 1) 1949 Plymouth Suburban 2) 1964 Plymouth Fury 383 4spd 3) 1971 Plymouth Duster 340 Wedge 4spd 4) 1977 Dodge Mirada 5) 1949 Plymouth Special Deluxe Club Coupe 6) 1949 Dodge Meadowbrook Of these, I still have only the Club Coupe, having purchased it from the original owner in 1989 and presenting it to my father as a gift. We had a 49 Plymouth four door when I was a kid (imagine cramming two parents and six kids into one in the middle of summer and driving from Portland to Los Angeles and back). Even after that bit of folly, the old man had a soft spot for the `49 Plymouth. One day as I was driving home from work I spotted this one for sale on the side of the road. I pulled over and gave the owner a deposit on the spot, then gave it to my dad. It had 32K miles on it then, and sits at just over 39K today. Unfortunately, it became mine again after my dad passed in 2012. So, although owning 84 cars and trucks is pretty solid evidence that I have a tendency to not keep them, this one never leaves the family, at least not while I'm alive ...

 1 point
 -
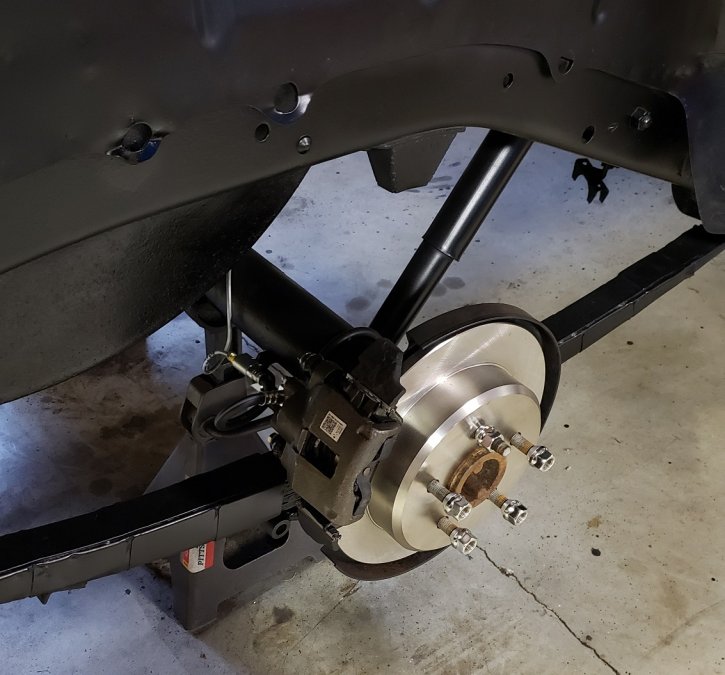
Hello all. It has been a long road and the project took the back burner for a while. But, here is an update on where the build is now: - Rear replaced with a 98 ford 8.8 with disc brakes - Engine buttoned up, repainted silver - All the body rust repaired and sealed, fuel tank repaired and installed - Front disc brake conversion (Scarebird) finished and pedal assembly reinstalled - Trans reinstalled, clutch linkage and shift linkage reconnected - Front and rear brakes plumbed, bled and tested - New wiper motor installed from Newport (great kit) while dash is out On the list of things to work out are: - How the heck the throttle linkage from pedal gets to the side of the motor to the bell crank ... no pictures from my books on how this linkage is made ... I have a rod, but can't make out how this attached .... it can't be solely supported by bellcrank and floor board, can it? - Prime and paint - Wiring - Exhaust work ... looks like it's not possible to run true duals all the way back given the battery box and left side mounted fuel tank ... only have a small opening between tank and spare tire well to run tubing and this is not big enough for duals. If anyone has info on they did it around the tank and spare tire well, I'd be happy to see but everything I've seen, it's too tight

 1 point
 -
No car in the pic but it was a real nice autumn morning anyway. This is where Alick was born in 1897 and lived until retirement in town in 1955 - save for three years on the Western Front during WW1.
 1 point
 -
If you like take our or delivery Pizza then you can collect great platforms for painting bolts and nuts. Put a hole in the top of the closed box and you can "screw" the bolts in and have them standing up for painting. A piece of wire (cut up coat hanger) can be used to suspend the nuts in air while you paint them as well. The pizza box can be used over and over and can be easily moved even when the parts are still wet using a little care. Hope you find this helpful.
 1 point


.thumb.jpg.78d6c0802c54e2d4382e1ae232fa93e6.jpg)