
Leaderboard


Popular Content
Showing content with the highest reputation on 10/14/2020 in all areas
-
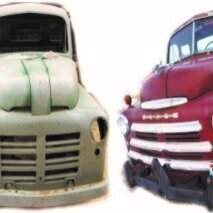
I appreciate the sentiment- but it's not as solid as it looks. The rust issues are quite extensive- I plan to salvage as many parts as I can for my solid '56, including doors, trim, steering wheel, bumpers, etc. It is weird how it rusted- it sat under a tarp in the Sierras for 40 years...the whole back of the wagon is corrosion but the front is OK. the floors are gone, but the rockers are solid, including the original aluminum step plates. Once I get all I can from it, I will drag it down to Turner's Auto Wrecking where it will hopefully supply parts for others.2 points
-

Version 1.0.0
18 downloads
Stromberg Carburetors For Passenger Cars, Light Trucks and Industrial Engines Condensed Catalog 22 Pages, 34 Mb Covers 1930's to 1950's2 points -
10-14: Been driving the Meadowbrook to work every day this week. I have the oldest car on the road every day, at least that I've seen. ? Now that my e-brake is working good I don't have to worry about rolling down into the neighboring business' grass. ? I'm happy to see the car after work is done! Pic 1: 7:50am Pic 2: last one to leave1 point
-
My son in law Dale is working on restoring a 1961-1966 Ford f100 pickup for a fellow. When he got to the seat adjusters he thought they looked familiar. So he dug out an adjuster for his 1949 P15 which he rebuilt some time ago. Sure enough they were made almost exactly alike.....with the exception being that the handle to operate the adjuster is on the front end of the Ford item instead of the side. The Ford item uses ball bearings just as the Plymouth. As you can see, the length is very similar. So: the Ford track may simply bolt in as is....or you can probably relocate the adjusting lever to the side. Or if you can find one, just use the Ford item for repair parts. Thought I would mention his discovery as many seat tracks need repair. (Ford item on R)1 point
-
Just looked on eBay and there were virtually none of what you want. Best advice I have is look at swap meets and salvage yards. I don't think those small caps were ever a high demand item so there are probably some lurking somewhere. Otherwise....some have opted to purchase newer style wheels that will accept the later model dog dish caps.1 point
-
Don't know if you have Home Depot up there but HD will ship a Wix 51010 to my house for free, filter price is $12.05 US1 point
-
Old-timers when I was a kid always used kerosene. If some is left in the filter,and there WILL be some left in the filter,it will work to thin and remove any sludge.1 point
-
For the hell of it, I am going to replace my return spring also!1 point
-
I know it's been a few weeks, but I finally figured out what was going on with my brakes locking up. It was a two-fold problem with the new master cylinder. Problem one: when I disassembled, cleaned and transferred the pedal assemble from the old m/c to the new m/c I was precise in measuring the length of the brake push rod. Turns out it needed to be drastically shorted from factory length for the "new" m/c. I am assuming the cup on the m/c piston where the push touches is much more shallow than the factory one. I shortened the rod and I get a nice little spurt of fluid between 1/8"-1/4" of pedal travel. So I feel good about that! Problem two: I found I had to adjust the pedal return stop screw slightly probably due to slight differences in the casting of the m/c. Because it would hit the floor board before fully returning. I took it for a test drive and it seems as if the brakes are working as they should (minus some slight adjustments in the drums). Thanks for all the help!1 point
-
The napa filters are made by wix so you can also try a 51010 if you have a store that sells wix1 point
-
DISCLAIMER this is a last resort measure...... put the axle nut on loosely almost touching the drum and if you can drive the car around the yard or up and down your driveway at different angles trying to break the rust grip1 point
-
If the puller is put on crooked you loose half the pulling force.1 point
-
If you have one, a pneumatic hammer applied to the center of the hub, perpendicular to the axle, really helps that taper release. Just move it around the entire circumference. Retighten puller, repeat as often as needed. Be prepared for the release, it will probably be a loud bang when the hub hits that nut you left on!1 point
-
Cutting and buffing is a good winter project. If you use a professional buffing compound it will go much quicker than you expect. I recently rejuvenated really poor 15-year-old paint on a TR6 with 1200 wet-dry paper and this compound: https://www.amazon.com/gp/product/B0002ZQ016/ref=ppx_yo_dt_b_asin_title_o01_s00?ie=UTF8&psc=1 Don't sand in a circular pattern, straight lines only, and I used a lambs wool pad on a rotary buffer. If you want a really deep gloss finish up with a foam pad and polishing compound. The professional products are several steps above the consumer products you buy at a local auto parts house. It's gonna look great!1 point
-
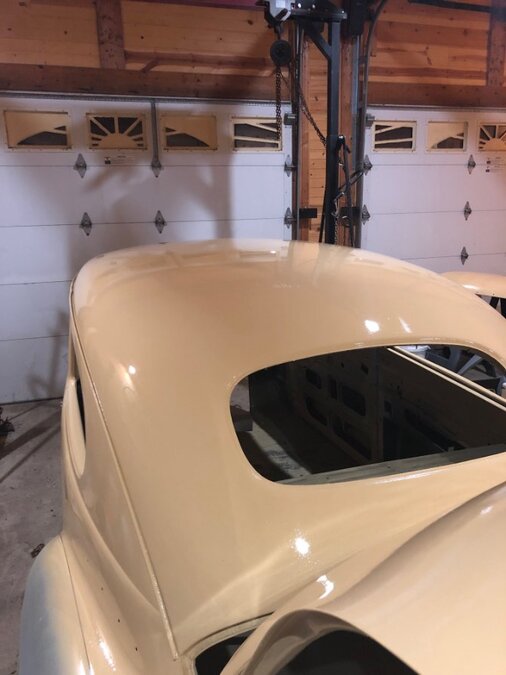
The rest of the paint arrived yesterday. Just in time too. Today may be the last day this season with good driveway painting weather. Focused on getting the body (still not ready to paint the fenders fully for now) and on the inside surfaces that will be exposed -- three coats Some of the surfaces seem to have dried nicely, but I'll be sanding and buffing out orange peel for a long time on some of the other sections. Anyway, now I can start building out the interior.
 1 point
 -
Dang Lingle, if I knew you were going to Ggdad’s I would had you mess up his shop for me, or at least hide Puma’s brush ? Brad, did you run 4 wires to the rear? I ended up using JB’s “modified diagram”.... very happy1 point
-
The quality of the puller is of importance in this situation. I like to use an older USA made puller. An inexpensive foreign made puller will usually not work on a stubborn hub.1 point
-
Have you tried backing off on the brake shoes and then smacking the outside of the dr bum just enough to set off vibrations? Do NOT use brute force because they idea is to create vibrations to separate a brake shoe from a rusted drum. Can't remember what Mopar brakes look like now,but before you do this go to backing plate and remove/clip any spring hangers there might be there that keep the brake shoes in place,or remove any nuts you might see that would be used to adjust the brakes. Then use the hammer to drive the studs back inside the drum. If that doesn't work,all I can tell you is tighten your puller and then smack the brake drum all over,front and sides,with your BFH to set off vibrations to encourage things to move. Do it,and then go away and let it sit for a hour or two,and come back and do it again. If necessary,let it sit overnight and go back and do the tighten and smack routine until it eventually comes off. Be VERY careful to not let it come off and "get ya" when it does. Put the axle nut back on the axle and tighten it down a few turns before you do ANY of this. When these tough ones finally come off,they seem to REALLY come off.1 point
-
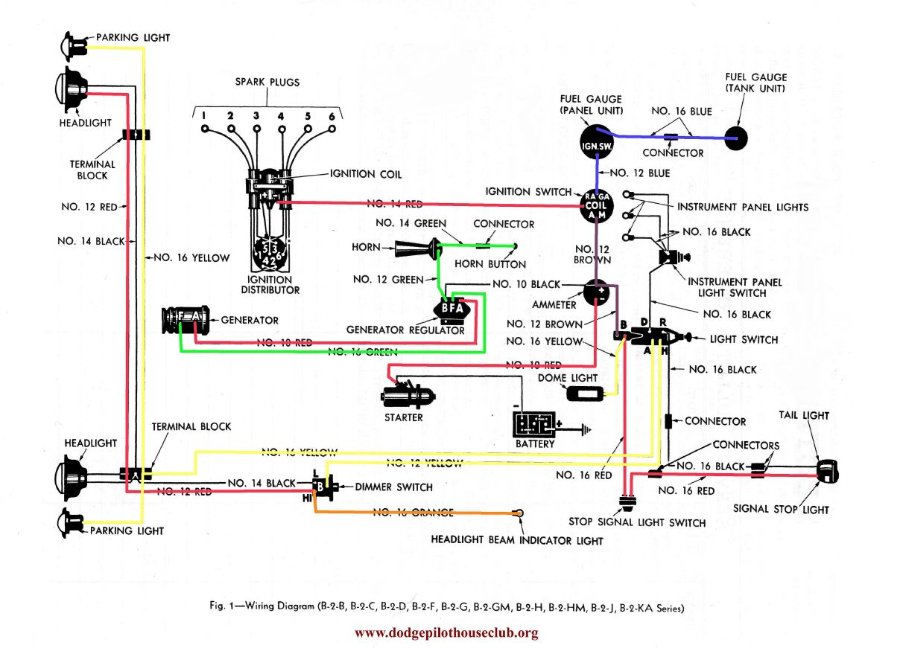
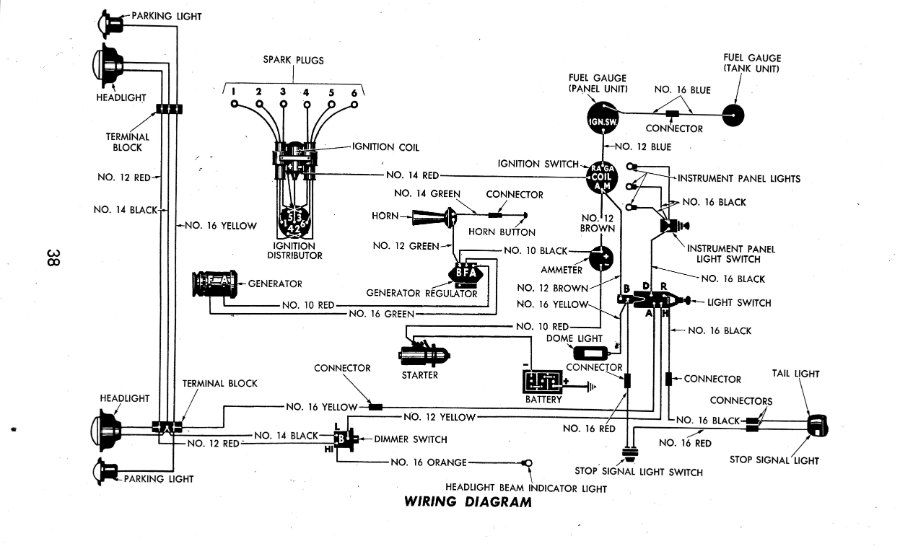
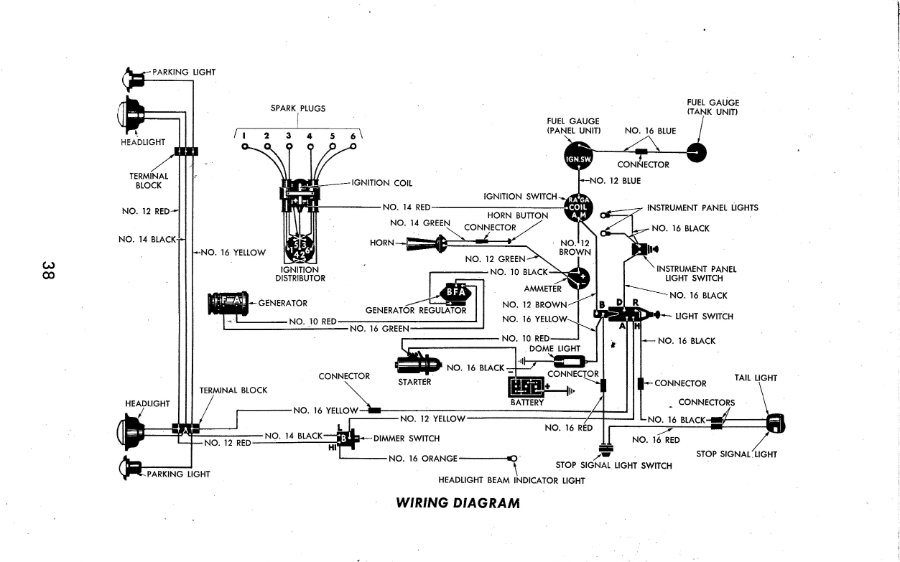
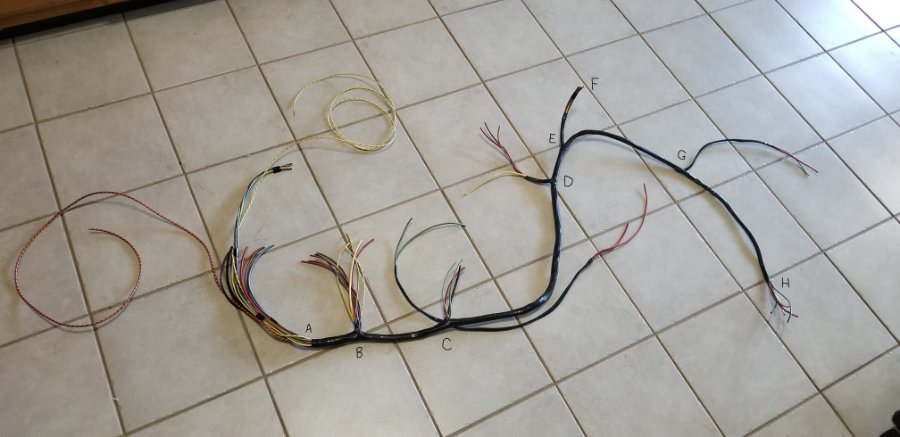
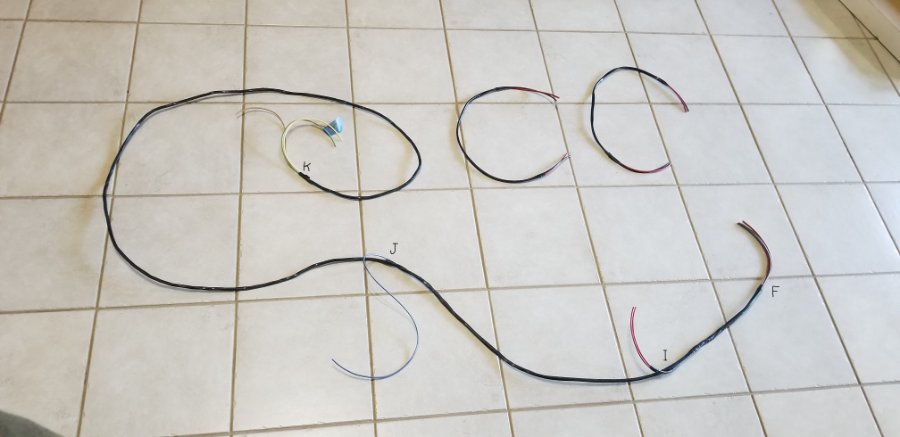
I'm getting closer to the point where I can install the new wiring harness that I've made. There wasn't much left of the original wiring harness when I dismantled the truck so I didn't have a whole lot to work with. Back in 2007 or 2008 I started searching for information and came across the Pilothouse.org site where Dave Erb had uploaded some really good information based on a wiring harness original bought and documented by Allen Parkhurst. So in the spring of 2008 I printed out that information and proceeded to design and build my own harness. Since I was on a work assignment in Pasadena for a year I spent a lot of my spare time scrounging through the junk yards in the area and working on oddball B3B projects. Probably the major one was the fabrication of the wiring harness. When I made the harness in 2008 I was using Dave Erb's diagrams which were for a B2B and I failed to notice that little tidbit of information. Once I realized my wiring harness was not built to work correctly with my gauge and switch locations I started looking into the wiring diagrams for the B3Bs I noticed there are two different versions. The difference between the B2B and what I am calling the early B3B wiring is one wire between the headlight switch and the ammeter (B2B) vs headlight switch and ignition switch (early B3B). The difference between the B2B and what I am calling the late B3B wiring harness are two wires. The first one is the same as the early B3B wiring change and the second one is a wire between the horn and voltage regulator (B2B) vs horn and ammeter (late B3B). Since my truck is a 51, first year for B3Bs I'm calling my truck an early truck and will use the early B3B wiring diagram. What that means for me is I only have to worry about the wire between the headlight switch and ignition switch will will be just a short jumper. The wire from the headlight switch to the ammeter that is currently in the wiring harness will be taped off at both ends and kept as a spare. I guess I got lucky in that the wiring changes between the B2Bs and B3Bs were not major. A simple enough change for me and I'm good to go B2B wiring diagram Early B3B wiring diagram Late B3B wiring diagram Brad
 1 point
 -
Yeah, I took apart two of my b3, 4speeds just now looking for that o-ring and...... zilch ? Must be a 3speed thing like JB said. the only reference I found to the o-ring was this I am comfortable not having them and I don’t THINK they leak from that spot (hard to tell from all the other leaks LOL)
 1 point
 -
Mopar OD's are great....and you just have to stick with the OBD1 unit for application as they are still hydraulic shift with extrernal OD lockup and an easy hookup...(RH where R is rear wheel drive and H is hydraulic shift) you want to stay away from the REs as they require the computer module for shifting.....the 360s are externally balanced...so watch crossing these to the 318 if you find one that is not a combo eng/trans...you can get weighted flex plates for ease of retrofitting...I have not failed to get 250000+ and still running from all my early OD transmissions both A500 and A518's and I tow heavy loads in OD with them always...secret is not to follow the dipstick information as early units were printed with the wrong oil to use....a major snafu by Mopar that lead to the early death of many front and rear wheel drive transmissions...you must use ATF 3 or better...1 point
-
My car is original and I am not interested in driving fast. I am retired and don't need to get anywhere in a hurry. However, being in the Miami area of FL introduces dangers and crazies that I did not encounter in Connecticut. Not that there aren't crazies in CT, but the ones down here are in a much higher league. AA in CT versus Major League in FL.0 points
.thumb.jpeg.28cb36506a6b17cd30e7d4a22504384d.jpeg)


