Leaderboard


Popular Content
Showing content with the highest reputation on 09/20/2020 in all areas
-
Update: about a minute after I posted that wifey got a call and the dog has gone home. They are new to the neighborhood and apparently she tunneled under the fence and had a couple hour adventure.2 points
-
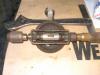
They are not to bad with the correct tool. These old vehicles have a tapered axle. You need a decent Hub puller to get them off easy ... while there are other home made tricks. Here is a photo of pulling my hub, I bought the puller off of ebay for about $80 and with shipping came to about $110 or so. But I pulled each hub in just a few min ... one of those tools you just need when you have a old car to maintain.
 2 points
 -
Had a great day at Canfield swap meet. Found some baby moon caps cheap plus a complete carb for 5.00. The best score is a NOS sisson choke for 40.00 and the guy tested it before he let me pay. A good haul.1 point
-
was just sitting out on the patio by my firepit......was just cool enough to enjoy the heat from the flames....always relaxing to watch the flames dance1 point
-
You need to check voltage and polarity with a multimeter...test lights are only good at showing there is current present...1 point
-
Filler, sand, prime, sand, repeat until a guide coat (thinned black paint or dark primer) sands out smooth enough to suit your eye? 2nd opinions allowed? with a 320 grit sand paper ( I like wet and dry as it lasts --way longer) . Move to next area repeat (I first mistyped - repent and you may ask what you did to deserve this?) until done or bored to death. I found women and children like to help at least for a while! Good news it is worth the time and trouble! ? DJ1 point
-
That is very true. The OP may have to move the MDG in order to align the teeth of the low/rev gear to the cluster. Since no syncros with tapered ramps to guide that one, they may just butt against each other until moved a little. Sort of sounds like what was described.1 point
-
Well,the key thing with ANY of these pullers and Mopar rear drums is patience. Generally speaking,you can NOT pull a stuck drum off a car that has been on there for decades by simply hooking up the puller and smacking on the tension arm, It takes PATIENCE. Bolt it on,tighten it up pretty damn tight,then smack all along the outside circumference of the drum with a hammer. Do not think "brute force". Think "vibrations". Do that a couple of times in a row,and if things seem to be progressing,do it some more. If,after tightening it up a time or two and then putting more pull on it by smacking the tension arm it doesn't seem to be loosening any more,take a break for a while and let the tension do it's work. Check on it every few hours,and if it seems to be loosening,smack the outside and the face of the drum several more times with the hammer,tighten it up a bit ,and go take another break. Remember,this is NOT a contest. Get frustrated and in a hurry,and you will be looking for a new rear drum,and these things ain't cheap these days. Repeat as necessary,and it will come off without breaking anything. If it takes two or three days,so what? The important thing is that you get it off,and you don't have to buy a new drum. BTW,I did read where you borrowed a HD puller and pulled it off,but chances are that was more due to the work you had already done to the hub having already loosened it than the new puller. "Heavy Duty Puller" generally means it will take abuse and last longer. Buy one,and it will last longer than you,even if you are a brake man in a commercial shop. BTW,you DID adjust the brakes shoes away from the drum before you started,right? I can't remember at the moment if the Mopar brakes have the spring-loaded "floating" brake shoe locators on them or not,but my first move on a old one is to cut the heads off the pins so the shoes are free to "float" once they start to loosen. IF,as I THINK,the Mopars have the bolt sticking through the backing plate to adjust the shoes,take the nuts off and smack the bolts with a hammer so they move. h Been several years since I have done this,and am I am now eaten UP with CRS.1 point
-
Yep, points are in. Now that I've had the distributor completely apart about a dozen times I actually understand how it works now. I'm grateful that I had that much trouble with this whole mess. It's what I needed to learn. I have no trouble at all pulling out the distributor and setting points on the bench. Stay tuned for my regularly scheduled programming...1 point
-
There should be an adjustment on the clutch pedal. You may need to back off the adjustment bolt to allow the clutch fork to move further, then readjust to the proper free play once it’s together.1 point
-
So you are running points now again? Pentronix is out? Glad to hear its running again. Points worked very well for many decades. As long as an owner is ok doing basic maintenance. Breaker-less ignitions were supposed to be easy and trouble free! Lol. Hmmmm.1 point
-
Saturday, Sept. 19: A friend visited me today after trying to coach me over the phone on the steps I needed to follow to troubleshoot my car. I'm sure he sensed I was desperate. I never would've gotten my car running without him. Before I give him all the credit I want to say that I ALWAYS appreciate everyone's help/suggestions here. It's just that today I needed a hands on tutorial because I'm not smart enough to figure this stuff out on my own a lot of times. My points were shorted out to ground. The little wire (that runs from where the points and condenser wire connect) to the bolt that comes into the side of the distributor (from the coil ground wire)...was touching the distributor. I didn't know it couldn't touch the distributor or it would ground out the points. How elementary now that it's been explained to me. Problem #2: all of my plug wires on the distributor cap were one hole off...how that happened I don't even know. It explains why I had huge burn marks in the plastic on one side of each contact point inside the cap. How on earth the car even ran at all I can't say. I'll say this: runs good now! I still think the Pertronix unit was bad. Running fine with points now ?1 point
-
Ok...here it goes (tail between my legs) wasn't the fuel pump...I was....umm...outta gas...fuel gage was not correct...was reading 1/2 tank sooo....put a few gals in...go to gas station fill-er up...get home...damn(aftermarket) fuel tank filler neck gasket leaking at tank....pumped out 15 gal of gas....with that....also noticed engine running hot 197-200 degrees...more things on the "ta-do" list... Never a dull moment !!!1 point
-
not tonight Frankie....I have special fabricated "sticks" for marshmellows and hot dogs....I had eaten supper just a wee bit earlier.1 point
-
And check the condition of the KEY, think its either 1/4 or 5/16th, they do sometimes wear and key material is cheap, get a piece, cut to length and replace, also a new tight fitting cotter pin is a good idea..........andyd1 point
-
When you do pull the hub, put axle nut back on and leave it loose. You will use a hammer to work the puller. I used a 3 pound sledge and did not swing it, just let the weight do the work tap tap tap. When it does pop lose, it will have great force behind it. The nut will prevent the drum from landing on the floor. When mine came loose in the photo above, the dog bone handle flew off and hit the side of my house. If I was sitting on the tire in front of it, would have hit me in the ribs. I also suggest standing to the side When installing it, I asked for some advice here in forum. clean the taper on the axle, light film of grease, and the nut goes tight. Think the torque specs is 165 pounds .... or as tight as your impact gun will get it. I could not find anything on torque specs in the manual and why I asked here. So wanted to pass that info to you.1 point
-
Los shows the correct type of hub puller......get the biggest you can afford, hire or find..........the correct type BOLTS onto the hub using the cars bolts or nuts as in your case.........BTW this is the puller I bought 49 yrs ago when I got my 1940 Dodge........it has never met a tapered axle it didn't like..........lol...........regards from Oz............andyd
.jpg.4d195fbdd2fdaa8d8312267bc9e8a383.jpg) 1 point
1 point -
Several years ago I was cleaning out the shop to have a downsizing sale for the family's antique tractor collection. In the corner of the shop sat a John Deere 830I - it was a big beastly tractor weighing in at 14,500lbs. I replaced the injectors and injector pumps in it in the fall of 2003 just a couple of months before my dad passed away. The tractor more or less sat in the corner of the shop untouched until spring of 2011. We hooked a chain to it to drag it out of its corner just so I could get around it and check it out before firing it up. I had the clutch disengaged (or so I thought) - but I left it in gear just because I was absent minded probably. Now - this is a nearly 500ci diesel engine on 2 cylinders that takes a small 4 cylinder gas engine to start it. It has its own decompression lever to allow the engine to get turning before putting compression to it, to get some momentum before firing. I would be surprised if I moved a single foot...... before that tractor sprung to life with no way to disengage the clutch. I nailed the decompression lever and killed it, but it could have been bad.1 point
-
you cannot do this with the modern standard transmissions today with the interlock safety switch in play....oh for sure you can by pass this if you wish...but not often an easy to get to connection...the modern brake light switch is multifunctional also and also prevent gear selection without brakes fully applied first.....they are tying to make things idiot proof which in turns yields better idiots daily....?1 point
-
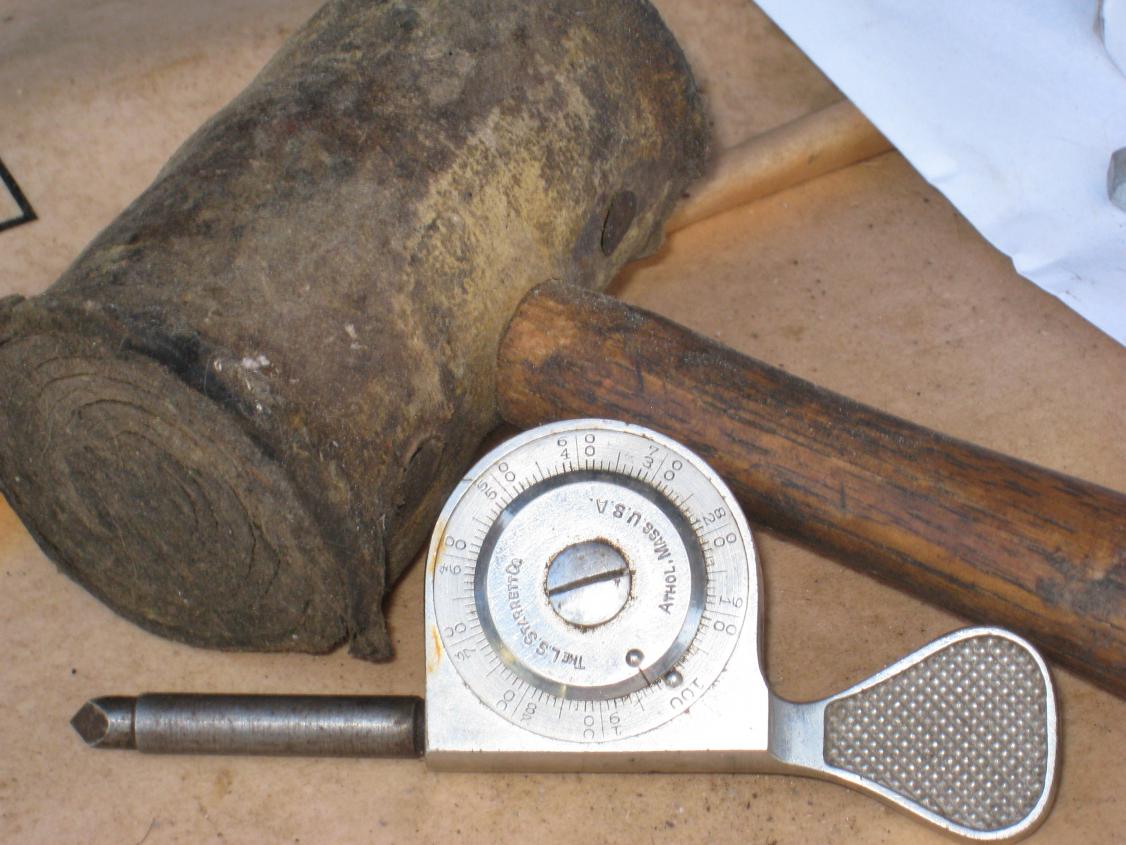
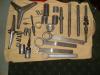
Wow!!! I want to play. I've got too much stuff to share but here's the story: My father was a mechanic. Dropped out of school and began working in the 30s. By the time I was born he was a service manager at James F. Waters "the largest Desoto Plymouth distributor in the world." He died in '61 so most of the tools I have go back before then. The hand drill was my grandfather's. The paten date on it is Aug 1910. It's a ratchet drill. The crescent wrench doesn't look like much but it was made by the Diamond Calk Horseshoe Co. It is "forged Diamalloy Steel" Made in the U.S.A. The book was my father's. I have 3 of them. They cover cars from the teens to 30s. The timing light I've just held on to - it's missing a cord. The hammer is rolled leather. I've never seen one like it. And the tool next to it is for measuring something. I'm not sure what. I've got all sorts of stuff - when I die someone will come in and throw all the "junk" out. It's just a little history. Thanks for letting me share. d-

 1 point
 -
I have the matching engine analyzer and the starter/generator tester,too. I even have the device you stick up a tailpipe to check the exhaust. I couldn't find a photo of one of my handiest tools,my 10,000 lb diesel loader with the big bucket that will pick 3500 lbs 10 feet up in the air. Tools just don't get any handier than that thing when you are pulling engines and transmissions out of junkers out in the yard and then loading them on a trailer to haul to the crusher.1 point
-
I nabbed these babies last week on ebay. A complete Fluid Drive Kit for 1942-1949 Chryslers. All Miller Tools. The Box they came in was Rusty so I'm getting it Sand Blasted to repaint and Felt the Drawer
 1 point