Leaderboard


Popular Content
Showing content with the highest reputation on 09/17/2020 in all areas
-
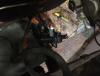
And if you start smelling the bacon frying...Well then take your bare hand off the rocker panel and put your gloves on.3 points
-
you should have a safety clip that bolts attached to the front of the rocker trim along with the one in the rear you show....these are a bit of assurance if the rocker along the edge was compromised a bit, it would still be attached to the vehicle...2 points
-
Okay everyone, VICTORY is ours. We have an original 1951 Coronet flathead 230 successfully turning a Sanden AC compressor. Not much of a drag on the motor either. As stated earlier, we had added a double groove pulley to the water pump thinking the original crank, water pump, alternator belt could remain unchanged. The AC compressor was stopping the spin of the water pump pulley. We tried belt dressing to sticky it up, to no avail. We decided we would try to put one really long belt on all four components. The belt is crank/water pump/compressor/alternator now. No slipping or binding and the evap blows 35 degree air on us while we drive. We are now experiencing a bit of overheating because the motor fan was taken off so it wouldn't hit the compressor. With the AC condenser in front of the new aluminum radiator, there is restricted air flow that our 1200 cfm Spal fan can't overcome. We ordered a larger 2100 cfm pusher fan as there isn't enough room for a puller fan. I'll get some pics uploaded, but if anyone wants more sent directly too them showing more detail, let me know. I'd be happy to share how we pulled this off. Dan H2 points
-
Or consider a late model ford 8.8 from an explorer, lots of ratios, limited slip units, with disc brakes 95 and up in the bone yards, and cheap - should be close to right axle width at 59.5 ". I had found a ford enthusiast website that had all the axle code info to search by the door tag. Another website to check is called "the ranger station". Mustang drag racers use these 8.8's with good success and durability. I considered using an 8.8 until I found the cherokee 8 1/4's w 3.55 ratio are cheap, plentiful and strong enough for a flattie powered car.2 points
-
I learned how to drive on a Farmall M when I was 10, and the trick I was taught to turn that tricycle steering was to keep the tractor moving, even if that means feathering the clutch to rock the tractor back and forth to make a sharp turn in tight quarters...this transferred to the '48 with the 6.50-16s, for as long as the truck was moving, even just a little, the turning of the steering wheel wasn't an impossible chore...if ya are going to move to a wider tire, this trick will become even more invaluable as wider tires will have even more resistance to turning at a standstill...what is happening is that if you are rolling over the pavement or dirt, even at a very slow speed, the steering resistance is low, but if ya are not rolling, steering resistance is very high because a large portion of the weight of the vehicle is trying to twist the contact surface, be it hard pavement or dirt, and that ain't easy... LT215/85R16s are a heavier tire than 6.50-16s, but them big radials do not need to be inflated to 50+psi during operation...they'll need a lot of psi to properly seat the beads (I usually put 70psi to make sure), but then deflate to 35psi and test drive...if still too harsh, deflate as needed but no less than 30psi...those radials will squat down at lower pressures, so your effective tire diameter has to be calculated as double the radius at the tire contact point...as a point of reference, the last 6.50-16s that were on the '48 were load rated C, and last time I checked, LT215/85R16 could be had load rated D, so those will be literally the next tire size up...if ya get E-rated, then you've gone too far2 points
-
With another new change coming to Photobucket on October 1st, I finally have decided I would try and figure out a way to download all of the pictures of my P15 from Don's account. This isn't an easy task with a login, and its even more difficult without. I'm essentially attempting to strip all the links out of their system and then do some magic and have an auto down-loader actually download the linked images. Unfortunately there are several pages that Photobucket won't even load for me to even extract the links. It seems pretty hit or miss, as if I keep refreshing the page eventually it might load. Its all very frustrating - and I just felt like venting. Also - if there is something specific someone wants/needs out of Don's account - let me know and I will see if I can snatch it. Or even if there is something in general elsewhere out of Photobucket I can probably do that too if there is time before it disappears.1 point
-
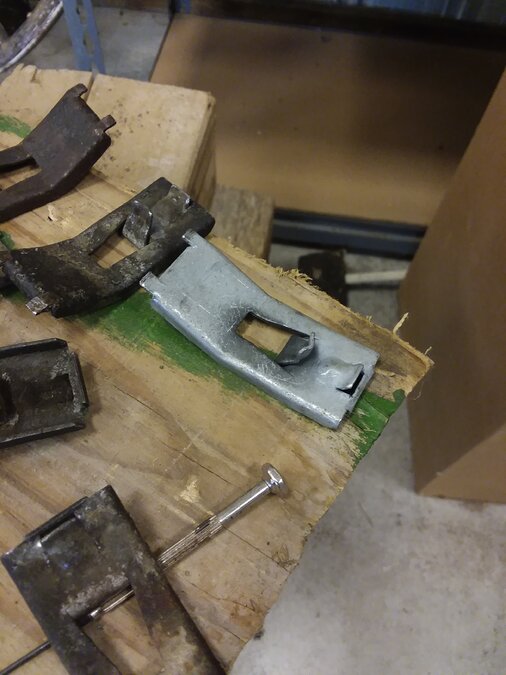
I just went through this in my 49 royal. The rocker moulding was not attached when I bought it. Definitely there should be a place under the car for what you call a weird clip. I found the boltsand washers still in the body. My clips are a different style. Had a body shop help me. They bolted the front down first and then beat down on the rocker moulding clips to get them to pop into the rectangular cutouts in the body. The back bolt was the last to tighten. Yours are different and straight. I dont see a locking tab on yours. I had a few of the tabs broken and bought so me extras on Ebay. Really should pop into the body somehow to hold it tight. Not sure how yours clips would lock?? Jeff
 1 point
 -
another 100 miles in the last two days (61 today). running excellent. got my volvo 240 repaired by replacing the cam plug, will be nice to be back getting 22 to 25 mpg instead of 4 to 6 mpg...1 point
-
appears correct....the clips are attached first to the rocker of the car and locked into place, look close at the way it is made and you will see how the top should latch to the clip and the snap into place at the bottom....affix the clips first and then the molding itself with the front and rear locking bolt/screw clips in position, it is snapped onto the clips you just affixed and secure the ends with the nuts/screws as applicable...1 point
-
For Paul F. ?
 1 point
 -
At the top ofthe page is a header with several topics. The pull down menu under"resources" has a listing for brakes. This section shows the proper puller and describes how to use it.1 point
-
You need the proper puller. It attaches to 3 studs and has a center that inserts into the center of the axle shaft. It should have 2 hammer ends. Keep the axle nut on. Back it off a few threads to keep the drum from flying across the garage. Don’t ask how I know that. I’m at work so I can’t send a picture of the puller. Also make sure to bolt the puller onto the studs tightly. Don’t ask how I know that either.1 point
-
IMHO, the strength of the rear axle is dependent on the size and how sticky the rear tires are. Every car/truck/tank/whatever will have a 'weak-link' and if you can generate enough torque then you will find it. The 9" and, especially the aftermarket 9", is overkill for 90% of the cars on the street. The 9" also suffers from the most parasitic power loss. The Mopar 8-3/4 is an excellent axle but now days expensive. The Ford 8.8 has proven itself as very durable. Until you make more than 500 lb-ft of torque you will be fine.1 point
-
I think wearing that t-shirt might tell people more about you than you want them to know.1 point
-
1269 unique photographs and videos have all been downloaded. It turns out I did have some duplicate links in my collection. They are all stored in one folder - so I now need to figure out a way to sort them (some will have to be hand sorted as several have the same name). I think I can do a quick script and use the folder structure from the download links to make a new folder structure and automate that part of it, but the hard part is really over - the files are no longer only on PB. The download itself probably only took 10 minutes. It probably took me an hour or so throughout the course of the day fiddling with actually getting the links.1 point
-
It may have had those on both sides at one time. They are notorious for popping out, especially if the owner tried a Dukes of Hazard stunt, even unintentionally. I'd just pull them out and drive it a bit, then measure the ride height on both sides.1 point
-
Thanks for your efforts. Don was always good about helping others. He would approve.1 point
-
I installed windshield glass with steering wheel in place with no problems. And this was on a 49 that has the steering wheel a LOT closer to the windshield than my '52. I guess I am not sure if the 51 is the same as the 49 but worked anyway with worse case scenario. Pretty sure the 51 has the dropped steering column with the newer dash layout.1 point
-
Well, I am eating crow pie on my recollection of the seal construction- got it out of the tranny this morning and it does indeed have an elastomer spring-backed lip seal beside the felt, and was correctly installed with lip seal side facing the inside, felt side out. Didn't remember it, it has been 11 months since I put it back together ( I thought it was short-term memory that goes first when you become an old fart?) Another good lesson not to run my mouth until I have all the facts. At 71, you'd think I'd learned by now...So, in this instance, it may well not be the part- a sincere apology to Bernbaum. Will replace it with the NOS part when I receive it and see what happens. In the meantime, I will check the surface finish again and if I see any suspect area, I will take care of that. If at all questionable, I will look into the speedy sleeve. Thanx, Dartgame. Thanx all, I will post the resolution.1 point
-
DODGE = Dem Old Dudes Go Everywhere1 point
-
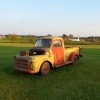
The '51 I know are the stock 16" rims and they are the ones for the 6.00 x 16" original tires I believe the rims are only 4.00 or 4.25 inches wide, so I personally would not go any wider than the 215's. I am not sure what the '42 rims are off off but they are the Mopar, but they have an offset and I think they were about 5.50 inches wide. I have 215/75 R 15 on my '38 sedan (late 40's 15" rims also)and went with that again on my Fargo. Popular size and cheap, about half an inch shorter than the stock 6.00 x 16 tires and calculator says 2500 rpm at 50 mph. Three sets of Mopar rims with no tubes, all hold air good.
.jpg.b6e31a859ebd9e636ae548e13f66306b.jpg) 1 point
1 point -
I got the car running, so it's not the pertronix unit in the distributor for sure. Those either work or they don't. But the car just putt-putts and I cannot run it without the choke pulled and I can't give it any gas. So, my ignition wires come out through the firewall and into the unit pictured (damned if I can remember the name of it), and to the starter relay. I tested for volts DC between the two with my ignition switch on and got 5.83. I tested for resistance with the key switch off and got 29.xx! That can't be good, correct? I also tested for resistance from where the battery ground cable connects to the engine....to the firewall and also got 29.xx. so my plan is to run a ground strap from the top of the engine to the firewall. I should also probably run one from the engine to the frame, or from the frame to the body, correct? Someone might ask, well how did this car run for 70 years without these ground straps and all the sudden now it's a problem? I guess I don't know if it's the problem or not, but I know the resistance reading isn't a lie. I believe tomorrow my ground straps will be here, so I will take that next step and see what happens. Any advice is greatly appreciated.1 point
-
In 1951 the Wing windows were a $15 option for the Standard cab. The Deluxe cab was a $30 option and the Custom Equipment was a $56 option. Brad1 point
-
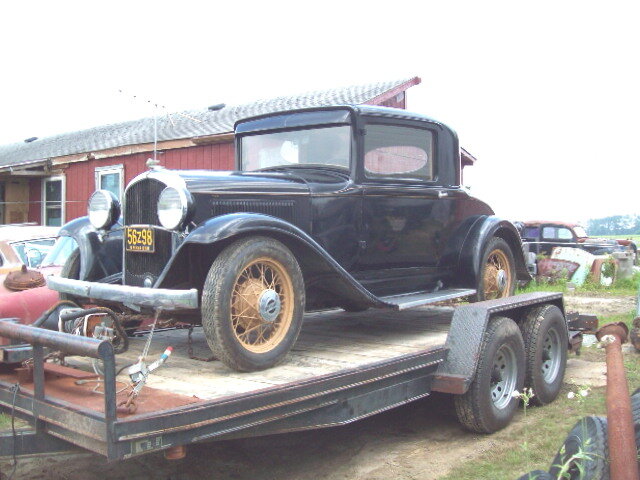
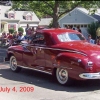
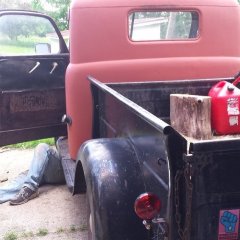
This is a very cool picture with two fine "projects" in it.
 1 point
 -
Here is a photo of the 31 Ply coupe. All original,and staying that way as long as I own it. The 37 Dodge is a 1 ton factory 4x4 that was originally sold neIw to the city of Newport News,Va as a fire truck,and it has a 9-1/2 foot bed on the back. It is now sitting on a 72 Ford F-250 4X4 chassis,and has a modified 390 in it and the truck 4 speed. Both are being replaced,as well as the chassis,with a 79 Dodge 1/2 ton 4x4 chassis with everything already rebuilt,and a new factory crate 318 in it with a auto trans. It is going to be painted the bright Lime Green you see on the new Jeeps. May finish my 32 Ford coupe hot rod after the two Mopars above are sold. It is unchopped,but channeled the height of the chassis,and has an extended chassis (122 inches) with a suicide original "Dago" dropped front axle. 350 Chevy engine w/Dart 2 heads,10 to 1 Keith Black flattop pistons,gapless rings,roller rockers,dual quad intake,7 gand comp cam,and the block was put together by a Nascar Speed Shop,thanks to a friend that works there, Car should be pretty fast. Going to have it painted baby blue,and probably have red and white flames added.
 1 point
 -
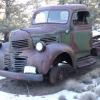
Temporarily placed the front seat in to mark for placement of holes and reinforcement strips. Also to get a little motivation to keep going.


 1 point
 -
Brake Kleen should remove whatever is left and evaporates on its own.1 point
-
more photos from the "parades":1 point
-
adding a pic that shows the knockouts used for a mopar heater (model 61) and fresh air package: if you look closely, you can see one heater mounting stud nut washer, and the attachment that connects the fresh air tube to the firewall. i assure you, the large circle is cut out, not just covered by this fitting. a better pic: and another: the fresh air inlet from the grille view of the fresh air duct and flapper model 61 heater defroster ducts, plenum, and heater flappers defroster plenum workings1 point
-
noticed on thursday that the master cylinder was leaking a tiny bit, so i placed an order that afternoon with roberts motor parts. the new big-bore (1-1/2”) master cylinder arrived on saturday afternoon, so i installed it this morning. took the truck out on a 30 mile ride today, and the brakes are even better than before. also did two more mini-parades around the lake. same trucks as yesterday for the first trip plus a ‘41 ford COE. then an f-6 fifth-wheel cab and a 70s diamond reo with a detroit joined my dodge and the 1-ton ford on the second trip. all good. the diamond was toting a single axle equipment hauling trailer of appropriate vintage. i do have some pics from the second trip, and i’ll add them to this post soon. here's some photos:1 point
-
Just got the front suspension rebuilt and buttoned up tonight. Don't believe the shop manual when it says Step 3 Align the steering knuckle support with the lower control arm and install pin. Screw on nut and torque to 110 lbs. Step 4 Install spring! Of course they don't tell you if you do step 3 before step 4, you will have to undo step 3, then do step 4, then do step 3! Got it! I guess the shop manual didn't care too much about getting the order right on assembly. Shop manuals were not written for DIY's, so you have to use common sense to avoid having to do the work twice.1 point
-
Andy, I used special Chrysler Miller tool C-608 today to install the new pivot bar and bushings. The tool is used for pushing the upper control arm out 1/16" because you have to torque the bushings on either side to 120 ft. pounds. That's a lot of pressure!!! I'm going to do the same thing to the lower control arm tomorrow, using tool C-594, and try to button it all back up again. I dont' remember what I actually paid for the rebuild kit, but is was something like $10 or $15, but that was back in the 80s. I'm glad I bought most of my parts back then rather than paying the exorbitant prices dealers want now for them. I like the idea that it's OEM Mopar parts and not a Chinese modern knock off.1 point
-
Marc..........if you paid $5.58 for that package they sure saw you coming......lol...........andyd1 point
-
Andy, I've got the really old Mopar control arm kits, so I think I'm good on most of the rubber grease seals.

 1 point
 -
You axle fans won, after doing my initial quick set up with a manual Omni rack, then receiving the power rack to find out they mount in a bit different way, I went to mounting the rack to the axle, which isn't real fun with the Dodge axle curving both up and down but a curve inward too, killing the idea of just mounting something to the inside of the rack. I also wanted to be able to try dropping a few front springs at some point, and that also would change where the rack mount needed to be, one way or the other. As this is a highway only cruiser and not a back roads truck, I built 5" wide x 10" long 1/4" thick plates that mount to the front face of the axle and make a 90 to come out flat under the bottom and stick past about 6"s. On the drivers side I did have to weld in a 1/4" plate to get my spacing I needed, you wouldn't have to do that if you made the upright piece longer, but I failed to allow for how close the rack bellows is to the leaf spring, and at exact axle height it would rub. The pass side is just mounted flush to the bottom with the exception or a very slight bend in the plate downwards to make sure the bellows stays away from the spring. I took a few pictures, but don't mind the mis match hardware etc, I didn't want to mess up the threads on all the grade 8 stuff pegged to go in..... Took a lot of mock up to figure everything out I'll keep you posted how the rest goes
 1 point


.thumb.jpg.52b659814cb5758b70f78e52ab046bdd.jpg)