Leaderboard


Popular Content
Showing content with the highest reputation on 01/01/2020 in all areas
-
The driveshaft travel can be estimated by using some strings laid out on the frame and a plumb bob. For this, a plumb bob can be made from a big hex nut with a string tied around it, located directly above the pinion yoke. The axles travel vertically, so the pinion yoke travel can be approximated by a vertical line...the highest point of the pinion yoke can be calculated as approximately the centerline of the axle's distance from the frame. The plumb bob string denoting the pinion yoke travel can be marked with an alligator clip to approximate the highest point the pinion yoke travels. This point represents also the center of the u-joint; now a measurement can be made from the transmission yoke...this might be a method that doesn't require safety glasses or touch up paint2 points
-
Who said the next generation isn't interested in the hobby- my 7 year old granddaughter asked me the other night if she could help me "work on the old cars". We immediately went out to the shop while I was frantically thinking of things for her to do that would be fun and not dangerous. I got some 1/4" bolts, washers and nuts and had her tighten them on the intake manifold of a 218 I have on an engine stand. I showed her how the open end wrench works, righty-tighty,lefty-loosey, and how a lock-washer works. She did a great job..Needless to say, I am getting her a set of tools for Christmas!. Any suggestions for projects that she could "help" me with?. I have 2 Suburbans (a '52 and a '56) in various stages of destruction.
 1 point
 -
I started my two boys fairly early. They came in really handy especially with their small hands. Now when the grandsons are around I get an hours work out of them before the 4 wheelers come out. Sometimes it is picking up sticks and sometimes it is working on an old car but they have to work a little. One of them complained to his dad that he didn't think it was fair to make them work. His dad said that he'd had to do it and that they were going to have to do it.1 point
-
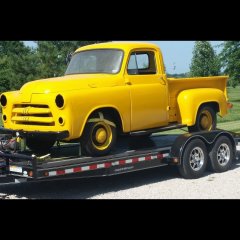
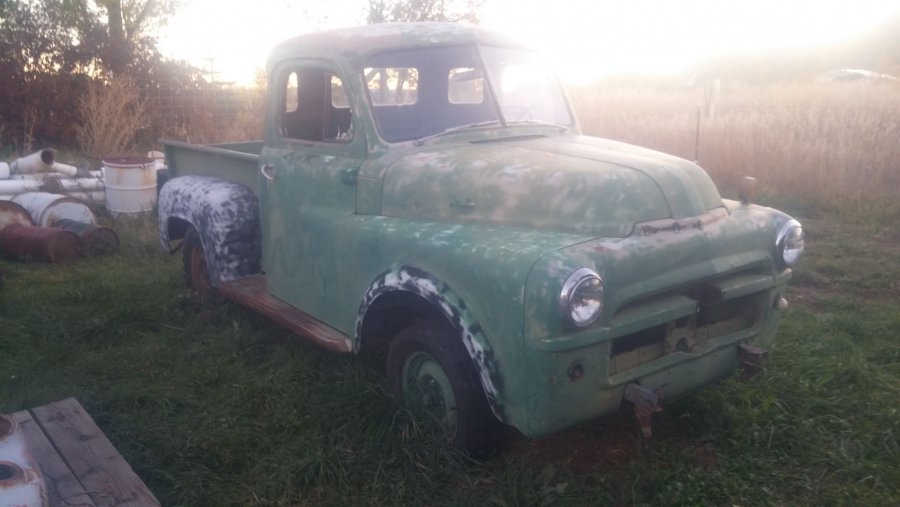
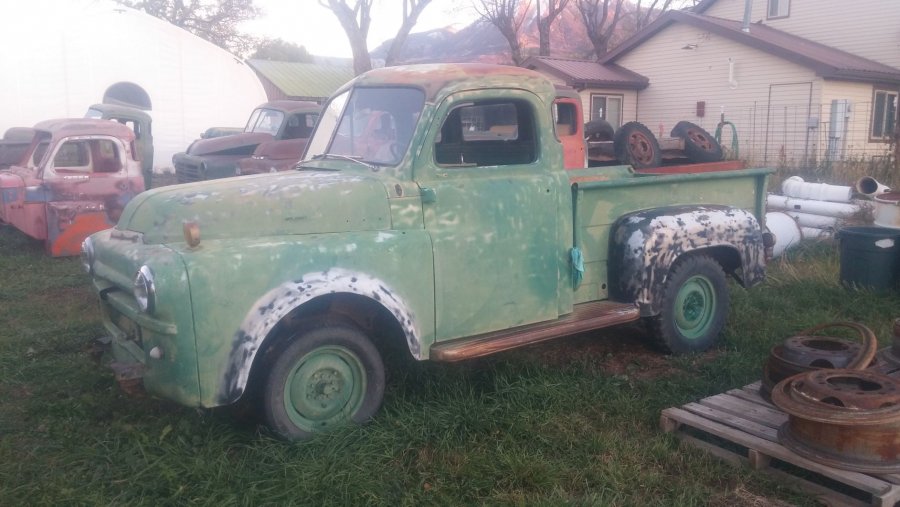
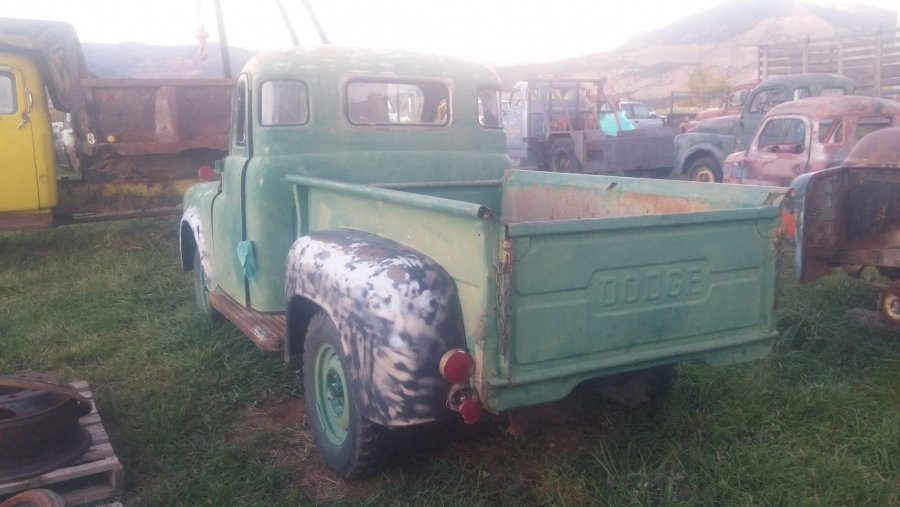
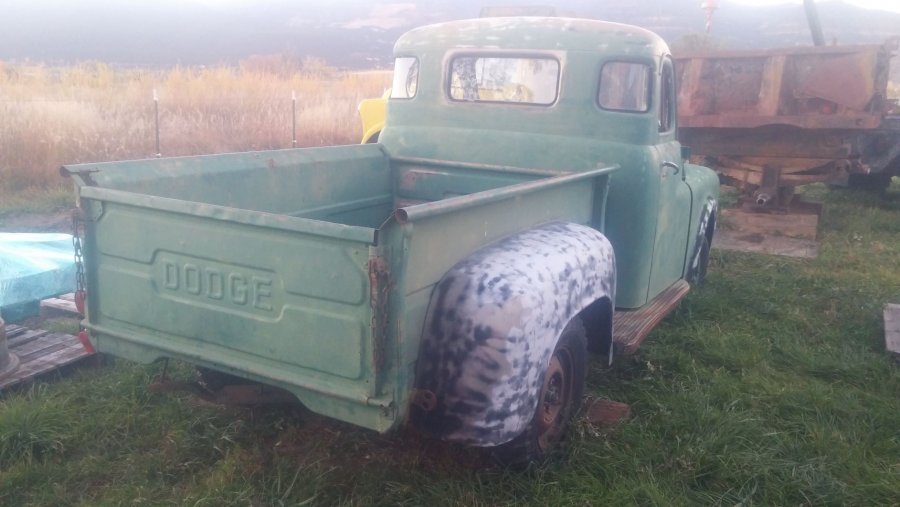
Truck 20, the first truck of 2020, is a 1953 Dodge B-4-B-108 Pickup Project Truck purchased in Reno Nevada. This dry-western-climate truck has nearly complete, excellent sheet metal for building your dream rat rod, hot rod, street rod, restomod, or whatever you desire. Last year of the split-window, flat-glass windshield Pilot-House cab. First year of the rear-fender-style that would be standard on Utiline pickups, until they were discontinued in 1985 to make assembly room for the Dodge Dakota. Generally the shorter-wheel-base, 1/2-ton pickups are more desirable.
 1 point
 -
Ok I am not sure how we got from me asking for some one to fabricate motor mounts to buying a turnkey vehicle. You can get motor mounts for just about anything but these trucks. Anyways I get for some this stuff is easy. Not everyone one has a million dollar garages you can work out of. This truck was given to me and has been in family since new. Anyways before I say something stupid again.1 point
-
First thing I would do is check the backlash of the gears. O don’t have the spec handy, but there should be a small amount of movement of each gear before it contacts, and moves, the other gear. When doing this, you should be able to determine if the pinion bearings are stiff, or if it’s the diff carrier bearings (making the ring gear hard to turn). Or maybe there’s zero backlash causing the tightness. After these initial checks you should be able to determine where the problem lies. Either way it may require a disassembly/ reassembly to correct the setup.1 point
-
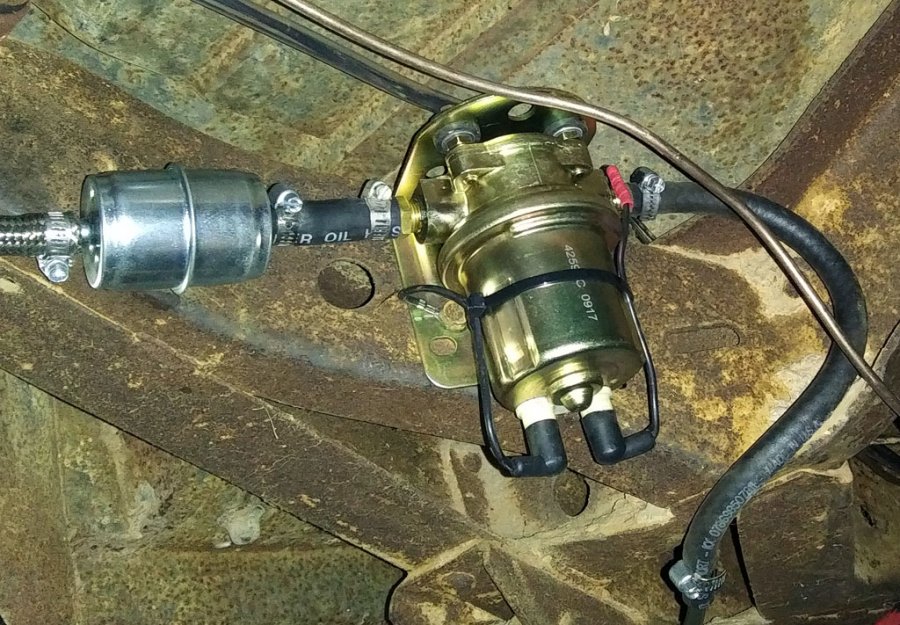
Here is the 6v Carter pump that is the only pump on my P15.
 1 point
 -
I used a modified version of Brian's approach. I ended up suspending a framing square from above and inline with the centerline of the pinion shaft. Then I calculated the point where the diff would be when it in the same horizontal plane as the transmission yoke (i.e. shortest driveshaft). At this point the driveshaft ended up being slightly less than 1/2" shorter than if it wasn't compressed. That length still leaves 1/2" of travel before the yoke could bottom out on the driveshaft. I then raised the frame of the truck until the wheels were off ground and took another measurement and it was 3/8" longer than when sitting with the wheels on the ground. In this situation there is still about 2-1/2" of spline engagement between the yoke and the driveshaft. I feel pretty comfortable that the yoke and driveshaft combination that I have will work fine. Time to buy the u-joints! Thanks! Brad1 point
-
Here is a tool that I made to remove and replace the harmonic balancers on my '67 Plymouth Fury's with 318 engines. Where they are both automatic transmissions, trying to torque the large balancer bolt can be difficult as the engine begins to turn before the proper torque can be achieved. After removing the pulley, the tool is fastened to the balancer using the pulley bolts. The adjustable piece on the bottom of the tool comes in contact underneath the cross member thus preventing the crankshaft to be turned and the balancer bolt can then be tightened to its proper torque. I have replaced the chains and gears on both cars before and this tool performed admirably. I believe that a similar tool could be fabricated for a P15 or other models too. A Fluid Drive car would truly benefit from this tool I'm sure. Happy New Year John R
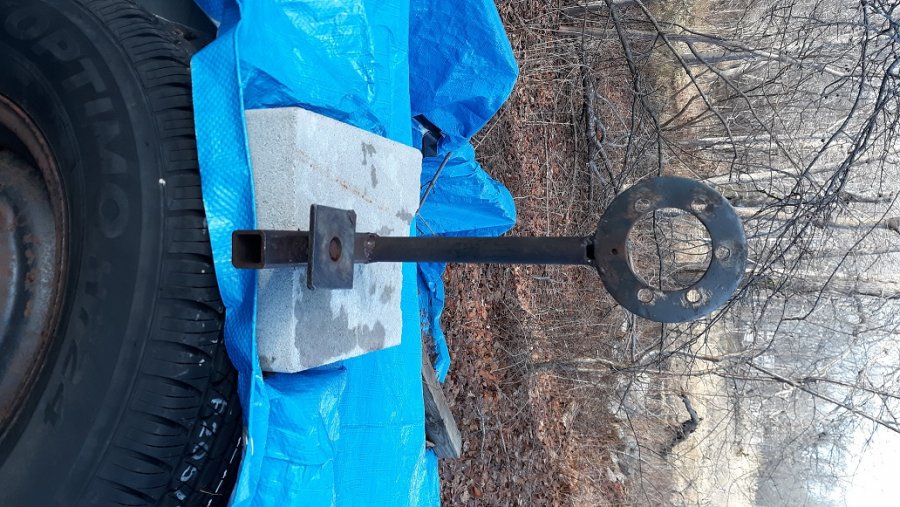
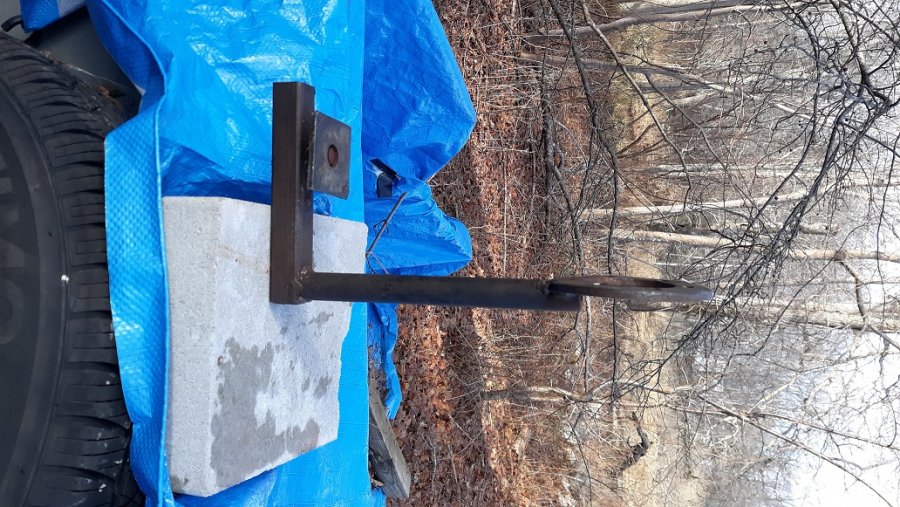 1 point
 -
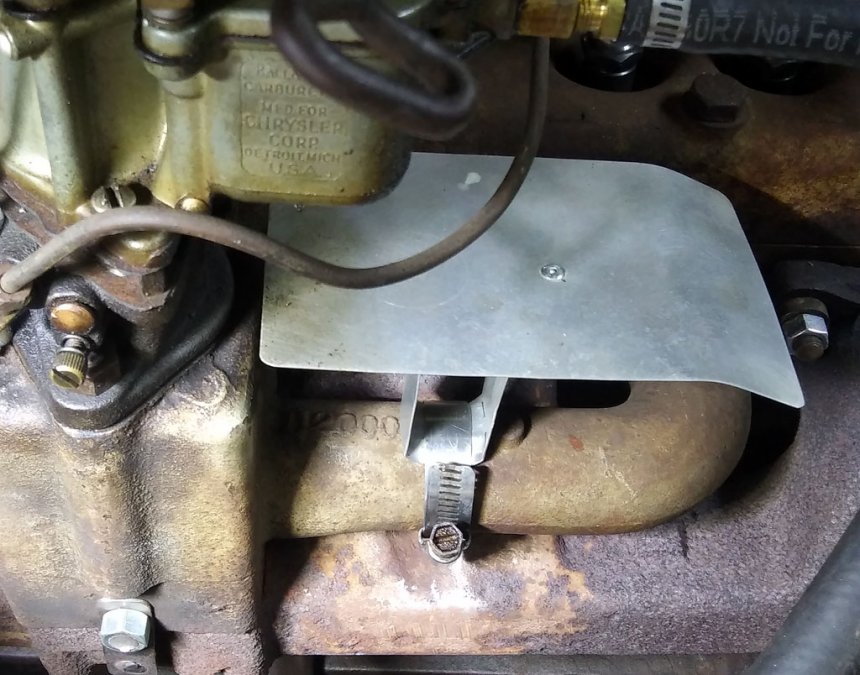
In case anyone is looking for ideas for a carb shield, here is one I made from 0.025 aluminum....can be made and installed in a few minutes. This one doesn't require disturbing the carb to manifold attachment.
 1 point
 -
Ok I know it is early in the evening, but some of you old timers and me included can not make it to 12 Midnight. Hoping everyone has a prosperous, happy and healthy new year. At least it is easier to remember the year because we only have to remember two digits and then repeat them. Lets all remember the members that we have lost this year and in past years. We are all getting older and time marches onward. So take the time to keep your friends make sometime for people that you might not agree with because they could make a difference in your life at some [point. Be helpful to the other guy, pass along your knowledge and spirit for these great antique cars and trucks. The cars and trucks are what keeps some of us going and a reason for getting up every morning. remember the golden rule do unto others as you would have do unto you. So as the ball in Times square slowly comes down the flag pole and brings in 2020 think back on what you did in 2019 and make an effort to seek out new friends and help others that are not so fortunate as us. Happy New Year from valley Forge, PA were our troops in 1776 spent the cold harh winter in log cabins trying to defend out new country and provide for our rights a freedoms. Rich Hartung desoto1939@aol.com1 point
-
I have bought two kits from Rusty Hope. Would buy a third! Rusty is a part of this forum, a plus in my opinion.1 point
-
HOTROD IT..........they're only original once but can be a HOTROD many times over...........lol...................hop up the engine, drop it a couple of inches, and go hunt some Frods.......regards, andyd1 point
-
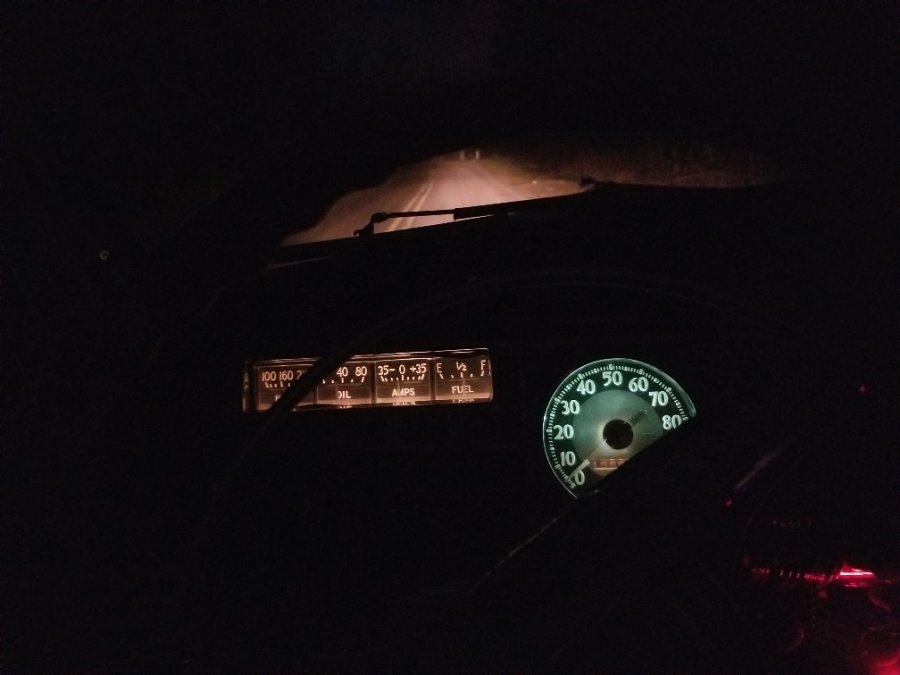
Took the 48 to town for the last ride of the year! Have any of you ever, while riding around in one of these old cars, imagined what it was like riding around 70 or so years ago in one of these things? A couple things come to mind as I day dream while crusin. 1. The lights. It's hard to see the dash lights at night.....but, there's probably more light pollution on the roads today compared to 70 years ago. More street lights, more oncoming headlights lights, and the oncoming headlights are no doubt brighter. I do notice if I get on a dark road with no oncoming headlights, I can see the dash lights better. I imagine that's the way it was back then. Another thing I think about is the roads. I imagine most roads commonly traveled to get from home to work or to the store was dirt roads so I imagine what it was like going to work or to the store 70 years ago in one of these old cars. So I like to picture what it was like back when these cars were commonly on the road. Here's a shot of the dash lights on a dark road. And then back in the shop.
 1 point
 -
well a bit of sandblasting, little primer work, whole lot of yard work today......that's it I am taking the rest of the year for myself....!1 point
-
I don't have any adults or kids around (unless I qualify as one or the other!) so I'd probably have to make due with my front end loader. The ratchet strap idea might be a good start. If I can find a warm enough day, cause I don't like the cold, I could probably roll the truck outside, use the front end loader on my tractor to apply downward force and then cinch the straps at that point. I'd probably get mighty p'ed off if I scratched the paint at this point ?1 point
-
With the plug removed there is a hole about 3/16" in diameter that opens into the combustion chamber right above the piston. When #1 piston is at TDC so is #6 piston. When setting the timing you want the #1 piston to be at TDC with both the intake and exhaust valves closed. This is the firing stroke and TDC is what everything is based on. So what Dodge did is put a hole in #6 that you can stick a rod down into and as you're rotating the crank to bring #1 & #6 to TDC, the rod will tell you when your at TDC as it will stop moving up and then start back down as you pass TDC. The goal is to verify the pointer on your timing cover is pointing at the TDC mark on the crank pulley. Once you've done this you will always know when you're at TDC and by verifying both valves are closed on #1 then you know it's the ignition stroke. Once TDC is established for #1 and both valves closed you install the oil pump such that the slot in the oil pump shaft is in the 1 & 7 o'clock position. If you look at the first picture in post #200 you'll see the 1 & 7 position. This orients the distributor correctly which is when the rotor is pointing towards #1 spark plug. The second picture in post #200 shows the rotor. I hope that didn't muddy the waters to much! Brad1 point
-
Compress the rear end? Redneck ideas get some serious ratchet straps going around the axle and frame, snug away, then put all the weight you can find in the shop on board or that welding/build table for your engine on it to compress till the shock appears to bottom out? Grab kids, adults what ever to add as needed if not enough???? I'd look at Kaiserwillys.com or 4wd.com if I wanted to add bump stops to the frame, old CJ's , MB's, Trucks or Wagons.1 point
-
In the good old days your upholster made their own. There is a sewing machine foot which funneled a cord of the appropriate size and a strip of the desired material under the needle and sewed them together. Of course you could buy a roll already made but if you had a unique color you made it yourself. You are limited in length to the width of the material but I have seen two strips sewn together (on a 45) to make a longer continuous piece. Most Upholstery shops use a machine like a Consew 206rb which is a copy of a Singer so the feet are plentiful. On eBay a "Welting/Cording foot" is $9 or $10. You will need to know the size of the cording you're going to use. The cord is available at Joanne's in most cities (and you might find the foot there as well).1 point
-
An old autolite spark plug catalog from 1993 shows that the 316 plug was replaced by 295. 295 shows an application of all 6 cylinder Dodge light duty trucks from 1949-1956, all 6 cylinder Dodge cars from 1946-1956 & all 6 cylinder Plymouth cars from 1946-1956. In the back of the catalog where principle applications are listed for the 295 plug it lists: B & S engines: Allis Chalmers, Beaird-Poulan, David Bradley, Dayton, Gravely, Hoffco, John Deere, Lawnflite, Montgomery-Ward, Roper, White, Yardman (L&G); Atomic (Inboard engines), Maneo (mopeds), Ariens, Bolens, Bunten, John Deere, Sensation (P/M), Blue Diamond, Brothers, John Deere (S,R,E) (10 pack). 295 plug lists its special features as Loose Nut Terminal & Nickel Plated Shell and has a 14 mm thread diameter, 3/8" reach, 13/16" hex, Gasket seat, Standard tip and is a Non resistor plug. Hope some of this helps!1 point
-
“I deleted my bypass oil filter,and will change oil as i see fit.“. So have I. Saves me money every oil change. Way back, Greybeard helped me rebuild my first engine. He taught auto mechanics and advised me not to keep the canister. He has been missed.,1 point
-
Well you got it off using the starter. How do you tighten the bolt back up tight..? I guess you reverse the battery cables?1 point
-
No offense taken!1 point
-
Just saw this.. The OE MoPar and all NOSR main bearings have matching grooves top and bottom. The modern offshore replacements only have one shell with a groove... Check out 415M Federal Mogul on Ebay to see pics of how original bearings were manufactured.1 point
-
I've had several vehicles over the years w/tachs, and like you, I don't use them for shifting guidance. I just listen to the engine. But, cruising down a highway, it has been interesting to see what the RPM's look like in various vehicles. Just a nice to have decoration, for me. ? And a redline, ha!, I've never even gotten close to one of those. ?1 point
-
Not as photogenic as your pictures but in your last one you mentioned and showed snow. I had my '53 Plymouth out yesterday for a drive in the country and took a picture of it with snow as well but only in the ditches. I'm in Lethbridge, Alberta, and lately it has been around the freezing point or slightly above during the day. We had a huge snowfall first week of October and another pretty good one mid November. Since then Mother Nature seems to have forgotten about us. We had a brown Christmas and very pleasant winter days for quite a while...…..touch wood.1 point
-
Thanks for sharing ?1 point
-
Today I was working with (guiding) my son, performing maintenance on his car. So my Windsor was sent out of of the garage for most of the day. We worked on his car in the garage. It started snowing today. I figured I had a rare photo opportunity with fresh snow on my old car. After sitting outside in below freezing temps for about 8 hours, I flashed her up. I swear the engine never made one complete revolution and it was purring. Starts faster than any car or truck in recent memory. Just dandy these old lovely Mopars are.1 point
-
Beginning to wonder if maybe a coil over swap is a better idea? Takes care of the spring and shock relocation in one fell swoop.1 point
-
HAHA my stuff is mostly all stashed away too. I do have the project 47 truck parked in the driveway. So far its clear but I imagine it'll be buried under snow soon enough..... Hope we can meet up with you on a tour next summer!1 point
-
Hello there.. To anyone interested my progress is a bit slow but moving forward. Valves out, one keeper dropped into oil pan, excited to remove pan in search of it being I will be able to scope out the lower end. Springs are a bit difficult to remove with guides in, I have pulled one, wondering if there is a simple procedure I am overlooking in removing. Getting ready to attempt to push guides out but apprehensive. The two center lower exhaust manifold bolts broke, and as luck would have it I then broke an easy out off in the first one I attempted to extract. Tried welding washer, then nut, etc. to no avail even after pre heating stud but couldn't get enough penetration into stud which nuts just kept breaking off. Lack of welding skills most probable issue... I was very very lucky I got the hole on center and drilled all the way through the stud. This was a trick I learned as a kid working on big trucks. I was able to take an air chisel and drive the broken portion of the easy-out through the stud then start over.. The bad is, the piece is still in the water jacket but I will try to recover it. De mounted 3 tires and re-mounted with decent used ones we picked up which had nice new tubes and flaps. Have four total, they were off an industrial air compressor with most of life being stationary where tires have started to dry rot and have the typical Michelin sidewall cracking, but flaps and tubes like new. Fun thing was I was able to have my oldest son at 16 change two of them after I showed him how. After 37 years I can still knock one apart in record time and fortunate enough to have my Dad's tire hammer and pry bars. If anyone wants a lesson I have one more to change... Thanks much to the several gentlemen who reached out in messages with tips and advice on the valve project. I have spent quite a bit of time researching the site and snooping around, appreciate the plethora of shared knowledge. So sorry to anyone currently affected by the many disasters currently going on. Very Truly, Doug.1 point

.thumb.jpeg.28cb36506a6b17cd30e7d4a22504384d.jpeg)