Leaderboard


Popular Content
Showing content with the highest reputation on 06/29/2019 in all areas
-
Have you carefully looked at the oil? Have you changed the break in oil since the rebuild? Letting the engine set for a couple days then loosening the drain plug almost till it's off would let green coolant come out first before the oil. If this happens to be the case most likely a head gasket leak on a flathead. This also would push some coolant into the exhaust sytem and also cause a initial single cylinder engine miss upon start up If the leak is into the exhaust manifold causing the white smoke and smell of course that's a stud or crack in an exhaust port or lower seat area seat possibly. This is assuming there was never a big loss of coolant into the exhaust system from the tear down...kinda unlikely after nearly 1000 miles of driving since the rebuild. Just some more hopefully helpful ideas.2 points
-
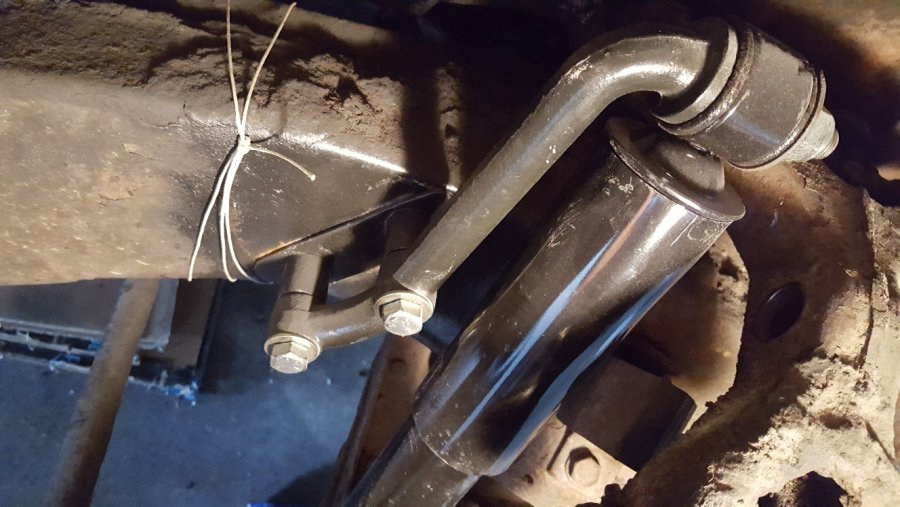
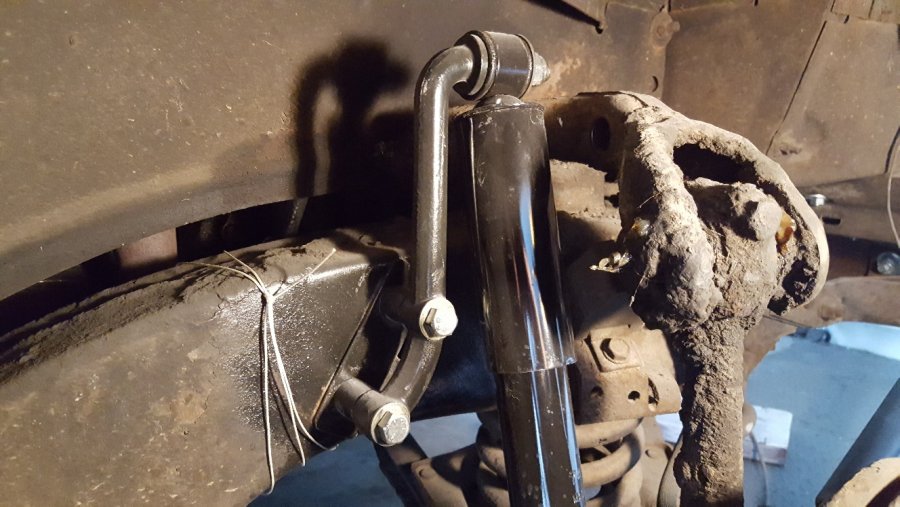
I recently put in F1 shock mounts on my 1952 Plymouth Concord. I'm not that good of welder so I wanted an approach that was minimal fabrication/welding. I ordered a set from Speedway Motors - 1948-52 Ford F1 Forged Upper Shock Mounts, 6-1/2 Inch. They were 84.99 plus shipping/tax etc. I didn't have an extra shocks to help locate where the mounts would go, so I make a shock simulator by cutting 2 short steel tubes the same size as the eye in the shock, then slid them on to the upper and lower mount studs. Then I welded a rod between them to simulate a shock. I put in a sleeve on the rod so that I could adjust it up and down to get the top located in a position so it wouldn't hit the control arm or be too high or too low. I mounted the fixture to the lower mount and bolted in the F1 mount at the top. I tighted the bolts and got it into a good position. The mount itself ended up hanging about 1 inch from the frame, so I used that measurement as the spacer, but subtracted for an 1/8" backing plate I was putting between the mount and the outside of the frame, so the spacers ended up at 7/8". I cut the spacers out of steel spacers I got at the local Ace Hardware that were pretty thick wall. After marking and drilled the holes in the frame, I make some backing plates out of 1/8" by 1" steel. I drilled one set with holes and welded on nuts to go inside the frame and one set to go outside the frame with the intent of sandwiching the frame between the plates. It was a bit tricky to get the backing plate up through the triangle slot in the bottom of the frame up into position on the frame. I fed a string through the mount\washer\spacers, then through the top frame hole, down through the slot in the frame, then into one of the nuts on the backing plate and tied on a nut, then pulled. It pulled the plate into position and I could get the bottom bolt in. I tightened it and then spin the top of the plate into position...if that makes any sense. I made a wag at the shock length and got Gabriel 82607's, but unfortunately they bottomed out. So I make a swag and got some Gabriel 81676 shocks. They are working fine and I was able to use the 82607's in the back. The whole thing went pretty easy, but I had some issues, like my shock simulator was off a little, so the top shock mount stud wasn't parallel to the bottom, so I had to redo the bottom hole. I was thru bolting the shock mount, thru one plate, then the frame then into the backing plate. I was off a little and had to adjust the holes a little with a file. It has a sway bar, I think it's a stock one, so with the shock relocation and the sway bar, it really stopped the boating of the front end. I hope this helps. FYI - The string is temporarily there because I have some clean up to do and if I take off the shock mount, I don't want the inside plate to fall down in the frame and be unretrieveable.
 2 points
 -
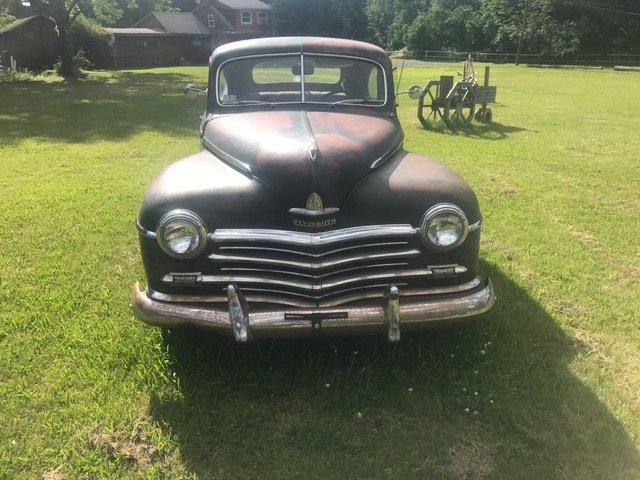
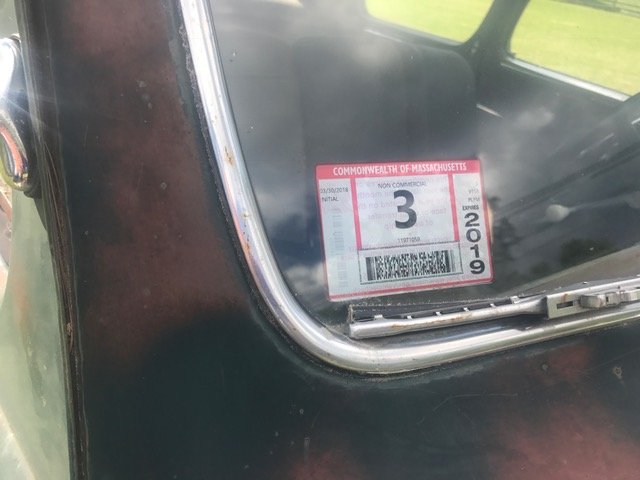
Look what I found by the side of the road yesterday! No "for sale"sign, but it is in front of a used car/parts yard (Tosy's Mustang Farm on Route 1A in Wrentham MA). Bad rockers and sills, but a recent inspection sticker and a serviceable interior that doesn't look like the site of a raccoon fight! I'd fix the rockers and sills and drive it as is! Feel free to add your own "Roadside Attractions" to this topic...
 1 point
 -
Or, paint to match the metal around the windshield? Fill the grain, sand really smooth and spray. I'm a long way from this point on my 56, but am following this closely. Great idea on using and forming the plastic. Is it ABS, PVC or something else?1 point
-
.....don’t want to clutter it up with too many textures.... While keeping in mind what they say about opinions (this is a family site!) I will hazard to offer mine: wrap the wood in plain black vinyl. You are correct about not using the diamond tuft vinyl (too small a piece for such a strong pattern), but keeping the headliner all vinyl will tie it together. Awesome work - I am inspired to try some straight pleated vinyl on my door panels.1 point
-
How about using an ebony stain on the wood so you can adjust how dark it gets and you could still the wood grain?1 point
-
did you seal the manifolds studs on install? yes the gasket should help seal this also but with exhaust you get a venturi effect....1 point
-
Is it possible that when you were working on the engine, some coolant spilled into the exhaust pipe? The reason I ask this is because we were doing a valve job on an engine and during the head removal, coolant found its way into the exhaust system. After reassembly, the engine exhaust reeked of anti-freeze and put out white steamy smoke for almost an hour before subsiding. Where you say that your oil looks clean and no apparent loss of coolant is evident, it could be a possibility. I hope that that is all it is. Good luck to you. John R1 point
-
Top panel is all done and installed. I’m considering painting the wood side pieces black and letting the diamond stitch be an accent and not everywhere you look.

 1 point
 -
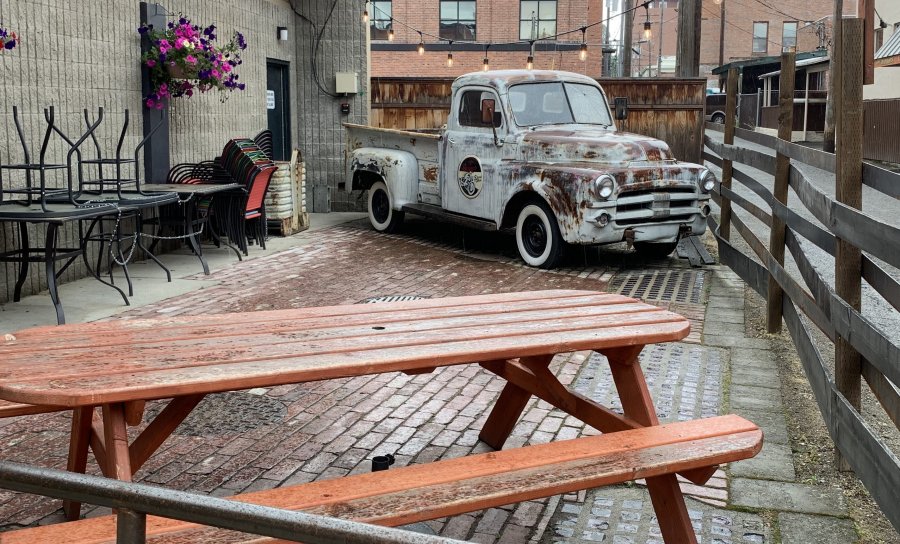
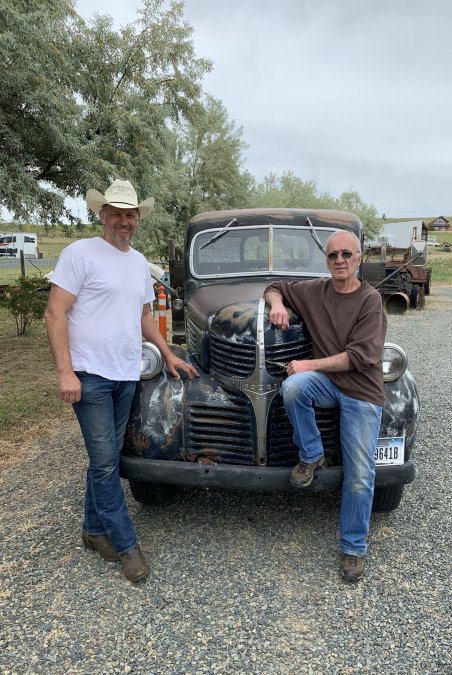
Wow, no, the truck was gone and the highway was open again....so we just drove on. Found this truck at a restaurant (patio decor) in Coeur d’ Alane ID ?
 1 point
 -
No, the pressure relief valve has too functions: First and for most it relieves any over pressure by dumping oil directly into the pan if needed. As a secondary function, it shuts off flow of oil from the bypass filter back into the pan if the oil pressure drops too low. In the case of your picture, if you aren't going to have a filter there then it would be far better to plug the opening into the oil gallery and into the pressure relief valve rather than piping a shunt between the two.1 point
-
Powertrain rebuild followed by a clearcoat...Done.1 point
-
1 point
-
A big step!
 1 point
 -
My father was in the 7th Cavalry stationed at Fort Bliss, Texas prior to being deployed to the Philippines in World War II. They patrolled the Mexican border on horseback before shipping out. The horses were retired and the soldiers were split between mechanized Cav and foot soldiers. At the same age, on the other hand, I was painting apartments for $3.25 an hour and enjoying my first taste of freedom waiting to start college. Life was good for me because of him and his generation.
-Copy.jpg.e9f5d45a0bbd6006c7a1167b688d7ae2.jpg) 1 point
1 point -
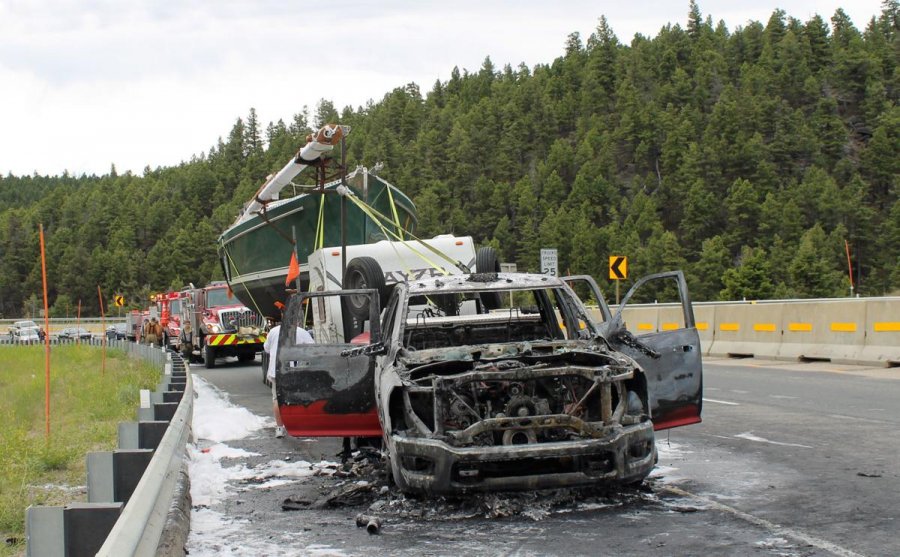
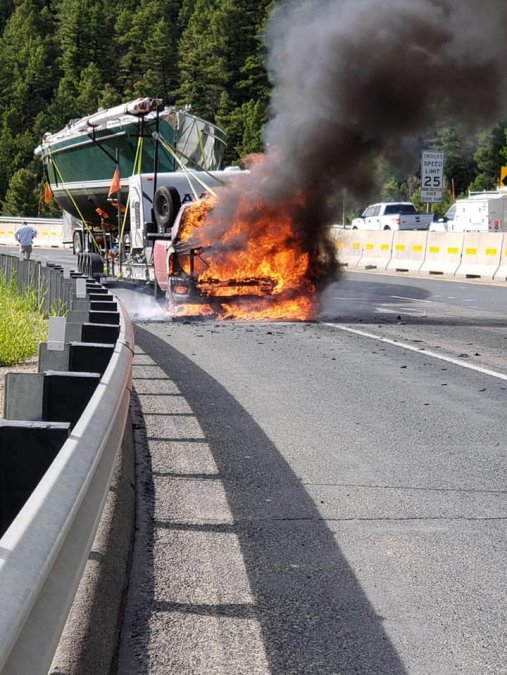
It was a pleasure to meet you and your wife. My first member meet. If I do a Pacific Northwest trip, I'll find Beaver Creek. Was the burnt truck still on the pass? It look's like he was pulling a camper and a fairly large sail boat from Florida and the pickup ignited somehow. It was a Dodge. I'll post the picture from today's newspaper, when I'm on my PC. Did you stop at that Cheney exit? I found another picture.
 1 point
 -
wouldn't that be more like 5foot?1 point
-
Swung thru “Whitehall” MT. Yesterday on our way back home and met up with “9’ box” I am consistently blown away on the generosity and hospitality of our forum members! should be home tonight.... our BTT50’s trip is over what a BLAST!
 1 point
 -
I believe 32 to 35 psi should work on the tires. On the thumping when turning. Have you checked the toe in lately? The reason I ask is I was getting a similar sound and found that my toe in was way out which made my worn king pins to make this sound. I corrected the toe in and it really helped.1 point
-
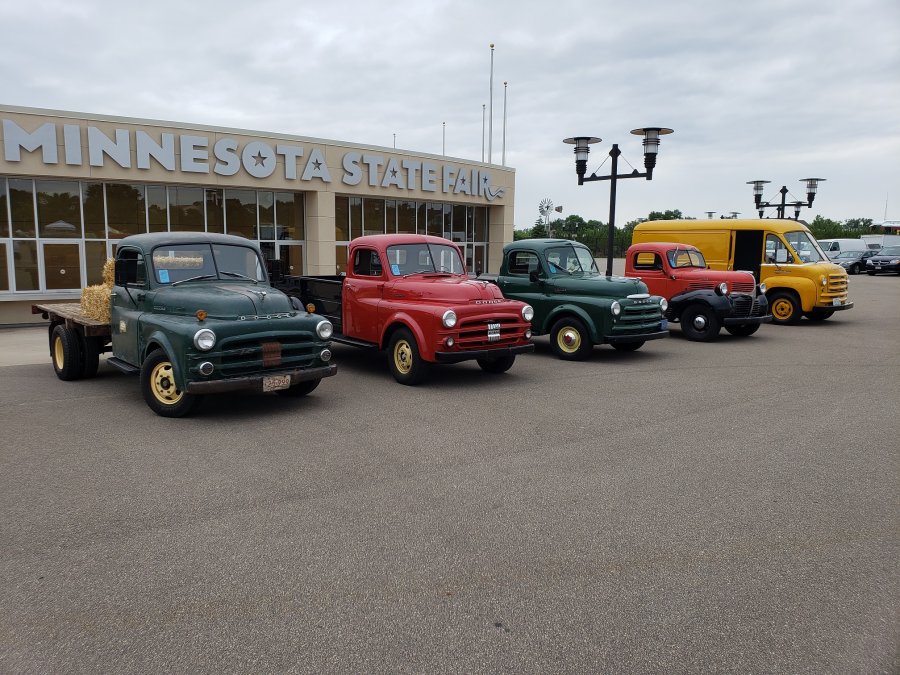
It was a great weekend. The weather decided to behave and we had a great Friday and Saturday, Sunday was pretty much a washout as it was POURING rain when I was ready to leave so we just drove by daily and hit up the swap meet. Good times seeing old friends, making new ones and having a fun. Below is a pic of the line up and of my drive in on Saturday...I downsized them so they'd load, if anyone would like a higher res version let me know.
 1 point
 -
Hello, The tires I installed years ago on the split rims are too wide to install. (Used 7.5x16instead of 6.5x16). As the hubs are off to replace all brake parts, I’m hoping it’s possible to re/re the lug bolts to accommodate the wider tires. The existing bolts are approximately 2”, and I’d need another 2” to make it work. Can we remove the existing and reinstall longer lug studs? Or do I have to change tire size back to original? Another common question I get is the possibility of swapping the rear end to ease up on the revs, maybe drive on a main road once in a while.. ive got rear stripped,( gas tank,running boards, lines, electrical) now grinding rust off frame, parts, etc . Got hubs to shop for turning, getting wheel cylinders,lines,hand brake assembly.,planning the flatdeck (steel frame, 2x6 Doug Fir decking) as no box available (its 9 ft). Gonna get it back to stock! Thank y’all, cheers, Dave in Squamish.1 point
-
NPT, I'm very impressed with you, and your parents! You should join the Detroit Region of the Plymouth Owners Club. This group is hosting the 2018 Grand National Meet this coming weekend (July 24-28) at the Four Points Hotel in Novi MI. This is right in your neighborhood! Walt1 point
-
Welcome NPT. It's great that you love the old ones. Does your school have an auto shop? They will fix cars for cost just to have something to work on. If your school doesn't maybe a tech school or collage nearby. Cheaper and way easier to switch to disc brakes. The transmission will do fine on the highway. You will need to find out what gear ratio your differential has. But most any of them will do 55 pretty easy.1 point
-
First off,congratulations on making an EXCELLENT pick! Simple,easy to work on (except the brakes),and reliable like a rock once you get it right. You are young,this is your first car,and nobody in your family has experience rebuilding cars,so keep it simple and focus on fixing what you have instead of modifying anything. Yeah,people selling stuff will tell you,"It's a little different,but simple to install!" Unless you are a mechanic at a NASCAR shop or some similar place,that is a lie. The truth is the original stuff is sometimes hard to remove and install. The suspension is fairly straight-forward and not that expensive to fix,but like the brakes,it is something that MUST be fixed before you start driving the car. New shocks aren't that expensive,and neither are new sway bar bushings. If your car doesn't have a sway bar,that means someone removed it in the past. Find one (they are cheap),put all new rubber on it,also cheap,and install it. At a MINIMUM install new front shocks and then install new rear shocks later. Pull the drums and redo the brakes. Be aware that pulling the rear drums is NOT the simple task it appears to be. Do a search here for rebuilding brakes and pay close attention to everything written before you even start. The next thing you need to do is post some photos here for us to look at. We LOVE these things and we love looking at photos of newly captured ones.0 points