Leaderboard


Popular Content
Showing content with the highest reputation on 09/22/2015 in all areas
-
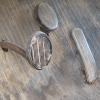
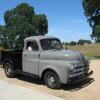
and manifold got mounted the other day. As I posted many years ago, I purchased a factory 2BB manifold from my good-buddy Ted and a NOS Stromberg WW from my good-buddy Reg and then proceeded to agonize for several years about the linkage issue. As everyone knows, these were primarily (exclusively?) used on MOPAR automobiles and not the trucks. The linkage is opposite on each type of vehicle. The carb is set up to accept the linkage coming across the head when used on the autos. On trucks the linkage comes up from the driver side and over the bell housing and attaches to the intake manifold. To solve this linkage problem I rotated the carb 180 degrees in order to get the linkage to line up with the throttle. This carburetor has a automatic choke that is activated by heat from the exhaust manifold. When I rotated it the choke housing wouldn't clear the cylinder head. I solved this by having a two-inch aluminum spacer made which raised the carb enough to clear the head (maybe I'll end up with some kind of ram effect...). All of that was actually the easy part. The hard part was trying to figure out the connection between the throttle linkage on the manifold (I had to tap the bosses like they are on the truck manifolds so I could use as much of the truck linkage as possible) and that on the carburetor. After I had actually produced a working mock-up and decide it would be the ticket, I started having doubts. So, I put it aside for about a year and a half. Apparently, that cleared my head enough to start thinking about a simpler design. Whereas my first model had an intermediate lever between the manifold linkage and the carburetor throttle with two activating rods, my new design is simply one steel rod (same diameter as stock) with a few appropriate bends in it. Everything worked off the truck with no hitches. It took another 8-9 months before I attempted to mount the thing, which I did a couple of days ago. I don't have the choke (as I'm running Fenton-type cast iron headers) or the poor man's cruise control hooked up but since I'm in sunny California where I've rarely used them, I figured it didn't matter. I may try and find a manual choke carb later. Anyway, I disconnected the coil wire and turned over the engine a few times in order to fill the float bowl. Reconnected the coil wire and turned it over. IT STARTED! I adjusted the idle speed a little and it purred like a kitten. I haven't had time to actually take it for a drive and make sure it'll work, but it doesn't leak at idle and the linkage doesn't bind up. Gettin' ready to fly back to Indiana and Ohio in the morning so I'll post some photos when I get back. Boy! Am I excited!4 points
-
I'd say you need a nice and clean unused new factory Autolite voltage regulator. Did you install a new OE Autolite regulator? Todays new replacement voltage regulators are not very reliable.2 points
-
Is there much, if any, difference between braided, or stranded, or whatever you call a wire with several small strands---- in electrical capacity and transmission ability.....compared to a single strand, heavier piece of wire? Hopefully that question makes sense. Am asking, of course, in regard to our old cars. I noticed that a lot (or maybe all) the wiring on my P15 is the "braided" or "stranded" type. Looking at a wiring diagram for a 1949 model Plymouth, it says wiring to dash illuminating bulbs is 16 gauge. It does not list wire gauges on my P15 manual diagram. I'm guessing that the new wires I installed for my dash lights are less than 16 ga..........so thinking of finding some new, clearly marked 16 ga wire to re-do them. And probably some other items that I've replaced along the way. I really should get a new wiring harness and call it good...... My car is still 6 volt. What might your thoughts be on this matter? Thanks.1 point
-
Merle, You should find this interesting. There is nothing in a voltage regulator that needs polarization. Note: Why do generators need to be "polarized"? Automobile generators need some magnetism to get started. This "residual" magnetism remains in the field pole pieces even after the engine has stopped. The next time the generator starts up, the residual magnetism creates a small voltage in the armature windings. Not enough to charge the battery, but enough to allow the field windings to draw current. As the field current increases, the pole pieces create even more magnetism. That makes even more voltage in the armature, and the cycle continues until the generator is capable of producing maximum output. Note: Voltage regulators do not need to be polarized -- they are not polarity sensitive. Even if voltage regulator came with instructions to polarize it -- these instructions actually polarize the generator, not the regulator. The regulator manufacturer simply wants to make sure that your generator will work properly so you don't blame the voltage regulator.1 point
-
from an engineering stand point ground straps are a crutch. You should have good ground thru the whole vehicle as it was designed. You also don't have to worry about ground loops.1 point
-
What does the axle have to do with the pinion seal?1 point
-
You can also power the lights through relays. This shortens the electrical path reducing resistance. It also takes a load off the headlamp switch. Speaking of the switch, there is a lot orfresistance in the stomp switch for highbeams. Make sure you check and clean those connections. Also cycling the switch about a dozen times will knock the crud off the interior contacts of the switch. If there is a fuse on the headlamp switch, make sure those connections are clean too.1 point
-
My ground strap went from the battery to a generator bracket bolt on the block. There was a smaller one (maybe 4 Ga.) that went from a starter bolt to a screw in the firewall. There was a third smaller one from the firewall to the dash near the radio, maybe 8 Ga. The 4th one went from the inner fender bolt holding the solenoid, through the loom, to the firewall & was just 10Ga. That wasn't the factory arrangement at all, but it worked well.1 point
-
Not sure about the need for extra ground straps......especially since you have a fresh engine and were apart recently. I have my ground cable from the battery to the top of the transmission cover. Never had any ground issues anywhere on the truck. I can see this happening on one that has sat undisturbed for a long time with lots of corrosion but you should have good clean mechanical connections. I think it is far more likely that you have either a loose wire connection or a bad terminal ...at maybe the ammeter? Hth. Jeff1 point
-
Yes, I believe they will all quit working after they burn up.1 point
-
Is it possible one of the new brushes is tight and sticking? I doubt that's the case, but I remember in the '70s, a friend who returned no fewer than 5 "rebuilt" starters to Kragen, because they would only work sporadically. Don't know what the trouble was, but it was a real ordeal for him.1 point
-
Make sure you have a good ground connection. When I have dim light I temporary run a ground wire from the battery to verify the circuit has a good ground.1 point
-
That is what I have on my 37.
 1 point
 -
For what it's worth: I had a similar problem but thought that my 5 year old Optima 6 Volt battery needed to be replaced. I removed a "suspect" quick disconnect battery terminal lead and installed two new solid brass terminals. I and was sure to wire battery brush both the battery terminals and new terminals. The difference in starting up was truly amazing. And yes I also have a ground strap from the engine block to the frame. Hank1 point
-
Reg: The bulb that was pictures is the wrong bulb. The correct bulb is a 2331 that is the PreFocus Buld that has the metal three pin setup. You can not use the 2330 bulb because on the 39 Dodge/Chrylser and Desoto the low/High filaments move from right to left in the buld and the 2330 move up and down. You could also put on a headlight 6v relay to help. Ye my headlight on my 39 Desoto are also not the great at night time. They did make a conversion kit but it takes away from the front end appearance of the car. You could also put on a sealed beam fog/driving lights off the bumper brackets. These are great cars for driving during the day time. Also there isa gentleman on the west coast that is anodizinf the reflectors and gives you a brighter reflection. write to me. I might still have the info at home. Rich HArtung Desoto1939@aol.com1 point
-
Looks like someone already quoted something from my web page, without attribution. Basic story: You need to get all the resistance out of the electrical system and get your reflectors clean. Then you should be able to swap the bulbs to quartz-halogen. http://www.ply33.com/Repair/lights1 point
-
http://www.amazon.com/s/?ie=UTF8&keywords=6+volt+halogen+bulb&tag=googhydr-20&index=aps&hvadid=64640854524&hvpos=1t2&hvexid=&hvnetw=g&hvrand=10524434209503896053&hvpone=&hvptwo=&hvqmt=b&hvdev=c&ref=pd_sl_5y1ikkfgou_b http://www.brattons.com/prodtype.asp?cookiecheck=yes&PT_ID=29&numRecordPosition=11&ph=&strKeywords=&&strSearchCriteria= Classic and Vintage Bulbs 82 Cumming Street Blackwood, South Australia 5051 Telephone: +61.8.8278.4393 Fax: +61.8.8278.4393 email: acpearson@chariot.net.au Halogen bulbs for classic and vintage cars. 25 Watt Quartz Halogen BulbsClassic and Vintage Bulbs has a 25 Watt quartz halogen bulb that is a drop in replacement for the number 1000 incandescent but claims to provides about 50% more light than the number 1000 lamp. This brings the light output up to 1960s-early 1970s standards. Classic and Vintage Bulbs also stocks a 35 Watt bulb which could bring total light output up to the low side of modern standards. This bulb would draw about the same as a 50cp bulb, so powering it with the stock 1933 or 1934 generator would be pushing things. If your night drive is at any speed and/or for any distance, you will run the risk of draining the battery. It would probably work acceptably in a P2 or later car.1 point
-
get halogen headlights. Them make them in 6 volt1 point
-
This should help.......
 1 point
 -
The regulator should be grounded by its mounting screws. Do you have a test light. it should light when powered and connected to one or both of the screws.1 point
-
To make sure that your regulator is grounded make sure that there is no paint under one of the mounting bolts heads and also no paint where the bolt touches the regulator flange . The mounting bolt itself should also be clean enough to ground itself to the firewall . The same procedure goes for your generator .1 point
-
There's a gillion things I'd like to do on both cars,....like wheel wells, interior and tunes on the Plymouth and cowl vent, interior and top on the Roadster. But,...road miles is one of my greatest pleasures, (along with fabrication). We'll see how long before I get the itch to bite off something almost more than I can chew. In the meantime, got the Roadster on the trailer this morning for the exhaust system (after a weekend thrash). Sunday evening, even 'tho I gotta ton of brass fittings, I'm frantically searching hardware and auto-parts stores, before they close, to find "the" fitting that leaked badly upon first fire. Got that resolved and several other surprise items by 10:00am today. Hoping for some serious road miles by week's end. - - -1 point
-
There might be a loose wire inside the generator. Probably rare, but it can happen. I'd still start with some jumpers to make temporary grounds.1 point
-
sorry, two checks. Check the output voltage with the engine both stopped and running. Check it at the battery terminal and also at the big wire on the generator. Check the ammeter readings both stopped and running. Basically you've done all that stuff already I believe. I had this happen once and everything looked fine, but charging voltage was a tad lower at the battery than at the generator. It turned out there was hidden corrosion on the generator wire, inside the terminal crimp, under the insulation. At idle it didn't make much difference, but at 3000 RPM you could really tell because the output was over a volt low.1 point
-
Wish I had a good answer for you but I skipped all this and put an single wire alternator on mine. I have a feeling though that it is going to be something relatively simple. Polarization or a bad connection. Something like that. You may have to check continuity on wires from one end of a connection to the other end. When you do find it treat it as a learning experience. It is much better than beating yourself up. Jeff1 point
-
The engine should always be ground-strapped to the frame. Also to the cowl for good measure, since the dash gets all its grounding by being screwed to the cowl. In any event, adding extra grounds is rarely a bad idea. When checking a charging problem I will first do the voltage/ammeter check & then put a 10 ga jumper wire from the generator case right to the base of the regulator, and check voltage & ammeter again. They nearly always go up a tiny bit because in the circuit I'm replacing cast iron with more conductive copper wire, but sometimes way up, because of a poor ground condition.1 point
-
Not entirely true. I just went through this with my local auto electric shop and my generator. We put the generator on the test bench and it tested out OK. I then brought in the regulator that had been on the truck and a new one. He hooked them up and tried it... nothing. Then polarized the Reg/Gen and it would attempt to charge. Then hooked up the new Regulator and tested it without polarizing and no charge. Polarized the new Reg and it charged good. So, if you are only polarizing the generator, and not the regulator, than why would the generator that was just polarized for the last regulator not work until the new regulator was polarized? Merle1 point
-
There is nothing in the regulator to polarize. If the generator needs to be polarized it is done at the regulator.1 point
-
Hmm... 1. Zero clutch free play 2. Noise disappears when trans is in reverse (not moving I presume?) 3. Slight noise when placed in High Fwd. (is that right at the moment it goes into gear and the clutch pedal is released?) 4. Noise reappears when driving. Sounds like your throw-out bearing is going bad and making noise since the clutch pedal/fork has it in contact with the clutch all of the time. When you are in Rev or Fwd and stalling the FD unit the clutch is not spinning, so it won't make any noise. In neutral, or when driving, the clutch is spinning against the bearing and it makes noise. Try adjusting the clutch linkage to gain some free play, and check that the throw-out bearing is pulling away from the clutch fingers when the pedal is released. You'll have to look from underneath with the clutch pan removed. Merle1 point