Leaderboard
Popular Content
Showing content with the highest reputation on 01/24/2023 in all areas
-
I haven't seen their kit before. They use a GM caliper that's often very badly misused. It's hard to tell from the picture, but on this one, there's at least a chance that the result is reasonably safe, although not exactly what that caliper needs to work as GM designed it to work. At least there's a caliper stop plate shown. The test for GM brakes with this caliper or similar GM calipers with the slider pins is this: Place a big C clamp over the outer pad and the back of the caliper. Tighten it down to "apply" the pads to the rotor. Try to turn the rotor to verify that you've got it stopped and locked down with the brake pads. Now pull out the slider pins and try to turn the rotor. If it turns further with the slider pins removed than it does with the slider pins installed, the kit is absolutely unsafe to use. It's using the slider guide pins to apply the braking force. Those pins aren't designed for braking force loads, they are only there to retain the caliper when the brakes aren't applied. If the caliper doesn't move with the pads clamped to the rotor and the guide pins removed, then it's at least somewhat safe. In all GM applications, the tab that stops the forward motion of the caliper is centered between the pads over the center of the rotor vents. That's so that stopping the vehicle doesn't put a twisting force on the caliper and it's mounting system. That's definitely not the case on this kit, but it's possible that at least it isn't abusing the pins to stop the car like a lot of other kits.2 points
-
I've installed those cheap "pulse type" pumps in several cars, mostly no-name units bought new off eBay. I did wear one out at about 5 years. All of those were for temporary use (back-up/priming/vapor lock days) but if I were looking for something in lieu of mechanical I'd go for something better. If you're running points, I'd say run it to the accessory side of your ignition switch so you can use it for priming without worrying about burning out them out. You could add a switch under the dash to turn it off...a good theft preventer, as well. If you're running an ignition that can be left in the run position, you could just wire it to that position.2 points
-
2 points
-
I think I found out what I did wrong. When I put the bakelite piston and the metal part that fits on the bottom of the piston in the cylinder, I did not align the contact with the button. I was about 90 degs off. So when I tried to screw the button shaft in, I put pressure on the fragile bakelite piston and broke a piece off on the tapered part. Luckily, I have two spare carbs with kickdown switches. One the them is missing the air horn, so I didn't know what year it was. I removed the throttle body so I could remove the kick down mechanism. I took out the button shaft and removed the bakelite piston. This bakelite piston contact assy. had a different design without the metal keeper at the bottom. I looked in my 1949 Dodge Parts manual and saw the one piece bakelite contact. I think it would work in my 48 DeSoto carb. So I'm going to try it. The trick to putting these kick down switches together is simply facing the contact toward the button shaft. I should have known that!1 point
-
Hi all, I'm looking for advice on a suitable 12V electric fuel pump that will replace the mechanical pump on my near standard 218 (25" block). It has a Langdon's HEI distributor and is 12V/neg earth, but everything else is pretty much standard. Pump will be mounted near fuel tank; my understanding is that it should be in the vicinity of 4-7 psi, but I'm not sure of the suggested flow rate? Pump will be sourced here in Australia for my 1948 D25 Dodge, so any recommendations would be appreciated. Thanks!1 point
-
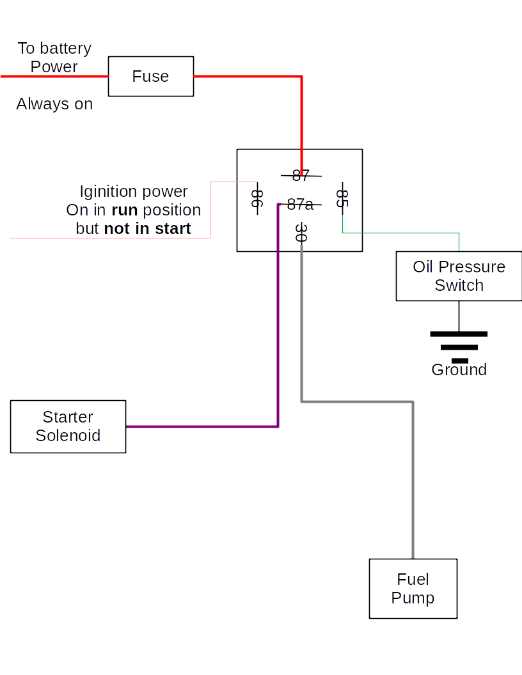
Whatever pump you go with, be sure when you wire it that you include a fuel pump relay or switch that cuts the pump off when the engine stops rotating. Your life may depend on it. I had a friend who had a street "beater" car that had been modified where the fuel pump ran whenever the key was on. He got into a moderate collision in that car and spent almost a year in the hospital with severe burns because the fuel pump kept running after the fuel line broke and was spraying fuel on his exhaust pipes. Other than the burns, he suffered a broken leg and a mild concussion from the impact. That's how I wire a 5 pin relay for a fuel pump. The purple wire provides power to the pump when the starter is actually cranking. This is for priming purposes to get the thing running. The gray (or pink) wire barely shows, but is on with the key in the "run" position to power the relay coil, and the oil pressure switch provides ground to the coil when there is oil pressure. When the engine stops, the oil pressure drops away and the pump stops running.1 point
-
Solar lights will be the way to go so I don't have to run power out there. Some of those clamp on lights that are advertised as flag pole lights would probably work.1 point
-
Sniper.......I stand corrected......I contacted Newport 20-25yrs ago and at the time was told that they used a cable operated wiper.........I was considering replacing the BMC cable wiper at the time but decided to stick with it..........although I do admit to purchasing a pair of wiper arms from Newport about 3 years ago to replace the BMC arms which had a few issues .....the Newport arms are top quality and so far have worked fine..........andyd1 point
-
I would suggest not using one of the inexpensive "Mr. Gasket" pulse type fuel pumps. I installed one on my car, and it failed after a few months. I replaced it with an Edelbrock rotary pump unit, and have no problems. I'm not certain what pressure the P15 carburetor likes, but I am not using a regulator, and the pump is feeding an Edelbrock 1406 carburetor (On a SBC). Seems to work just fine! I would also suggest wiring the pump through a Ford inertia switch, that will shut off the pump in the event of a collision. They are easy to find in Ford Explorers, and Rangers at your local "Pick & Pull".1 point
-
Check out Restoration Specialities. I used them on my '40 wagon and was very satisfied. Check out page 115 from their catalog for different types of windlace. Mine has a woven look and is color-matched to my interior.1 point
-
Early last Spring i was picking up some manure and ran across this model AA. I spoke with a man at the property and he said they decorate it up at Xmas which explains the remnants remaining in the pictures. On my way home with a full load of prime aged crap I spotted a second piece of vintage art of a slightly newer model I believe out on a corner lot not more than a mile from the first one.1 point
-
I played with the button when I took mine apart, and I stopped at some level around there I recall there was some bakelight piece in there I didn't want to forever disturb. The button itself is spring loaded from what I remember, and it connects to the electrical kick down connection to force the fluid drive to downshift (there are some aftermarket versions that do it from the column too). The pushbutton assembly will push down on its own before full reassembly. it's a clever mechanical to electrical connection. Maybe a short video or some pictures would help understand the state of yours.1 point
-
LOL, you'll get use to that to the point that as you're working you start to feel something sticky on your hand only to find out it's blood. You can then be like OJ Simson and say I don't know how I cut myself. I do it all the time'.1 point
-
You need about an inch and a half of free play at the top of the pedal's travel. In other words you must shorten the actuation rod to introduce the required slack. Also assure your mc isn't over filled and the cap vent is clear. This assumes your rubber brake lines are new and not rotted out. Old lines can collapse internally allowing fluid to pass when the brakes are app.ied, but not allow return flow when released.1 point
-
I had this problem. The more I drove the car the higher the pedal was almost like having Power Brakes. If I left it a day it would be normal until I started using it again. I readjusted the master cylinder free play and the problem went away.1 point
-
IF the thermometer readings do not resolve the issue - ie inaccurate gauge, then look to the thermostat. Many do not actually open at the temp specified. I always check them on the stove with a good thermometer, I rarely find any that open at their specified temp. usually 10-15 degrees higher.1 point
-
160 is an appropriate thermostat for a 49. 180 should really be used in a pressurized cooling system. Everybody knows water boils at 212 at sea level without any more than atmospheric pressure. No matter how much heat you put to a pan of water it will stay at 212, until you run out of water. The water evaporating cools the pan and keeps the water at 212. Use 50/50 coolant and the boiling point goes higher. Add a pressure cap and for each pound of pressure the boiling point goes up 2 degrees. So on the cars I used to work on the red area of the gauge was where the coolant boiled, 265 degrees! According to the factory 264 was okay. There’s a few things one needs to know about cooling systems: When you shut down an engine it gets hotter. The coolant is no longer circulating. When you’ve boiled off coolant the temp gauge will read lower because it is no longer covered with coolant which it needs to read correctly. Air in a cooling system will prevent it from working correctly. Robinaire (among others) makes a device which places your cooling system under vacuum, then if the vacuum holds you can open a valve and fill the system from a tube in a bucket. This gets all the air out and is useful for vehicles with complex hard to bleed cooling systems. Some times a mechanic will drill a small hole in a thermostat in order to induce a flow past the wax bulb. I used to do this when I noticed that engines would get hot well before the thermostat opened. The coolant under the thermostat was stagnant and didn’t get hot when the car sat idling. I’ve seen temp gauges peg before the thermostat opened. Just a small hole stopped that problem. Anti-freeze is made from the same chemicals as brake fluid and smells exactly the same when burned in the engine. A white cloud following you in addition to the smell is a good indication of a blown head gasket or a power brake master cylinder leaking. I once had both happen to the same car.1 point
-
FYI. Have you ever noticed how little jobs just domino into bigger jobs? Happen to me this evening. Wanted to remove the steering column mount from the dash of my 48 Dodge. Simple enough, two little 5/16" bolts up under the inside of the dash, one come right out but the other one won't come out, it hits the speedometer. The only thing to do was remove the speedometer. Two studs with nuts at about 5 o'clock and 7 o'clock, remove them but the speedometer won't come out. Its still secured at the top but I can't figure out why. Long story short the socket for the high beam indicator light screws onto the back of the turn signal/high beam indicator and secures the speedometer into the dash. Just in case anyone needs to do this maybe they won't remove half the dash like I did. Live and learn.1 point


