Cudan Posted July 1, 2017 Report Share Posted July 1, 2017 burrowing the millers tools would be nice, but i think Desoto 1939 wont ship them to the Netherlands Dan Quote Link to comment Share on other sites More sharing options...
JOHN EDGE Posted July 4, 2017 Report Share Posted July 4, 2017 Hope you consider doing the shock relocation looks like you're doing things right and it's a good improvement for very little money. Fatman has the mounts and the recommended upgrade shock part number. Felt the difference in my wagon Quote Link to comment Share on other sites More sharing options...
48ply1stcar Posted July 4, 2017 Author Report Share Posted July 4, 2017 10 hours ago, JOHN EDGE said: Hope you consider doing the shock relocation looks like you're doing things right and it's a good improvement for very little money. Fatman has the mounts and the recommended upgrade shock part number. Felt the difference in my wagon You are the fourth person to ask/recommend a shock relocation. I have searched this site and I have only found questions and or problems with installations. I searched Fatman's site, I didn't find a the mounts, except a mention that they were included in as part of a kit. I did find a F-1 truck relation part at Speedway, but the comments here seam to question the longer or shorter shock and the fact that the longer shock makes the car "bottom out". In my search of this site of I have yet to find someone who has shown or listed parts of a relocation they are happy with. I'll try again to search http://www.fatmanfab.com again. Quote Link to comment Share on other sites More sharing options...
RNR1957NYer Posted July 4, 2017 Report Share Posted July 4, 2017 RustyHope lists shock relocation arms for all independent MoPar car (not truck) front ends. Charlie Akers is a good guy - I bought a dual exhaust dump kit from him a couple years back - he sent it quickly. Quote Link to comment Share on other sites More sharing options...
casper50 Posted July 4, 2017 Report Share Posted July 4, 2017 I've done relocation on my 47 Dodge. I'm happy with it. Bought the shock mount from an already mentioned seller. $50 for 2 pieces of 3/8ths steel about 5 inches long. Wouldn't buy them if I'd seen a photo of them first. Could have made them far cheaper. I sent someone a digital drawing of the piece. I added the flat part that goes against the frame. 1 Quote Link to comment Share on other sites More sharing options...
JOHN EDGE Posted July 4, 2017 Report Share Posted July 4, 2017 Easy to duplicate the shock mount and then wire weld them in place. Fatman uses a late 70's truck shock Quote Link to comment Share on other sites More sharing options...
48ply1stcar Posted July 4, 2017 Author Report Share Posted July 4, 2017 5 hours ago, casper50 said: I've done relocation on my 47 Dodge. I'm happy with it. Bought the shock mount from an already mentioned seller. $50 for 2 pieces of 3/8ths steel about 5 inches long. Wouldn't buy them if I'd seen a photo of them first. Could have made them far cheaper. I sent someone a digital drawing of the piece. I added the flat part that goes against the frame. When I saw the part on-line I thought it was a steel stick with a hole in it. Thanks for the picture. I think I would lean toward the F-1 Ford bracket. What shock are you using? Quote Link to comment Share on other sites More sharing options...
casper50 Posted July 4, 2017 Report Share Posted July 4, 2017 Don't remember I bought them 2 years ago. I just measured the movement from full stop to full open and bought one that fit that distance. Quote Link to comment Share on other sites More sharing options...
48ply1stcar Posted July 4, 2017 Author Report Share Posted July 4, 2017 2 hours ago, JOHN EDGE said: Easy to duplicate the shock mount and then wire weld them in place. Fatman uses a late 70's truck shock I couldn't find it on Fatman so I sent a email. Also would like to know what shock they recommend. Quote Link to comment Share on other sites More sharing options...
Don Coatney Posted July 4, 2017 Report Share Posted July 4, 2017 F-1 brackets and as I understand some Dodge trucks also used these brackets. Quote Link to comment Share on other sites More sharing options...
48ply1stcar Posted July 4, 2017 Author Report Share Posted July 4, 2017 Thanks everybody. When I think I finally got it (F1 relocation bracket) there is a 51/2" and a 61/2" bracket.) lthough it looks like there is a couple of NAPA shocks that fit. Quote Link to comment Share on other sites More sharing options...
48ply1stcar Posted July 14, 2017 Author Report Share Posted July 14, 2017 On 6/29/2017 at 1:13 PM, Don Coatney said: Same color as your table Never realize my picnic table was "self-etching primer green" 1 Quote Link to comment Share on other sites More sharing options...
48ply1stcar Posted July 14, 2017 Author Report Share Posted July 14, 2017 Installed the bushing on the lower and upper control arms,and then onto the car. Of course you might be able to tell I installed the mounting bar upside down the first time. Installed the upper portion of the steering knuckle to the upper control arm. Feeling good about this. The I realize that I have to install the bushing in the lower mount of the steering knuckle in much the same manner as the other bushings. Has any one notice that the service manual doesn't even mention this bushing in the re-assembly, or did I totally miss that. To install the bushing I'm using the pin and nut to center the bushing at first. I've got it started and heading back the garage to continue to drive it on. Also I noted that the bushing and the bolt both enter from the same side. Please say something if you see something wrong I feel like I'm bursting my cherry, first time doing this on a car that I've had for 49 years. Quote Link to comment Share on other sites More sharing options...
48ply1stcar Posted July 15, 2017 Author Report Share Posted July 15, 2017 (edited) Well I just spent part of yesterday and a hour today putting the wrong seals in the wrong places, I think. I put the rubber seal with nut cut-out (mark 29A) on the eccentric bushing in place of the seal 16A. All of the time wondering how the camber can be adjusted with a rubber seal on the bolt head of the bushing. and I switched 16B and 29B and and walked away wondering why the bushing isn't tight. The seal I used for the eccentric bushing was the old seal because I couldn't get the new one to stretch over the bushing. Also, it looks like 29A fits over bushing #31. Looks like I finally put the right seals in place. If nothing else this group can always use me as a bad example. The last picture is a little blurry, I can feel a little room for grease. Edited July 15, 2017 by 48ply1stcar added info Quote Link to comment Share on other sites More sharing options...
48ply1stcar Posted July 15, 2017 Author Report Share Posted July 15, 2017 I measured the with of the outer - upper control arm noted a C - 3 1/8 inches, mine is at 3 1/16" hope it's find. Apparently I can't be too anal. Quote Link to comment Share on other sites More sharing options...
Andydodge Posted July 16, 2017 Report Share Posted July 16, 2017 I posted on another thread about this but as follows............re the upper outer bush, pin & seals the seals themselves you look at the pic of the shop manual are "tubes" that squash and do NOT have that HEX indent........the upper seals essentially can be replaced by large O rings which are much easier to install and in fact if you look closely at "Fig 2" above you'll see what appears to be "O" rings on either side of the bush.........btw lock bolt #20 in the shop manual pic will not allow a new bush to fit unless its removed first NOW, that rubber seal with the large HEX is ONLY for the lower fixed bush head that goes thru the hole in the lower spindle........there are sometimes found 2 different size hex heads on this part depending I think on the brand of part so make sure that you keep that hex indented rubber..........the other side of this metal bush uses a circular rubber with a round indent that fits over the protruding part of this bush when its fully screwed into the lower spindle......with both Hex and Round seals in place it is a tight fit into the lower outer A arms then screw the pin in the assemble it................... Does this all make sense?...........lol.........hope it helps........Andy Douglas 1 Quote Link to comment Share on other sites More sharing options...
48ply1stcar Posted July 16, 2017 Author Report Share Posted July 16, 2017 OK, but it's already tomorrow there. So I'll have to wait until tomorrow to see if I understand. Thanks for your comments. By the way if the top bushing still has play after it is grease I'll have more questions. Quote Link to comment Share on other sites More sharing options...
Andydodge Posted July 16, 2017 Report Share Posted July 16, 2017 If you have used new parts then the only play should be the minimal tolerance to allow grease to move thru the gap..........as for tomorrow......isn't it yesterday, today?..........oops......theres my corner....better go............andyd Quote Link to comment Share on other sites More sharing options...
ptwothree Posted July 16, 2017 Report Share Posted July 16, 2017 7 hours ago, 48ply1stcar said: OK, but it's already tomorrow there. So I'll have to wait until tomorrow to see if I understand. Thanks for your comments. By the way if the top bushing still has play after it is grease I'll have more questions. I just did mine last week. The upper had some play that disappeared after I tightened up the pinch bolt. Quote Link to comment Share on other sites More sharing options...
48ply1stcar Posted July 18, 2017 Author Report Share Posted July 18, 2017 (edited) Finished the driver's side today and should have taken more pictures. Went together easier than I anticipated. Used two putty knives to side in the support bushing. Bled the brake and took it for a ride, only a mile round trip. Before I re-installed the brake I looked at the spinal and now I can't wait to get disc brakes. I'll start the passenger side the day after tomorrow. It's been hot, humid, and stormy. Can't wait to start again. Edited July 19, 2017 by 48ply1stcar Quote Link to comment Share on other sites More sharing options...
48ply1stcar Posted July 19, 2017 Author Report Share Posted July 19, 2017 Started the passenger side. Bushing aren't as bad. Considered not doing this side at this time. Disassembly much faster this time, now the cleaning sandblasting and painting. That seems to take the time and re-assembly should be faster this time. Imagine this is old hat for most of you, but it's my first time ever doing anything like this. Removed brake drum and back plate in one. The only thing that felt like it was worn was the inside lower bushing and the king pin. Quote Link to comment Share on other sites More sharing options...
48ply1stcar Posted August 4, 2017 Author Report Share Posted August 4, 2017 Done with passenger side. Just few things, bleeding brakes, two tie-rod ends, and reinstall sway bar. Hopefully driving the church Sunday. Quote Link to comment Share on other sites More sharing options...
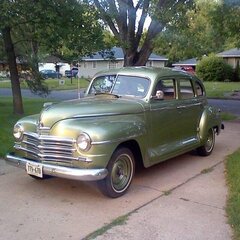
48ply1stcar Posted August 5, 2017 Author Report Share Posted August 5, 2017 (edited) BEFORE AFTER Edited August 5, 2017 by 48ply1stcar WORDING Quote Link to comment Share on other sites More sharing options...
medium_jon Posted August 5, 2017 Report Share Posted August 5, 2017 Looks like it sits higher up front. Agree? Quote Link to comment Share on other sites More sharing options...
48ply1stcar Posted August 5, 2017 Author Report Share Posted August 5, 2017 Should be a little higher in the rear also. Considering the rear springs were bent the wrong way. Actually, the rear springs were handle-bar mustache shape. 1 Quote Link to comment Share on other sites More sharing options...

Recommended Posts
Join the conversation
You can post now and register later. If you have an account, sign in now to post with your account.