M.Klapp Posted February 14, 2017 Report Share Posted February 14, 2017 Hey Guys, Been doing a bunch or research and have come up with a plan of attack, and figured I'd run it by you guys to get some input, suggestions or giggles . 1. Suspension check: Shackles, Shock and Bushings, replace as needed. Pretty sure the springs are ok, but will give em the once over as well. 2. Brake check: M/C (rebuild or replace), Replace flex lines, shoes and hardware, check brake cylinders & drums. Flush system and new fluid. - Little intimidated by the brakes, not familiar with this type of drum set up. Heard it can be a nightmare. 3. Engin: a.) Pull Plugs and pour in some MMO in each cylinder. b.) Rebuild/replace carb and gaskets. c.) Pull oil pan and check bottom end. d.) Spin motor to see how free we are. e.) Drain gas and replace rubber lines. f.) Check radiator to see if it holds pressure (not sure how I'm gonna do this yet) and replace coolant hoses and coolant. g.) Petrtonix ignition upgrade. h.) 6v Alternator 4. Chassis check: Rust, damage and other potential issues 5. New battery, probably Optima, but open to suggestions. 6. Gauges: speedo is shot (missing needle) and need to check the others. Any advise on how/where to get the speedo fixed? 7. Wheels & Tires: No clue yet, but would like a little more rubber. 8. Lights and wiring check/replace. Any thing I'm missing? Any comments on the order above, should one thing come before another? Thanks, M 1 Quote Link to comment Share on other sites More sharing options...
Young Ed Posted February 14, 2017 Report Share Posted February 14, 2017 The speedo needle is mounted via a clear plastic disk. Typically the disk shrinks and crumbles and then the needle is laying in the bottom. You can buy a new disk from a few places and put it back together. Quote Link to comment Share on other sites More sharing options...
M.Klapp Posted February 14, 2017 Author Report Share Posted February 14, 2017 6 minutes ago, Young Ed said: The speedo needle is mounted via a clear plastic disk. Typically the disk shrinks and crumbles and then the needle is laying in the bottom. You can buy a new disk from a few places and put it back together. That appears to be the case. Was wondering how that got like that. m Quote Link to comment Share on other sites More sharing options...
Young Ed Posted February 14, 2017 Report Share Posted February 14, 2017 Here's what it should look like. The trickiest part of the entire process is getting the two pieces of that little center disk apart. Quote Link to comment Share on other sites More sharing options...
M.Klapp Posted February 14, 2017 Author Report Share Posted February 14, 2017 Looks like its gonna be fun. M Quote Link to comment Share on other sites More sharing options...
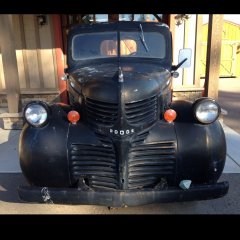
jeffsunzeri Posted February 14, 2017 Report Share Posted February 14, 2017 Sounds like you've got all the systems covered. Based on the photo of the dash area, I'd change around the order of things to put the wiring system either first or just after freeing the motor. It looks like there are some serious modifications that ought to be addressed with the customized wiring job. 1 Quote Link to comment Share on other sites More sharing options...
M.Klapp Posted February 14, 2017 Author Report Share Posted February 14, 2017 4 hours ago, jeffsunzeri said: Sounds like you've got all the systems covered. Based on the photo of the dash area, I'd change around the order of things to put the wiring system either first or just after freeing the motor. It looks like there are some serious modifications that ought to be addressed with the customized wiring job. Good point. There's def some "home mechanic'n" going on in there. M Quote Link to comment Share on other sites More sharing options...
Jerry Roberts Posted February 14, 2017 Report Share Posted February 14, 2017 Be very careful when putting pressure into the radiator . Some of these old radiators were zero pressure systems . I have read of making a pressure test system using a bicycle tube . Cut the tube in half and attach each end of the tube to each outlet / inlet of the radiator and plug the fill spout . Inflate the tube and submerge the radiator and look for bubbles . 1 Quote Link to comment Share on other sites More sharing options...
Merle Coggins Posted February 14, 2017 Report Share Posted February 14, 2017 When you add MMO to the cylinders, you may need a small plastic tube to get the oil to the pistons. The valves are directly below the spark plugs. If you just dump it down the spark plug holes it will just dump into the intake or exhaust manifolds if any valves are open. With a thin plastic tube, or hose, you can fish it past the valves to ensure it gets into the cylinders. Quote Link to comment Share on other sites More sharing options...
M.Klapp Posted February 15, 2017 Author Report Share Posted February 15, 2017 2 hours ago, Jerry Roberts said: Be very careful when putting pressure into the radiator . Some of these old radiators were zero pressure systems . I have read of making a pressure test system using a bicycle tube . Cut the tube in half and attach each end of the tube to each outlet / inlet of the radiator and plug the fill spout . Inflate the tube and submerge the radiator and look for bubbles . That's really good to know. Might just flush the system and go with straight H20. If its good, I'll drain it and add the antifreeze, if its shite, I'll pull it and send it out for repair. Thank you! 1 hour ago, Merle Coggins said: When you add MMO to the cylinders, you may need a small plastic tube to get the oil to the pistons. The valves are directly below the spark plugs. If you just dump it down the spark plug holes it will just dump into the intake or exhaust manifolds if any valves are open. With a thin plastic tube, or hose, you can fish it past the valves to ensure it gets into the cylinders. Nice trick! Thanks Merle. 1 Quote Link to comment Share on other sites More sharing options...
M.Klapp Posted March 28, 2017 Author Report Share Posted March 28, 2017 OK Guys, We made it home a couple weeks ago, after a pretty uneventful trip, save for some crap winter weather. Haven't done anything yet, still in the research phase, but I am officially stumped. Today I went out to figure out what oil filter I was going to need and have officially fallen down the rabbit hole. Seems that its a Fram filter housing with an AC P-115 Filter (seems I need a Fram C4 or C4P replacement, current me if I'm wrong). Then I took a closer look at the motor to see what we had and that's where the bottom fell out of this hole. It's clearly not the 218 that would have come from the factory, but there are no identifying #s on this thing anywhere. Appears to be a 25" motor (measures 25.25"). Head has the # 1313825-2 cast into it, and a tag with a 12-20. Intake manifold has a 1121704-7 cast into it. I'm guessing this is a reman of some sort that would have had and ID Tag, but said tag has vanished like a fart in a stiff breeze. Any ideas or suggestions on how to ID this bad boy? Thanks, M Quote Link to comment Share on other sites More sharing options...
M.Klapp Posted March 28, 2017 Author Report Share Posted March 28, 2017 Quote Link to comment Share on other sites More sharing options...
49D-24BusCpe Posted March 28, 2017 Report Share Posted March 28, 2017 Mr. Klapp, I personally think that you're a 'lucky camper' with your long-block engine! With those part numbers, your engine is most likely a 251" or 265". The easiest way to identify if it is a 265", is to pull the fuel pump. If the connecting rod bolts have flat nail heads, you've hit the 'jackpot' - it's a 265! Walt Quote Link to comment Share on other sites More sharing options...
M.Klapp Posted March 28, 2017 Author Report Share Posted March 28, 2017 14 minutes ago, 49D-24BusCpe said: Mr. Klapp, I personally think that you're a 'lucky camper' with your long-block engine! With those part numbers, your engine is most likely a 251" or 265". The easiest way to identify if it is a 265", is to pull the fuel pump. If the connecting rod bolts have flat nail heads, you've hit the 'jackpot' - it's a 265! Walt Thanks Walt! Can you tell me what you mean by nail heads? I also have a horoscope, I plan to send into the oil pan or down the fill for a look see. M Quote Link to comment Share on other sites More sharing options...
49D-24BusCpe Posted March 28, 2017 Report Share Posted March 28, 2017 M, The head of the bolt is flat and round, shaped just like a nail. Not like a typical rod bolt fastener. Good luck! Walt Quote Link to comment Share on other sites More sharing options...
M.Klapp Posted March 28, 2017 Author Report Share Posted March 28, 2017 Thanks, I'll keep you guys posted. M Quote Link to comment Share on other sites More sharing options...
jeffsunzeri Posted March 28, 2017 Report Share Posted March 28, 2017 Look on the left side of the block, up front, above the generator for the engine number. It will tell you how this started out. The big motor gives you lots of options! You lucked out. Quote Link to comment Share on other sites More sharing options...
M.Klapp Posted March 28, 2017 Author Report Share Posted March 28, 2017 (edited) 11 minutes ago, jeffsunzeri said: Look on the left side of the block, up front, above the generator for the engine number. It will tell you how this started out. The big motor gives you lots of options! You lucked out. Hey Jeff, The raised spot the # is supposed to be is blank. Top and side. Edited March 28, 2017 by M.Klapp Quote Link to comment Share on other sites More sharing options...
M.Klapp Posted March 28, 2017 Author Report Share Posted March 28, 2017 (edited) Ok, found another # low down on the block, under the starter: 1138129. Its official, its a 251, and I'm a pretty happy dude Edited March 28, 2017 by M.Klapp Quote Link to comment Share on other sites More sharing options...
M.Klapp Posted March 28, 2017 Author Report Share Posted March 28, 2017 (edited) Scroll down to page 8 (page number #16) and the # above references to the 251 http://www.enginepartswarehouse.com/enginecatalog/CHRYSLER-DODGE.PDF Edited March 28, 2017 by M.Klapp Quote Link to comment Share on other sites More sharing options...
RobertKB Posted March 28, 2017 Report Share Posted March 28, 2017 Probably a Jasper engine rebuild as they were painted green. Quote Link to comment Share on other sites More sharing options...
M.Klapp Posted March 28, 2017 Author Report Share Posted March 28, 2017 Hey Robert, it appears to be just the head that's green. Block is more grey/white. M Quote Link to comment Share on other sites More sharing options...
BobK Posted March 29, 2017 Report Share Posted March 29, 2017 M. Klapp The only way you can be sure of the cubic inches, is to measure the stroke. You can do this very easily by using a long thin stick or stiff wire. There will be a small hex head pipe plug on the cylinder head between spark plug #6 and the firewall. Removing the plug will allow you to place the stick on top of the piston and by rotating the engine by hand, you can measure how much the stick moves up and down, and thus determine the stroke. Since the engine is not original to the truck and maybe has been rebuilt a time or two, you can't be sure of what crank and rods are in that block now. I have been fooled twice in my effort to find a 265 for my 46 pickup. Wanna trade? Looks like a really nice truck. I would like to see a few pics of the front motor mount area and radiator support to see how they moved the radiator forward and such to fit the long block in. Did they notch the front cross member for pulley clearance? I may be in Mooresville at some point for a visit to relatives and looking at an old truck might be better than staring at a new baby. Quote Link to comment Share on other sites More sharing options...
M.Klapp Posted March 29, 2017 Author Report Share Posted March 29, 2017 27 minutes ago, BobK said: M. Klapp The only way you can be sure of the cubic inches, is to measure the stroke. You can do this very easily by using a long thin stick or stiff wire. There will be a small hex head pipe plug on the cylinder head between spark plug #6 and the firewall. Removing the plug will allow you to place the stick on top of the piston and by rotating the engine by hand, you can measure how much the stick moves up and down, and thus determine the stroke. Since the engine is not original to the truck and maybe has been rebuilt a time or two, you can't be sure of what crank and rods are in that block now. I have been fooled twice in my effort to find a 265 for my 46 pickup. Wanna trade? Looks like a really nice truck. I would like to see a few pics of the front motor mount area and radiator support to see how they moved the radiator forward and such to fit the long block in. Did they notch the front cross member for pulley clearance? I may be in Mooresville at some point for a visit to relatives and looking at an old truck might be better than staring at a new baby. Hey Bob, I was thinking the same thing when RobertKB mentioned the green motors were Jasper rebuilds, but only the head is green. Block casting is still leaning me toward 251, but like you said, no telling what the crank/rod combo is. I think I'll try your trick. As for the placement of the motor, I'll grab some pics tomorrow (attached is the best one I have so far). I will say that this thing is on the firewall, maybe 3/16"-1/4" of clearance. And, the trade, sorry, no can do. This is my dad's truck (technically mine now, but will always be his) will be with us for as long as I have anything to say about it. But, hell yeah, come'on by! Would love to show her off and get some opinions/advice/knowledge. Feel free to PM me and we'll exchange some contact info. M Quote Link to comment Share on other sites More sharing options...
M.Klapp Posted March 29, 2017 Author Report Share Posted March 29, 2017 Hey Guys, Here are the pics of the motor in the truck. Lower Rad support is definitely relieved for the pulleys and the side brackets look like they're pushed back, and like they front edge (closest to the camera) has been cut. You can see how close this thing is to the firewall too. It doesn't clear by much. M 1 Quote Link to comment Share on other sites More sharing options...

Recommended Posts
Join the conversation
You can post now and register later. If you have an account, sign in now to post with your account.