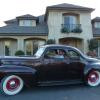
Bmartin Posted May 14, 2015 Report Share Posted May 14, 2015 Just a last picture before I tear her down. I guess I’ll start this thread to show my progress, or lack there of. I’m slow and have too many passions in life so this won’t be quick. My goal for this stage is a swap to a 230 with an overdrive tranny. I’m converting to 12 volts and refreshing/repairing a few things along the way. Oh, and lots of degreasing. In preparation for the engine pull I checked the compression on the existing engine. All cylinders were around 65 psi according to my gauge. So I’m questioning my gauges accuracy because I thought an engine wouldn’t even run at that low of a compression. I started by taping all the edges of the front end and pulling the hood. I don’t have anywhere to store the complete front clip so its coming off in pieces. That way it fits in the house. The wife is thrilled. Off with the rest. The next step was to get the steering gear out for a rebuild. That dang steering wheel will not budge! I used a small puller, no luck. Tried the bearing puller, split the stock nut. Now I’m trying this contraption with no luck. Soaking and letting it sit each night. Wondering if I am going to have to cut it off. I’ve got a 49 deluxe wheel coming from the bay that I hope will work (and be as good as the pictures). I removed and disassembled the heater box. Anyone know a good way to get the fan off the motor post? I removed the set screw and it won’t budge. Currently soaking in PBblaster. I took a wire wheel to the bell housing to get the grease/rust/paint off. This will be gloss black when finished. Anywhere to pick up new mesh inserts? I know no one will see it, but I’m OCD like that. And just a pick of a junkyard find. I love this dash. 33 desoto. The cluster may end up in the 40 someday if it’s salvageable. For now it’s destined for garage art. 3 Quote Link to comment Share on other sites More sharing options...
46Ply Posted May 14, 2015 Report Share Posted May 14, 2015 Beautiful car! I'll definitely be following your progress. Thanks for posting. Quote Link to comment Share on other sites More sharing options...
deathbound Posted May 15, 2015 Report Share Posted May 15, 2015 Ditto what 46Ply said! Quote Link to comment Share on other sites More sharing options...
40plyrod Posted May 15, 2015 Report Share Posted May 15, 2015 Cool, gonna take a nice car and make it nicer I keep watching. Quote Link to comment Share on other sites More sharing options...
Bmartin Posted May 15, 2015 Author Report Share Posted May 15, 2015 Well I managed to break my bearing puller and the steering wheel has not budged. Any ideas?? Quote Link to comment Share on other sites More sharing options...
LAKOTA169 Posted May 15, 2015 Report Share Posted May 15, 2015 Well I managed to break my bearing puller and the steering wheel has not budged. Any ideas?? https://www.youtube.com/watch?v=hHXK2t50S-8 Quote Link to comment Share on other sites More sharing options...
Bmartin Posted May 15, 2015 Author Report Share Posted May 15, 2015 (edited) https://www.youtube.com/watch?v=hHXK2t50S-8 Nice One! I got the fan blade off by taping it further on with a socket and then using emory cloth to clean up the shaft. Slipped right off. I got the heater completely apart and its ready to powder coat. I picked up a harmonic balancer puller, but the spacing is too wide for the bolt holes. I also picked up a 3 jaw puller, gonna try that tomorrow. That steering wheel is coming off! I got the seat loose, but need to move the engine to get it out. Then I'll have room to lie down and label all the wires for gauge removal. I need to get the speedo and temp gauge rebuilt. May have someone take a look at the oil pressure gauge for accuracy. Would also prefer a voltmeter, still thinking on that one. The crate builder comes tomorrow to take measurements for the engine and transmission. Then I can start taking off all the parts I'll need for cores. Edited May 15, 2015 by Bmartin Quote Link to comment Share on other sites More sharing options...
mrwrstory Posted May 15, 2015 Report Share Posted May 15, 2015 I need to get the speedo and temp gauge rebuilt. May have someone take a look at the oil pressure gauge for accuracy. Would also prefer a voltmeter, still thinking on that one. I retained the original face and had my amp meter converted to a volt meter by Red Line Instruments. Quote Link to comment Share on other sites More sharing options...
Bmartin Posted May 15, 2015 Author Report Share Posted May 15, 2015 (edited) I retained the original face and had my amp meter converted to a volt meter by Red Line Instruments. Thanks, any chance you could post up a picture? Did they change the numbers on the face or just retain the ammeter face but change the gauge to a voltmeter? Edited May 15, 2015 by Bmartin Quote Link to comment Share on other sites More sharing options...
Bmartin Posted May 16, 2015 Author Report Share Posted May 16, 2015 Success! Finally got the steering wheel off. Thanks to Deathbound for showing me the proper puller. Turns out I had one, but the casting was a little off. I could not get the bolts to line up because they wouldn’t slide all the way in. A little file work and I got all three to line up. Then another big thanks to Suntennis. He had similar issues and when he took it to a shop, they used heat to break it loose. The key was that his steering wheel did not suffer any major damage. So with the puller under tension, I slowly heated up the center section with a torch. I did it in stages to limit the charring of the wheel. Then after it was heated up, I hit it a few times with a rubber mallet from the back. Wah La!. The steering wheel suffered some charring on the inside, but it will all be covered up when the horn button goes back on. 1 Quote Link to comment Share on other sites More sharing options...
Mopar Mick Posted May 16, 2015 Report Share Posted May 16, 2015 Very nice looking ride. I am doing up a 1940 Chrysler Coupe (C25). I love the shape of this era Coupe. I have a 318 Poly and a "push button"gear selector 727. Keep up the good work. Mick. 1 Quote Link to comment Share on other sites More sharing options...
Bmartin Posted May 17, 2015 Author Report Share Posted May 17, 2015 Mick I agree, the early 40's have their own look that works for me. Sounds like a cool build. Today was one of those days where everything just kept getting in the way of me making progress. I did get the frame cleaned up and got a coat of primer on it. I'll shoot some gloss black on it tomorrow. I need a nice backdrop for the new powerplant. Quote Link to comment Share on other sites More sharing options...
Bmartin Posted May 17, 2015 Author Report Share Posted May 17, 2015 Sometimes a frustrating day needs to be tempered by the nectar of the Gods. Quote Link to comment Share on other sites More sharing options...
Bmartin Posted May 18, 2015 Author Report Share Posted May 18, 2015 I go the frame all painted up today and started stripping, wire wheeling, and priming a bunch of other small parts. baby steps Quote Link to comment Share on other sites More sharing options...
dwest999 Posted May 18, 2015 Report Share Posted May 18, 2015 Bmartin, thanks for posting the build thread. I've always admired you're car... it's awesome and will be awesomer with the power plant and tranny. Quote Link to comment Share on other sites More sharing options...
ellum Posted May 18, 2015 Report Share Posted May 18, 2015 Subscribed! What color is your car? I'm loving it! Cheers Elvis Quote Link to comment Share on other sites More sharing options...
Bmartin Posted May 19, 2015 Author Report Share Posted May 19, 2015 Haha! I have no idea what color my car is. Never could get the info from the seller. Looks so good in pictures. Looks so bad up close. I'll be sticking with a similar hue when it comes time for a repaint some day. Thanks. Quote Link to comment Share on other sites More sharing options...
Bmartin Posted May 20, 2015 Author Report Share Posted May 20, 2015 I got my 49 steering wheel but it does not have any of the internal parts. I need the spring and horn ring. Anyone have a pic of one that is taken apart or an exploded diagram? Quote Link to comment Share on other sites More sharing options...
rtlsnakedaddy Posted May 22, 2015 Report Share Posted May 22, 2015 Very nice. Looks like a great project. Looking forward to more updates. Quote Link to comment Share on other sites More sharing options...
Bmartin Posted October 29, 2015 Author Report Share Posted October 29, 2015 (edited) I do have a little bit of progress. But I am still waiting on the engine and transmission. I'm also still looking for a rear axle. I would like to get a Dana 44 out of a Cherokee but they are like gold around here, Jeeps are popular for wheeling. I got back my first batch of chroming. Mostly stuff I took off the original engine and believed would swap over. And the starter, all rebuilt and converted to 12 volt Tonight I decided to polish the interior trim. I had no idea what the original finish was, but the trim is not magnetic and it looked like corrosion had built up. I used some mothers metal polish. Firstly, I do not recommend this method. Its just too messy. The polish is too much of a liquid and got in every crevice. Made for along cleanup. I'd pull it all off to do it. Here is the glove box door partially done, you can see the corrosion/oxidation on the middle bar. Here is the final product. Not like a true polish but its quite a bit shinier and still looks 'vintage'. Chrome would just make the rest of the interior look shabby at this stage. I go my steering column and shift lever painted to match the exterior. I've also been ordering different parts. Here are some cover for some of the botls on the block and a cloth spark plug wire kit. I picked up these Lincoln wheel covers to go along with the 15" wheels I aquired. I want a more traditional custom look and be able to run a smaller wheel/tire combo to get the car down even lower. I think they are perfect.....but they don't fit the wheels. The wheels have so much backspacing that the cap hits the wheel center before the lip. I got the large backspacing to bring the wheel in more to increase fender clearance. No easy answers I guess. I finished up what I could on the 12 volt conversion and swapped out all the bulbs. The gauge cluster was rebuilt by Redline gauges. They converted the guts of the ammeter to a voltmeter but left the face stock. The gas guage was also swapped to more modern internals and matched to a sending unit I installed. The speedo and temp gauge were rebuilt as well. So all gauges should work once its all back together. Thats it for now. Hope to have the engine by the end of next month. Edited October 29, 2015 by Bmartin Quote Link to comment Share on other sites More sharing options...
40plyrod Posted October 29, 2015 Report Share Posted October 29, 2015 looking good! glad to see your still at it. Nothing better than having a bunch of shiny pieces ready. Quote Link to comment Share on other sites More sharing options...
Cpt.Fred Posted October 29, 2015 Report Share Posted October 29, 2015 Very cool, Brian. You're really going the shiny route here, man, look at all that chrome stuff... wow. ...i bet AndyD's gonna love this Hope you find a way to put those wheel covers on, i think they'd be perfect on you car. Nice 50s look on a lowered coupe. Funny how different the dash looks without that big speaker grille mine got in the middle, next to the ash tray, i always thought they were there on all 40 models. Very clean though, i like it! The dash trim polishing made a huge difference to the interiour. Quote Link to comment Share on other sites More sharing options...
58prostreet Posted October 29, 2015 Report Share Posted October 29, 2015 Is the cap hitting the dust cap? I have some 51 Chrysler caps that hit the dust cap and I cut the top off cap and removed 1/4in. and welded back together and they fit. Quote Link to comment Share on other sites More sharing options...
Bmartin Posted October 29, 2015 Author Report Share Posted October 29, 2015 Is the cap hitting the dust cap? I have some 51 Chrysler caps that hit the dust cap and I cut the top off cap and removed 1/4in. and welded back together and they fit. Unfortunately no. Its hitting the actual wheel. I don't even have the wheels on the car and the cap won't engage. Its pretty significant, possibly an inch. I'm going to try and find the backspacing on a stock 56/57 Lincoln wheel and compare to what I have. I did come across some other mopar wheels that had less backspacing, but it kind of defeats the purpose I was going for. I suppose I could make some sort of adapter, but that would push the cover further out and the best part of the look is the inward dish. Quote Link to comment Share on other sites More sharing options...
fstfish66 Posted November 10, 2015 Report Share Posted November 10, 2015 love that dash,,crazy looking head liner,,, Quote Link to comment Share on other sites More sharing options...

Recommended Posts
Join the conversation
You can post now and register later. If you have an account, sign in now to post with your account.