Mr.Dids Posted June 16, 2015 Author Report Share Posted June 16, 2015 I know the above is kind of random but I like how the door turned out considering it was rotted away when I started. Again, just happy with it. This fender was split in two and had a sort of metal bandaid screwing it together. This section of the hood was missing the rear brace so what's another piece to make, right? 1 Quote Link to comment Share on other sites More sharing options...
Mr.Dids Posted June 16, 2015 Author Report Share Posted June 16, 2015 Purists look away now! These are bolted on and not riveted. lol Tailgate latch brackets. One is original and I made the other. Considering I used only high end metalworking tools, i.e. vice, hammer, and torch, I think it's decent. 2 Quote Link to comment Share on other sites More sharing options...
Mr.Dids Posted June 16, 2015 Author Report Share Posted June 16, 2015 This is, without question, my favorite part of the truck. Something i think we need to see more of. 6 Quote Link to comment Share on other sites More sharing options...
ruff1148kr Posted June 16, 2015 Report Share Posted June 16, 2015 So I'm not the only idiot that took a chunk ot of my leg... LOL 1 Quote Link to comment Share on other sites More sharing options...
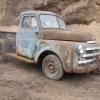
Mr.Dids Posted August 1, 2016 Author Report Share Posted August 1, 2016 (edited) Just realized its been ages since I updated this. Here is a pic of my self-made and upholstered seat. Not too bad for my first ever. Edited August 1, 2016 by Mr.Dids 3 Quote Link to comment Share on other sites More sharing options...
Mr.Dids Posted August 1, 2016 Author Report Share Posted August 1, 2016 Outside pic after paint. 6 Quote Link to comment Share on other sites More sharing options...
Todd B Posted August 1, 2016 Report Share Posted August 1, 2016 you should consider doing upholstery for a living. looks great 1 Quote Link to comment Share on other sites More sharing options...
Mr.Dids Posted August 1, 2016 Author Report Share Posted August 1, 2016 Thanks, you're too kind. The seat back is the stock one, just recovered. My seat base though was completely rotted away so I made the entire base with plywood, nylon webbing and high density foam (similar to a restaurant booth). I was self-employed as a cabinet maker for 12 years so I can handle woodworking. This was my first attempt at upholstery though. Quote Link to comment Share on other sites More sharing options...
Mr.Dids Posted August 13, 2016 Author Report Share Posted August 13, 2016 IT LIVES!!!!!!! Received the final piece to make this beast run on Thursday (hei distributor from Langdon's). Dropped it in, wired it up, dumped gas in the tank, and hit the starter pedal. Spit, spit, nothing. Advanced the distributor a few degrees, hit it again, and no way........it lives! Not bad for an engine which hasn't been so much as turned over in probably 30-40 years. The attached picture is of me being overzealous and taking it on its maiden voyage. It still needs a year of shop dust washed off of it and minor things like a windshield and more than an exhaust manifold for an exhaust system but it runs and drives (and even stops). 7 Quote Link to comment Share on other sites More sharing options...
Mr.Dids Posted August 26, 2016 Author Report Share Posted August 26, 2016 Helpful hint #347a....... If Your Windshield is Too Big, It Will Not Fit! In my rush to get the last of my glass in, I failed to notice my freshly cut windshield glass didn't exactly match the pattern glass I had sent. Not a problem, right? I've always found a square peg will fit a round hole if you apply proper motivation. This leads me to Helpful hint #347b: Glass Breaks. So, I spend part of my morning belt sanding half of my windshield (yes, it works, just don't overheat the glass) and contemplating a half glass/half 1/4 plywood windshield combination. Looks like I'm off to the glass shop again tomorrow. At least it's only money, right? Quote Link to comment Share on other sites More sharing options...
Brent B3B Posted August 26, 2016 Report Share Posted August 26, 2016 Bummer, hope the glass shop will make it right. If they didn't make it the size of the pattern, I would hope the replacement would be free. How far off was it? Quote Link to comment Share on other sites More sharing options...
Mr.Dids Posted August 26, 2016 Author Report Share Posted August 26, 2016 It was only about 1/16 too big but apparently my original was tight to begin with. I don't know if they were tight from the factory, my new windshield rubber is thicker than original, or if my "original" windshield had previously been replaced. Quote Link to comment Share on other sites More sharing options...
Mr.Dids Posted August 27, 2016 Author Report Share Posted August 27, 2016 Progress pics. Still needs color sanded and buffed, windshield installed and a few minor water leaks fixed but I'm pretty happy with the old girl considering the boat anchor I started with. 4 Quote Link to comment Share on other sites More sharing options...
Plymouthy Adams Posted August 27, 2016 Report Share Posted August 27, 2016 not sure if my eyes or the monitor but is that a gray or silver finish...I only know it is anti-patina... 1 Quote Link to comment Share on other sites More sharing options...
Mr.Dids Posted August 27, 2016 Author Report Share Posted August 27, 2016 It's a medium to dark grey. Between the shop fluorescents, outside light, and random camera flash, it looks about three different colors. not sure if my eyes or the monitor but is that a gray or silver finish...I only know it is anti-patina... Quote Link to comment Share on other sites More sharing options...
Young Ed Posted August 27, 2016 Report Share Posted August 27, 2016 Looks great! I'd say perfect but I think your center tailgate support is upside down HAHA. What is the story with the bed? Looks like it was cut for standard strips but then you filled in with opposite color wood. Looks nice. Quote Link to comment Share on other sites More sharing options...
Mr.Dids Posted August 27, 2016 Author Report Share Posted August 27, 2016 Looks great! I'd say perfect but I think your center tailgate support is upside down HAHA. What is the story with the bed? Looks like it was cut for standard strips but then you filled in with opposite color wood. Looks nice. Haha, really? We (my dad and I) debated for some time over that tailgate support and even tried to find pics of others but found pics showing each way and finally settled on the way it is now. My bed floor was gone. The cabinet maker in me couldn't paint hardwood, so I went with natural cherry instead. My bed strips were shot and by shot I mean there was maybe 8-10 inches of one remaining. I thought to myself that I've not seen one done with wood strips so I made the strips from hard maple. I'm not sure if I like the contrast. Probably would have preferred walnut and cherry but maple is considerably harder than walnut. Quote Link to comment Share on other sites More sharing options...
Plymouthy Adams Posted August 27, 2016 Report Share Posted August 27, 2016 got to love the grays..... (official color of reported aliens worldwide) this shows my gray theme inside and out of the car... 1 Quote Link to comment Share on other sites More sharing options...
Young Ed Posted August 27, 2016 Report Share Posted August 27, 2016 Haha, really? We (my dad and I) debated for some time over that tailgate support and even tried to find pics of others but found pics showing each way and finally settled on the way it is now. My bed floor was gone. The cabinet maker in me couldn't paint hardwood, so I went with natural cherry instead. My bed strips were shot and by shot I mean there was maybe 8-10 inches of one remaining. I thought to myself that I've not seen one done with wood strips so I made the strips from hard maple. I'm not sure if I like the contrast. Probably would have preferred walnut and cherry but maple is considerably harder than walnut. I couldn't see it that well but it looks like it. The horizontal part of the support should be just below the gate so if the gate sags under weight it would hit the support. Don't worry about it though. My truck hasn't had that support in over 10 years. Quote Link to comment Share on other sites More sharing options...
Mr.Dids Posted September 4, 2016 Author Report Share Posted September 4, 2016 5 Quote Link to comment Share on other sites More sharing options...
48Dodger Posted September 7, 2016 Report Share Posted September 7, 2016 Looks great Mr Dids!!! Leave the tailgate mid support upside down. It really isn't needed, unless you plan on a big payload or two in the future. If you put in the correct position, chances are you'll only be scraping paint off the bottom rail of the gate. High marks for the 3 guard bumper, stainless steel grille and rear bumper! 48D 1 Quote Link to comment Share on other sites More sharing options...
Mr.Dids Posted September 7, 2016 Author Report Share Posted September 7, 2016 Thanks! We test fit the third hinge before painting and it seemed like it was going to scratch the heck out of the tailgate if we put it the other way. I wasn't sure if they just were that way or if it's because my tailgate is a little out of whack. My tailgate was nearly destroyed from a hard farm life and I'm not nearly a good enough body man to properly straighten it. Quote Link to comment Share on other sites More sharing options...
Mr.Dids Posted October 23, 2016 Author Report Share Posted October 23, 2016 Well, every story has a beginning and an end. Here is the end of this one. The old girl is leaving me and headed a little farther North to begin the next chapter of its life in New York state. A little sad to see it leaving but it leaves space to begin something else. You die-hard Mopar guys will be glad to know that's a Ram dually pulling the trailer. lol 1 Quote Link to comment Share on other sites More sharing options...
HotRodTractor Posted October 24, 2016 Report Share Posted October 24, 2016 I was watching this truck on Ebay. It would have been perfect for my daily driver (with a few updates), but I obviously didn't get funding together in time. 1 Quote Link to comment Share on other sites More sharing options...

Recommended Posts
Join the conversation
You can post now and register later. If you have an account, sign in now to post with your account.