Charles Furman Posted March 5, 2014 Author Report Share Posted March 5, 2014 Today's update is about the use of the stock and modified heater control panels. I am going to use the stock heater panel along with a modified panel and a new version we fabricated to accommodate the air conditioning vents and all of the miscellaneous switches and knobs that won't fit in the holes next to the ignition switch in the dashboard. The stock panel will go on the drivers side and will contain one air conditioning vent and the new starter button. The enlarged stock panel will go in the center and will contain two air conditioning vents, and the new longer panel go on the passengers side and it will contain all the air/heater/defroster controls, the fresh air vent cable, and one air conditioning vent. I have attached a couple of pictures of the modifications that are in progress and one showing where the new longer panel will go. Quote Link to comment Share on other sites More sharing options...
John-T-53 Posted March 5, 2014 Report Share Posted March 5, 2014 Hey, that steering column looks familiar! Quote Link to comment Share on other sites More sharing options...
Charles Furman Posted March 6, 2014 Author Report Share Posted March 6, 2014 (edited) John, Yep, that's the 1950 Pilothouse 3-on-the-tree column I got from you. Actually, a lot of guys on this Pilothouse forum have parts on this truck. For example, the small stock exterior passenger side mirror bracket that I got from Reg Evans is going on during this upgrade. By the way, I seem to recall that I agreed to send you the original bracket without the shift notch when I took out the old column. Well the old bracket is now out, do you still want it? If so, send me your mailing address to charlesfurman@att.net and i'll send it to you. Charles Edited March 6, 2014 by Charles Furman Quote Link to comment Share on other sites More sharing options...
John-T-53 Posted March 6, 2014 Report Share Posted March 6, 2014 Charles, I totally forgot about that. I had to look at our email exchange from October '12 and put the pieces together, lol. It turned out the brackets were significantly different between your truck and mine. You found one that would fit my truck and sent it to me back then (thanks again).. So I'm good! On the same note, I think it's a great benefit (and cool) to have "cross-pollination" of parts from fellow club members among our trucks. Same here...there's parts from Reg, Tim, Greybeard (Dave), Mark, Hank, etc on mine, that I'm grateful for. AND....that woodie is coming along good bud. If you make Santa Cruz, hope to see you there! Or Doheny, or Wavecrest if travel time permits.... Good luck! 1 Quote Link to comment Share on other sites More sharing options...
48Dodger Posted March 6, 2014 Report Share Posted March 6, 2014 I wanna be "part" of your truck Charles....what do you need?! 48D Quote Link to comment Share on other sites More sharing options...
Charles Furman Posted March 6, 2014 Author Report Share Posted March 6, 2014 I'm sure I'll be needing something else before this project is complete,and it's great to know I got a fabulous support group here for ideas, knowledge, and, of course, parts. I know I said earlier in this thread that I have been researching and planning this project for a long time, but I forgot how long it has actually been. I bought the steering column and shift lever from John back in 2012 and I got the passenger side mirror bracket from Reg well before that. It has been a long road which makes it feel so good to see it finally coming together. As I think back on it, I've been following this forum for at least 13 years. When I first joined it was Gerald (GTK), Don Coatney, Blue Skies and a few others who were leading the way and teaching the rest of us. Now, I am seeing some of us who learned from them beginning to help others. And so it goes. Thanks again for your support. I am truly honored to be a part of this great vintage Mopar community. Attached is a rendition of my 1949 Dodge Pilothouse Woodie with some "Hemi" attitude. 2 Quote Link to comment Share on other sites More sharing options...
Don Coatney Posted March 6, 2014 Report Share Posted March 6, 2014 Time sure flies when you have fun. Thanks for the kind words Charles but as I see it you were a great asset to this community back then too. Quote Link to comment Share on other sites More sharing options...
Charles Furman Posted March 8, 2014 Author Report Share Posted March 8, 2014 3-7-14 Update - Not a lot of real sexy stuff happening in the past few days, but here are a few new pictures. One is of the new gas tank which is built to fit between the frame rails where the spare tire used to go. Once we get all the mounting brackets ready, the tank will get the filler spout installed and then it will get cleaned up and painted. It looks like it will hold about 24 gallons. The other picture is of the computer which is mounted under the dash on the brace located above the steering column. The picture is taken through the hole where the radio mounts in the dash. The next big things to go in will be a Currie 3.73 to 1 rear-end with disk brakes and the dual exhaust system. Quote Link to comment Share on other sites More sharing options...
Charles Furman Posted March 22, 2014 Author Report Share Posted March 22, 2014 3/21/14 Update I am using the stock under dash heater control panel to house the air conditioning vents, ac/heater/defroster controls, and the fresh air vent which we were able to retain. I'm using one stock panel for the drivers side A/C vent and there will be a starter button mounted on it also (pictured below on paint can). The panel that will sit under the center of the dash and house two A/C vents is a stock panel that we stretched about two inches (no picture yet), the passenger side panel is a custom made replica which will house passenger side A/C vent, the A/C/heater/defroster controls, and the fresh air vent cable (pictured below). There is a picture below of what the new floor pan is going to look like. It's not quite complete, but you get the idea. The hole to access the master cylinder is in place and we still have to cut the access hole for the battery box. I am really happy how it is coming out. The entire floor board will be relatively flat. Remember, I had a floor shifter and a floor mount e-brake before. Now my honey can slide over and I may even be able to cop a feel now and then. I'll might have to buy a suicide knob. The final picture is of the new wheel. Just picked them up from the Wheelsmith in Corona, CA this morning. They have the stock centers with new 7 inch rims, so they are 16x7 and my stock hubcaps will fit right on. I plan to paint them to match the body which is the look I had when I had the full body colored beauty rings on it before. Quote Link to comment Share on other sites More sharing options...
Charles Furman Posted March 30, 2014 Author Report Share Posted March 30, 2014 Now that all the fabrication and fitting work is completed on the front half of the truck, we pulled everything out and did some painting. Quote Link to comment Share on other sites More sharing options...
ruff1148kr Posted March 31, 2014 Report Share Posted March 31, 2014 Hi since you changed out the fuel tank is the tank bracket the same as a 48 Truck? if you are not going to use it I would be interested in buying it from you. Also what ac unit did you use thanks Quote Link to comment Share on other sites More sharing options...
ruff1148kr Posted March 31, 2014 Report Share Posted March 31, 2014 Hi since you changed out the fuel tank is the tank bracket the same as a 48 Truck? if you are not going to use it I would be interested in buying it from you. Also what ac unit did you use thanks Quote Link to comment Share on other sites More sharing options...
John-T-53 Posted March 31, 2014 Report Share Posted March 31, 2014 Charles, Lookin' good bud! Where is the frame fab work being done at? Just curious... Quote Link to comment Share on other sites More sharing options...
Charles Furman Posted March 31, 2014 Author Report Share Posted March 31, 2014 ruff48kr - All B1 Series (48-49) pickups used the same tank bracket. I might be able to help you out, so send me an email to charlesfurman@att.net. The fuel tank is already sold, but I don't think the guy needs the bracket. Here is the AC unit I am using. It's a Vintage Air unit I got through Summit Racing Equipment. VTA-671400-VUZAir Conditioning, Gen IV Magnum, Heat & Cool, 26 in. Length, 10.5 in. Height, 10.5 in. Depth, Kit(Mfr. #: 671400-VUZ) Quote Link to comment Share on other sites More sharing options...
Charles Furman Posted March 31, 2014 Author Report Share Posted March 31, 2014 John-T-53 Everything that I am not doing myself is being done by a couple of brothers, Chad and Dave Everett, at there shop in Fallbrook, CA. They do everything (metal fabrication, wiring, paint, exhaust systems, etc), In fact the only thing that they aren't set up to do is upholstery and woodworking. This is a relatively small shop and these guys do excellent work, as you can see. The other part that is cool is that they let me do all the work I can right in their shop using their tools. That's a lot different from the places that have a chain across the shop with a sign saying "employees only" It took me almost a year to find these guys, and I looked into a lot of shops. I am so glad I took the time to find these guys. Quote Link to comment Share on other sites More sharing options...
HanksB3B Posted April 1, 2014 Report Share Posted April 1, 2014 John-T-53 Everything that I am not doing myself is being done by a couple of brothers, Chad and Dave Everett, at there shop in Fallbrook, CA. They do everything (metal fabrication, wiring, paint, exhaust systems, etc), In fact the only thing that they aren't set up to do is upholstery and woodworking. This is a relatively small shop and these guys do excellent work, as you can see. The other part that is cool is that they let me do all the work I can right in their shop using their tools. That's a lot different from the places that have a chain across the shop with a sign saying "employees only" It took me almost a year to find these guys, and I looked into a lot of shops. I am so glad I took the time to find these guys. Charles, I know just how you feel. It was my good fortunbe to find Ricardo. I hope you "brothers" turn out to be just as helpful, and that your project turns out great, but I'll bet there won't be any Tacos like Ricardo's. Hank Quote Link to comment Share on other sites More sharing options...
Charles Furman Posted April 4, 2014 Author Report Share Posted April 4, 2014 4/4/14 Update I picked up the rear-end today and took it out to the shop. The wheels are now painted to match the body. Now that all the frame painting is done in the front, stuff is going back in for good. I am particularly pleased with how the A/C plumbing is going up inside the fender, Quote Link to comment Share on other sites More sharing options...
The Oil Soup Posted April 5, 2014 Report Share Posted April 5, 2014 Are all of your wheels now 7" wide and is Wheelsmith the shop that did it? They look fabulous! Gary Quote Link to comment Share on other sites More sharing options...
Charles Furman Posted April 5, 2014 Author Report Share Posted April 5, 2014 Yes, Wheelsmith in Corana did the wheel work. I only did 4 wheels as 7x16. I am moving the spare up inside the woodie to make room for the new gas tank. I will be mounting a narrow spare tire the same height as the others on the stock 4.5 inch wheel so it can lay flat under the 3rd seat. Quote Link to comment Share on other sites More sharing options...
ruff1148kr Posted April 6, 2014 Report Share Posted April 6, 2014 wow what a sweet engine and ac installation job true attention to detail in planning and prep. The wheels look great.... I look forward to all your posts they inspire me to think things through a little better Quote Link to comment Share on other sites More sharing options...
John-T-53 Posted April 8, 2014 Report Share Posted April 8, 2014 I am curious about the 7" width as opposed to 6". Is it easier to find tires for a 7" wide wheel? Or is 7" preferred for better handling / traction? I would like to go with 16" wheels on my truck and the width issue has got me thinkin'.... Thanks, Quote Link to comment Share on other sites More sharing options...
Charles Furman Posted April 10, 2014 Author Report Share Posted April 10, 2014 John .... I went with 7x16 inch wheels instead of 6x16 inch wheels primarily because the weight of the wood body makes my pilothouse more like a large SUV, and I knew I wanted to go with slightly wider tires. It was certainly not rocket science. All my hot-rod buddies were pushing for 8x16's which I simply wasn't going to do. I have decided to go with LT265/75R16 tires which are essentially what is on my GMC Yukon. If I had a pick up, I may have considered the 6x16 inch wheels and slightly smaller tires. Quote Link to comment Share on other sites More sharing options...
Charles Furman Posted April 11, 2014 Author Report Share Posted April 11, 2014 4-7-14 Update We put the front grill piece on to check the clearance in front of the radiator/AC condenser for the transmission cooler. Good news, there's plenty of room. It is amazing how much room there is in these Pilothouse trucks. we did not have to touch the firewall or the inner fenders, and you can see in the photo how easy the steering linkage was. I am even going to be able to retain my fresh air vent. The electric fan set up will go in directly behind the radiator. Quote Link to comment Share on other sites More sharing options...
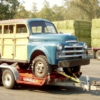
HanksB3B Posted April 13, 2014 Report Share Posted April 13, 2014 Charles, It was great to meet you and see the one-of-a-kind 4-wheel drive Woddie So then, should we look for a red one next year ? Charles...Davin..and Hank at Doheny Wood, Dana Point CA 2 Quote Link to comment Share on other sites More sharing options...
Charles Furman Posted April 13, 2014 Author Report Share Posted April 13, 2014 Hank and Davin, What a wonderful surprise to see you at the woodie meet in Dana Point. It is always nice to meet people in person that you have been chatting with on-line over the years. Yes, our red Dodge will definitely be here next year. Thanks for stopping by, I really enjoyed meeting both of you. Charles Quote Link to comment Share on other sites More sharing options...

Recommended Posts
Join the conversation
You can post now and register later. If you have an account, sign in now to post with your account.