kented Posted February 17, 2014 Author Report Share Posted February 17, 2014 (edited) I too have a 49 BC, have driven it all over the US. What I did was convert to 12v using a Rhode Island wiring kit, at the same time repainted the motor and engine bay, I converted the 6v generator to 12 volt, works fine, looks good and didn't need to change the pulleys for the belt size. I also have an R10 overdrive, just converted the front to disc brakes. Plan on driving it to the summer POC meet in MIchiigan how did you convert the generator? Edited February 17, 2014 by kented Quote Link to comment Share on other sites More sharing options...
ChrisRice Posted February 17, 2014 Report Share Posted February 17, 2014 All of this talk of conversion makes a purist want to cry. My other car is an '01 Regal GS (with supercharger). I do my upgrades on it, and keep my classic a classic. Just my two cents. Enjoy your car and welcome to the forum. Quote Link to comment Share on other sites More sharing options...
kented Posted February 20, 2014 Author Report Share Posted February 20, 2014 All of this talk of conversion makes a purist want to cry. My other car is an '01 Regal GS (with supercharger). I do my upgrades on it, and keep my classic a classic. Just my two cents. Enjoy your car and welcome to the forum. So i should probably keep the fact the car will eventually have air ride and 4 link to myself? haha thanks! Quote Link to comment Share on other sites More sharing options...
ChrisRice Posted February 20, 2014 Report Share Posted February 20, 2014 So i should probably keep the fact the car will eventually have air ride and 4 link to myself? haha thanks! Oh that car is so beautiful to begin with.. But indeed it is your car to enjoy as you like, but wouldnt a cadi be better for baggin'? SMH. Quote Link to comment Share on other sites More sharing options...
kented Posted February 23, 2014 Author Report Share Posted February 23, 2014 Finally got the manual i ordered awhile ago: Starting to read, lots to learn! Quote Link to comment Share on other sites More sharing options...
mrwrstory Posted February 23, 2014 Report Share Posted February 23, 2014 (edited) So i should probably keep the fact the car will eventually have air ride and 4 link to myself? haha thanks! I think that car would look way cool slammed. 'Tho for me, not to the degree you couldn't drive it lowered. Also, bags are another system you gotta install and maintain. My wish for you is to proceed with your own vision and not have any second thoughts later on. Edited February 23, 2014 by mrwrstory Quote Link to comment Share on other sites More sharing options...
fstfish66 Posted February 25, 2014 Report Share Posted February 25, 2014 Finally got the manual i ordered awhile ago: Starting to read, lots to learn! that books loooks to good to be original ? where did you get it ide like to have one for my 40 dodge,im sure a 40 plymouth may be the same thanks in advance Quote Link to comment Share on other sites More sharing options...
kented Posted February 26, 2014 Author Report Share Posted February 26, 2014 that books loooks to good to be original ? where did you get it ide like to have one for my 40 dodge,im sure a 40 plymouth may be the same thanks in advance Yeah its a re-print of the original. I got it from KMS car parts which is a local supplier. I'll get you the name of the actual reprint company on friday when im back in town. Quote Link to comment Share on other sites More sharing options...
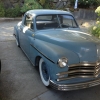
kented Posted February 26, 2014 Author Report Share Posted February 26, 2014 (edited) Found some pictures of the car before it came into my ownership: How the car was purchased in California Car accross the border New white walls installed Full set of these came with the car, just need to modify the front's to clear the grease caps, i think they're from a mercury? not sure Photo from a local car show, unknown photographer or lady in the car...unfortunately Enjoy! Edited February 26, 2014 by kented Quote Link to comment Share on other sites More sharing options...
Lumpy Posted February 26, 2014 Report Share Posted February 26, 2014 That's a neat looking car for sure. k. Quote Link to comment Share on other sites More sharing options...
fstfish66 Posted February 26, 2014 Report Share Posted February 26, 2014 Yeah its a re-print of the original. I got it from KMS car parts which is a local supplier. I'll get you the name of the actual reprint company on friday when im back in town. yes please do,,, and car looks good with those bullit hub caps Quote Link to comment Share on other sites More sharing options...
derek_m Posted February 27, 2014 Report Share Posted February 27, 2014 i like that car...look forward to seeing progress on it Quote Link to comment Share on other sites More sharing options...
kented Posted April 6, 2014 Author Report Share Posted April 6, 2014 (edited) Finally got to spend a little bit of time on it Removed most of the factory wiring to make way for the re-wire, starting to put together a plan of where to run the wires so they're mostly hidden. Took out the radiator to get cleaned and tested. Generator removed for alternator. Battery will be going in the trunk. Its a start! haha Edited April 8, 2014 by kented Quote Link to comment Share on other sites More sharing options...
fstfish66 Posted April 10, 2014 Report Share Posted April 10, 2014 looking like a great start... Quote Link to comment Share on other sites More sharing options...
kented Posted May 6, 2014 Author Report Share Posted May 6, 2014 Pulled out the gauge panel to re-wire and change the bulbs to 12V. Im in the process of removing the glass from each individual gauge, cleaning up the faces and glass then re-sealing. Im looking at the wiring diagram but cant figure out if the panel light goes to all the dash lights and makes them adjustable or it goes to another sort of "map" light which i doubt the car has since its so basic. Any ideas? Also when i was taking the panel out 2 brittle plastic clips broke which look as if they hold the top part of the panel in place. They may have been rubber at one point but not anymore haha Quote Link to comment Share on other sites More sharing options...
kented Posted May 7, 2014 Author Report Share Posted May 7, 2014 Heres some pictures of the gauges, not going to touch the faces of the gauges but the glass was fairly dirty and the existing sealer was cracked. Re-sealed with some silicone Quote Link to comment Share on other sites More sharing options...
Young Ed Posted May 8, 2014 Report Share Posted May 8, 2014 Can't see for sure but it looks like your guages might use the same rubber rope like stuff for a seal between glass and housing that my 46 truck uses. If so bring parts of it to the hardware store and match it up to the right size window screen spline. Quote Link to comment Share on other sites More sharing options...
kented Posted May 8, 2014 Author Report Share Posted May 8, 2014 It was all cracked and in terrible shape. I used some marine silicone as a seal which stays flexible, Made a nice bead and sat the lens on top. Glass cleaned up really nice compared to before much clearer. Don't mind the missing panel light knob Quote Link to comment Share on other sites More sharing options...
DJ194950 Posted May 8, 2014 Report Share Posted May 8, 2014 Original seal was a Very thin rubber gasket that over the years just melded into a black mess that creaped out onto the glass to look terrible! I did the same as kented a scraped the goo off with a razor blade, cleaned the lens and put a very small bead of silicone sealer to replace the rubber seal. Works out great. Years ago say one seller on ebay with nos gauge rubber sealers at $15 each! Not for me, thanks. Doug Quote Link to comment Share on other sites More sharing options...
kented Posted May 11, 2014 Author Report Share Posted May 11, 2014 (edited) Put the hubcaps on My helper for the day discovered how comfy the bench seat is!Still waiting on parts. Won't be back till the 24th Edited May 11, 2014 by kented Quote Link to comment Share on other sites More sharing options...
kented Posted June 13, 2014 Author Report Share Posted June 13, 2014 Got the alternator mocked up Made a bracket for the solenoid, mega fuse and new fuse block Started to run some wires and mounted the battery box in the trunk but forget to take pictures 1 Quote Link to comment Share on other sites More sharing options...
51CamClub Posted June 13, 2014 Report Share Posted June 13, 2014 Great pictures!!! Keep em coming. I just bought a 51 Cambridge Club Coupe 2 mos ago as a surprise for my bride and am looking forward to the restoration this fall. Thanks for the inspiration! Quote Link to comment Share on other sites More sharing options...
Don Coatney Posted June 13, 2014 Report Share Posted June 13, 2014 It appears you are running a skinny belt in wide belt pulleys. Not a good idea. You can buy a wide belt pulley for your alternator. Quote Link to comment Share on other sites More sharing options...
Don Coatney Posted June 13, 2014 Report Share Posted June 13, 2014 Also what are your plans for the 4th pole on your solenoid? Quote Link to comment Share on other sites More sharing options...
Plymouthy Adams Posted June 13, 2014 Report Share Posted June 13, 2014 Don..I do not know of any wide pulleys for the Mopar alternator..one major set back when choosing this beast..best alternator you can get but does have a limitation when it comes to belt size,,,and...as most folks upgrade to an alt and 12 volts some will in the future look to AC..the narrow belt will be the better choice in the long run.. Quote Link to comment Share on other sites More sharing options...

Recommended Posts
Join the conversation
You can post now and register later. If you have an account, sign in now to post with your account.