


DrDoctor
-
Posts
760 -
Joined
-
Last visited
-
Days Won
5
Content Type
Links Directory
Profiles
Articles
Forums
Downloads
Store
Gallery
Blogs
Events
Classifieds
Everything posted by DrDoctor
-
Given your stipulated criteria re: bolt circle – you’ll be focusing on Ford, or Chrysler products. However, that doesn’t include the big/older Lincolns, Chryslers, Imperials. I’d recommend getting a bolt-circle gauge – it’ll insure that the rearend you eventually select does indeed have the necessary bolt circle. They’re not expensive, and are readily available. Good luck . . .
-
Apparently not enough revenue from the overabundance of ads . . . No charge to someone who’s trying to buy something, but a charge to those who’re trying to sell something. So, the seller’s stop posting, and the site becomes just that much less user friendly. Oh well, that seems to be the way things are going all over the place these days. Just sayin’ . . . . . Hmmm . . . I wonder how long this comment will remain alive . . .
-
It’s too bad the wheel’s not worth saving, but it is what it is. Take care when “eliminating” the wheel, and hopefully, all will be OK for you. Regards . . .
-
If the wheel’s not worth salvaging – and ONLY if that’s the case – you’ve got 2 options, albeit both are drastic: 1) Take a torch, and heat the hub of the wheel. We had to do that on an old Chevy back in the ‘60’s because we couldn’t get it to budge, and we ruined the hub – the bolts pulled out of the threaded holes in the hub of the wheel, so we deemed the wheel expendable, but needed the column, so we put the “gas wrench” to the wheel, and we used a gear puller to finish the job. 2) We’ve also taken a cutoff wheel and cut thru the wheel’s hub from the side to split it, and then it just falls off of the shaft.
-
The red one’s a business coupe, and the blue one’s a club coupe. The business coupe has a small quarter window, and a longer more horizontal trunk lid, while the club coupe has a longer quarter window, and a shorter steeper sloping trunk lid. Further, the club has a rear seat, whereas the business coupe doesn’t.


-

1950 pilothouse dodge truck transmission
DrDoctor replied to Rlopera44's topic in Mopar Flathead Truck Forum
. -
Taking out the dash is definitely the way to go. As mentioned – once the all of the chrome’s removed, then you can polish it, and do the dash as you wish, with no tap lines. If you do decide to paint the back of the dash, think about painting it white – it makes working under it much better, as the light you use will be much brighter underneath there. I redid our dash in dark grey to go with the interior (it had been stripped, and was black like the car, and I don’t like dashes the color of the car vs the car’s interior, but that’s me . . .). I also painted the back side of the dash in light grey, but I wish I’d used white. Good luck.
-
Wow!!! Thanks Chrysler1941, and DonaldSmith. You’ve both cleared up that nicely. I obviously wasn’t as confused as I tho’t I was. Now, I’ll just get myself an adult beverage, relax, resume sitting in my favorite chair, and watch the show. Warmest regards to you both . . .
-
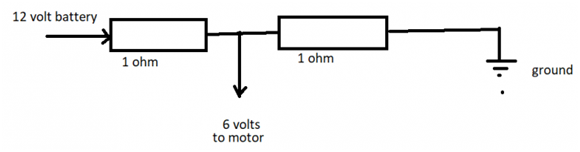
Su 17Mar2019 12:42p – “[sic] I picked up a reducer. One of those gold colored ones with the aluminum heat sink. i was told it would work better than the smaller Runtz reducers.” Su 17Mar2019 09:37p – Tu 19Mar2019 02:36p – “In the original post I said that I have a 12-6 resistor and it’s not powering the motor.” Tu 19Mar2019 08:26p – “Why not just buy a 12v to 6v voltage reducer – simple to use – 12v in and 6v out.” Tu 19Mar2019 08:38p – “This is the second comment in a row, that mentions that I just need to use a 12 V to 6V reducer. The post mentions that I have a 12V to 6V reducer. That is the reason why I posted. I am using the reducer, and it isn’t working.” F 22Mar2019 01:15p 9(approx) – Yep, I did miss the remark about the reducer – sorry ‘bout that. However, please take note that your diagram of 17 March, 2029, that you refer to 2 resistors. Resistors aren’t the same as voltage reducers. Hence, the confusion. It appears as tho’ you’ve “switched horses in the middle of the race” – resistor or voltage reducer??? Well, I think that about covers this. Now, I’ll go back, sit in my favorite chair, eat some popcorn, and just watch the show . . . .
-
Why not just buy a 12v to 6v voltage reducer – simple to use – 12v in and 6 out.
-
Reversing the polarity on the wiper motor will have no effect on the direction the motor runs.
-
Belvedere666, I’m certainly no electrical expert, altho’ I’ve wired/rewired my share of cars in my time, I’ve wired motors with both – and + grounds in + ground cars, and never had a problem. Radios, for example, are ground-sensitive. I know a – ground radio connected to a + ground system will fry, as I’ve got a fried lump on my garage floor that was once the radio from our ’46 Plymouth Special DeLuxe Club Coupe. But, electric motors are “ground indifferent”. Now, as to what’s causing your specific situation, I’m sorry, but I’m not much help. I tho’t is it’s something with the voltage reducer, but that just a SWAG. Good luck with this . . . Regards . . .
-
Robin (UK), Great photos!!! I love looking at photos my dad took of his ship-board adventures during WWII. As for where the front license plate was positioned with the presence of the center bumper guard, the initial photo answers that question. I mention that because our “46 Special DeLuxe Club Coupe has a bracket mounted on the front splash pan in that same position, which makes me wonder if our car once “served and protected” somewhere in its past. Hmmmmm . . . . . Thx.
-
Some states issue their own VIN’s for older vehicles that only have serial numbers, and don’t have factory-assigned VIN’s – a couple that come to mind are Kansas, and Delaware. It’s my understanding that a true VIN has alpha characters as well as numeric characters. Don’t know what difference it makes, but I didn’t write the laws . . .
-
Hey, Woodrow. Oh, I forgot to mention what to do about excess the sealant on the glass side – let it dry, take a new sharp razor blade (don’t use an old one – we don’t want any scratches from a chewed blade . . .) and run it perpendicular to the glass next to the rubber, and carefully cut it. Then take the razor blade, and use it as a scraper to lift some of the excess sealant, and just peel it off like cellophane. The tape on the body side will yield the same effect – after you’ve also run it perpendicular to the glass next to the rubber, and carefully cut it. Again – another “happy dance” . . .
-
BobDeSoto. From what I’ve been told by a former patient who worked at a GM factory his entire adult life – the stapler used by the factory uses larger diameter, and harder, wire. The staple’s driven into the thin metal, which is typically abit softer than the staple, exactly perpendicular to the metal, by means of a “foot” (much like a sewing machine foot) holding the work-piece in place during the actual stapling action.
-
Woodrow, Before you use the clear sealant, consider this – if it’s going to be visible, you may be better off using the black sealant, since the rubber’s black. Get yourself a plastic interior tucking tool (also used for glass work . . .), and use that to lift the rubber from the car, or the glass, and to spread and/or remove excess sealant. If you’re working on the body-side of the rubber, consider taping the body along the edge of the rubber to keep the sealant off of the paint. Afterwards – another “happy dance”. Kindest regards . . .
-
Woodrow, Well Done!!! Doing each side independently is the only way to do this successfully, as you’ve already discovered – keeping everything in relationship with one another while attempting to install both sides simultaneously is just impossible. Use the 3M black weather-strip adhesive at the joints, and the messy part’s done. The stainless trim’s going to be a breeze for you at this point. Again, great job, and congratulations!!! Now, go smoke that cigar, and enjoy your libation, as you pat yourself on the back.
-
On projects such as this, we didn’t use any type of adhesive. For lubricant, we just used liquid dish soap, and plenty of it. on the occasions where we had to but 2 ends together, we used 3M black weather-strip adhesive.
-
The only real problematic piece of glass in a P-15 (vis-à-vis replacement) in the entire car’s the rear one. The remainder of the glass in a P-15’s flat laminated glass, so if they break it, they can just cut another one right there. I certainly wouldn’t use an old piece of flat glass, as it’s probably beginning to de-laminate, or it will soon. Tempered glass will typically shatter when attempting to cut it (altho’ I’ve ground windshields, and rear glass, and side glass, all tempered, with a fine disc on a body grinder and a garden hose to keep the glass cool, the key in this process is patience, patience, and more patience). In your case, it’s not nearly this complicated, but rather a straight-forward installation. the secret in this installation is to grind the sharp edges off of the cuts, use plenty of lube, strong cord, have a helper, and go for it.
-
Bobt-47P15, Welding to your aluminum radiator’s one option. However, you could fabricate brackets – one end connected to the original ones that the rubber’s affixed to, and the other end connected to the top of the core-support. A tho’t . . . OR - a single bracket that spans the radiator, but doesn't connect to it, running from 1 side of the radiator to the other side, connecting at each end of the single bracket to the core support. It'd probably be a good idea to put a piece of rubber in between the new bracket and the radiator, so as not to have the bracket abrade thru the radiator tank. Another tho't . . .
-
I’ve also been a victim of Murphy’s Law – I’ve needed something a month or two after I’ve gotten rid of it. I’ll hang onto parts for a year or 2, and if I haven’t been able to sell/trade/gift it, out it goes. There’s quite abit of stuff (what I tho’t was good, usable stuff . . .) in the landfill. Do I feel bad about these items not being used by someone else??? Nope, I’m not in the junk yard business, and I’m not a warehouse for others. If they don’t want to come and get it, or pay the shipping, then they really didn’t need it that badly.
-
Sharps40, I’ve seen similar installations where 5 lbs of engine is put into a 3 lb opening of an older car – a challenge to be sure, but with patience, and perseverance, it can be done (and what a warm glow you’ll have when it’s accomplished . . .). There’s a gear-drive (3 gears within the case), that’s designed specifically to go around immovable obstacles. I’ve never used it, but do know of a couple of other builders who have, and they report no problems. The only issue with this is to ensure that the gear unit is mounted SOLIDLY. Also, it uses NO chains – a definite weak link. I’m sorry, I don’t remember the name of the company that make this gear unit, and I’ve got to run, but I’m sure some internet trolling should turn up the information you need. Lastly, I’ve also hear some “elitist” comments pertaining to the HAMB site – not the most congenial folks. Some herein fit into that category, as well. But, that’s why there’s the “ignore” feature. Best of luck to you on this interesting project. Regards . . .
-
GG40Dsoto, Your grandfather’s car – now that’s a keeper!!! Once you’ve got it back on the road, and you’re behind the wheel, you’ll have a smile on your face that no one will be able to wipe off. As anxious as you’ll get wanting to drive it, take your time, and proceed with caution. This site can be a vast source of information, and you’ll soon discover who you can trust for reliable information, and who the opinionated blowhards are. Sorting thru that can take abit of time, but it’s usually obvious. The main thing is to set your goal as to what you want the car to be when completed, keep that goal in sight, and take it methodically, step by step, to that goal. Remember, the joy of anything isn’t necessarily the achievement of the goal, but rather in the journey itself. Good luck, and best regards to you.
-
This just makes me appreciate a heated garage all that much more . . . Now, I want A/C for the summer months . . . Momma says “No!!!”, so “No” it is.

