


Los_Control
-
Posts
4,280 -
Joined
-
Last visited
-
Days Won
27
Content Type
Links Directory
Profiles
Articles
Forums
Downloads
Store
Gallery
Blogs
Events
Classifieds
Everything posted by Los_Control
-

ANSWERED Installing inner front fenders.
Los_Control replied to Los_Control's topic in Mopar Flathead Truck Forum
Thanks @JBNeal .... and it took 23 seconds for @48Dodger to show how it is done ! I'm still scratching my head because I saw no way to get it out of the top .... While I do have a aftermarket aluminum radiator, I'm using the factory brackets & mounting holes to install it. I'm going to have to take a better look at it tomorrow. And flip the hood all the way over, not just propped up. -
ANSWERED Installing inner front fenders.
Los_Control replied to Los_Control's topic in Mopar Flathead Truck Forum
Here is exactly where I'm at, trying to get the inner fender installed. I think it should go in through the wheel well, no way it is going through the top .... I'm certain now I'm just going to have to remove the shock mounts to get it in. I was hoping they would just slide in with the wheels out of the way .... not going to happen. Same time I'm just physically worn out for today and need rest ... I have a big week ahead of me. I can spend a hour or two on it in the morning ..... No matter what this truck needs to move tomorrow and I have to replace all the bearings in my rear end of my daily driver using these jack stands and this space. Just would be nice to get them in while it was on jack stands and not out in the gravel driveway .... they sure want to fight me though.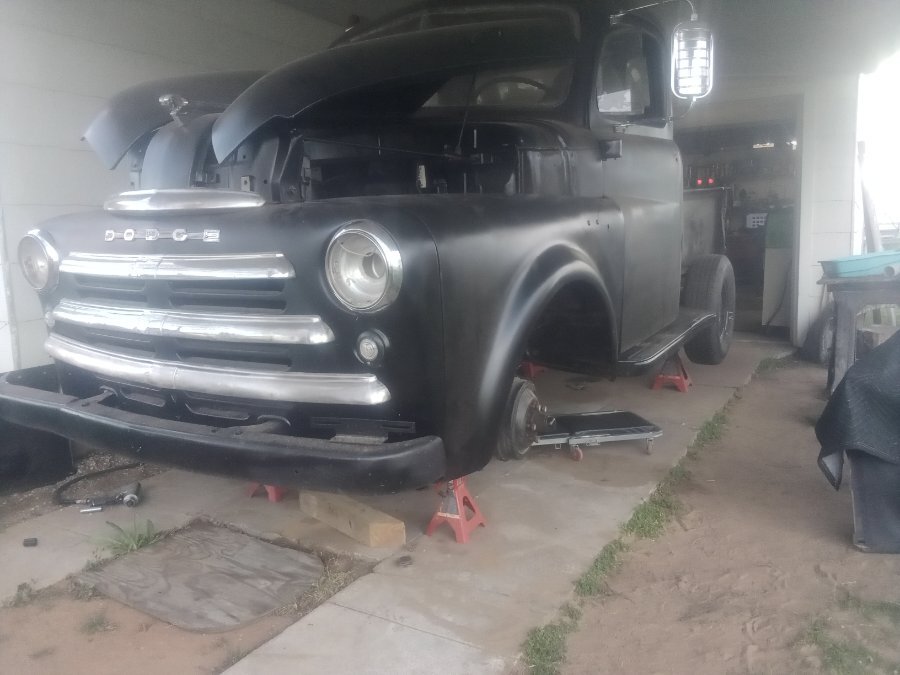
-
ANSWERED Installing inner front fenders.
Los_Control replied to Los_Control's topic in Mopar Flathead Truck Forum
Yes sir I am, I never tried from the top through the hood. You can see in the photo I would need to shorten the fender 5" to get it past the core support and radiator. No way I can turn it sideways and slip it in. I dunno about your big truck with the 25" engine ..... no way mine is going through the top ..... because I'm not restoring my truck, just repairing it .... I never took the shock mounts off the frame so I'm working on taking out the 75 year old bolts. ..... One of those days just not getting a lot done.
-
ANSWERED Can anyone identify this car? OT
Los_Control replied to John Reddie's topic in P15-D24 Forum
Using google image search I also see the exact same photo on pinterest saying it is a 1938 Volkswagon. Here is a random photo of a 1937 Volkswagon ..... I still say the Bugatti is cooler
-
ANSWERED Can anyone identify this car? OT
Los_Control replied to John Reddie's topic in P15-D24 Forum
This is what it reminds me of .... Bugatti Type 57 ..... But we only see the rear and nothing else. It is a foreign car according to the license plate. Maybe there are others that look like a Bugatti. The louvers in the rear deck lid does not look correct but who knows? ..... This is my guess. I did watch Bad Chad for a few years and he is building one for his girlfriend from scratch. I should add, when @Plymouthy Adams checks in, I bet he knows -
ANSWERED Can anyone identify this car? OT
Los_Control replied to John Reddie's topic in P15-D24 Forum
Have to admit, I have not seen a invisible car before. -
ANSWERED Installing inner front fenders.
Los_Control replied to Los_Control's topic in Mopar Flathead Truck Forum
Thanks Keith, this is what I'm looking at ..... I worked on it for awhile last night and gave up on it. Tried again this morning and only way I can see it is the fender needs to go behind the shock ..... I have tried to lift it up through the hood but can not get high enough to get over the shock. I have tried to put the bottom in first to get it past the shock & swing it up. I have tried to sneak it in anyway I can think of ...... I'm not very good at jigsaw puzzles either. I got snookered into taking the wife to the grocery store so no chance to remove the shock mount yet ..... going to try that now so can move forward.
-
It's been awhile since I have taken this truck apart ..... same time I was taking everything apart so not sure if I removed the front fender first or what I did. Seems like others with their cars they just remove the front tire and unbolt the inner fender and pull it out. I remember watching one of @keithb7 video on adjusting valves and was a non issue .... thinking his 38 Chrysler does not have a straight axle front end though. I'm just not seeing A way to get it past the shock mount without removing the shock /mount then installing the inner fender then re-install the shock & mount. Is this the proper way for trucks? ..... Guess I'm going to try it and see, just not sure thats what others do.
-
Cleaning carbs without toxic chemicals
Los_Control replied to lostviking's topic in Mopar Flathead Truck Forum
While I do not feel I have enough space for one in my little garage to justify how little "I" would use one. I often watch one youtuber that does a lot of carburetors and has the space so naturally has one. Couple years ago he made a few different videos and would talk about the different solutions he would try in the ultrasonic cleaner .... in the end he went with Berrymans carb cleaner. Nothing he tried really did a good enough job on the carburetors. Later on he bought the larger sized cleaner for carbs and he uses the smaller one with some sort of soap for non automotive cleaning .... jewelry and such. Making youtube videos, seems like every week he is going through a different project and all of them need the carb cleaned .... so he uses it a lot. You might find something that works to your satisfaction that is less toxic .... let us know. -
What I meant is, I buy it by the gallon. I buy walmart super tech for $19.98 per gallon .... Then the name brands are always $25-$30 a gallon. .... $10 more. I have researched and found the cheaper walmart oil is basically same quality ..... simply does not have the same packaging as the name brand oils. This is what I do, I understand others have their own preferences.
-
ANSWERED Floor Replacement
Los_Control replied to RobRobitaille's topic in Mopar Flathead Truck Forum
I understand that totally. I did cut the brazing out and removed my seat base ..... I did not have a lower seat to put back in it. Now my seat base is heavily modified, flipped upside down & backwards ... Has several supports welded into it for bucket seats and seat belts ...... I doubt anyone has a seat like mine. ..... But it started out as a original 48-50 pilothouse seat base. It still is flat and straight across the top & bottom, is the floor that changed in my case. -
You're just not cheap like me .... I get synthetic GL5 for about $20 a gallon .... GL1 at a specialty house is over $10 a quart .... Says the guy that is currently replacing the pinion bearing on his daily driver that runs the same oil .... In fairness I can not blame the oil on a vehicle that has over 400k miles on it ..... possible it is my choice of oil but no way to confirm it. I'm changing the bearings but not the oil.
-
ANSWERED Floor Replacement
Los_Control replied to RobRobitaille's topic in Mopar Flathead Truck Forum
My first time also. I think what matters is your end goal for the truck .... Will it be a 100 point show vehicle? .... I doubt it since it is your first floor replacement. This is also my first floor replacement .... my goal is for it to be rust free, painted and I want to drive the wheels off of it. .... Use it as a work truck scratching up the paint in the bed and not care about it. ...... So what is your goals? I made a first time mistake installing my floor. You can see where I cut out the floor pan, the upper level relaxed and bowed. I did not catch it and welded the pan in this way. Now with the seat base in, you can really see the bow. .... sits flush on the ends, big gap in the middle. .... Next time I promise to do better. I'm not going to beat myself up over it and use it as it is. First I will see how close I can get it using bolts and sucking it down tight .... then I will use washers or shims to be sure it is tight ..... I have 16 grade 5 bolts going into the seat base & floor and will use the base for my seat belt attachment point. I will trust my life on it and it will be fine. .... The base is still straight across the top, will never feel it in your butt. The floor has a small wow to it .... will never feel it in your feet ..... nobody needs to look at it ...... So it just depends on what you want to do. I like to watch a clown on Youtube weld in body panels, Just amazing to me how he can take a car apart and fix it using basic tools most of us have in our garage. His last car was a 1967 camaro ..... Was fun too watch how much rust he found as he dug into it deeper .... within 6-8 weeks he had replaced every panel on that car. He was really good at pointing out the differences between the factory sheet metal and the modern replacement panels. Point was, the original metal was not great as if there was no real quality control on the assembly line .... there were original panels way out of specs when you measured them. ..... We all knew body panel fitment was never good in the 30, 40's, 50's .... he proved not much better in the 60's. So when you say one side is 1/8" out ..... fix it if you need to, just your choice. ..... These old cars were never that exact in the first place. My example is a flat out mistake on my part .... I'm comfortable living with it and promise to do better next time.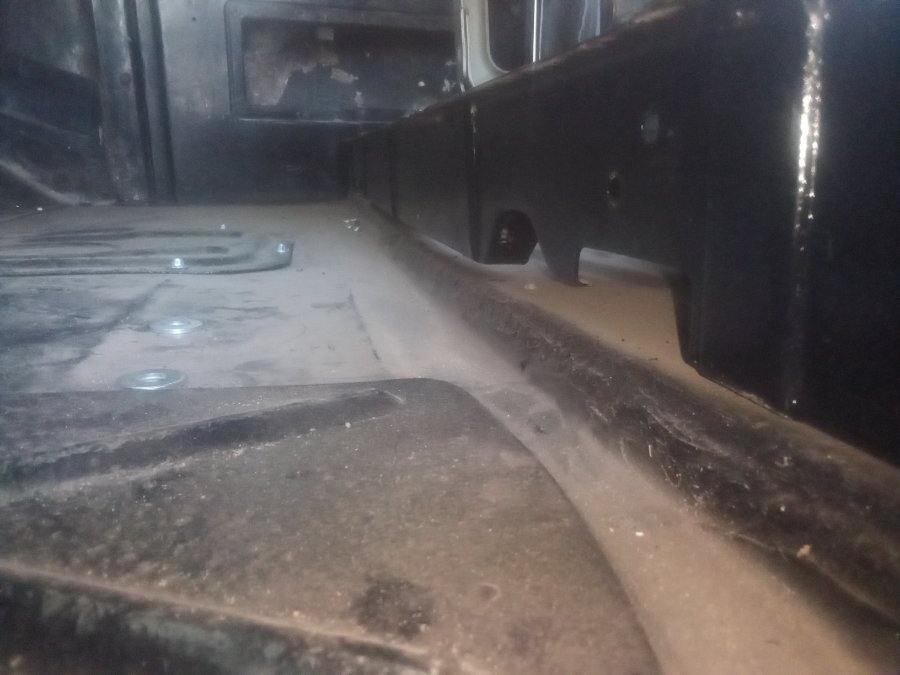
-
ANSWERED Floor Replacement
Los_Control replied to RobRobitaille's topic in Mopar Flathead Truck Forum
Really is looking good, I know it looks better then mine ..... I just kept fixing junk though. -
I'll tell you what I did .... does not mean it is correct. The key is to read the label on the bottle and you are looking for words such as .... Protects against rust, foam, high temperature, and corrosion of copper or bronze bushings. I once found a chart that had the differences of GL1 through GL5 oils ..... Wish I would have saved it. Basically when our cars were new, GL1 is all that was available. .... The chart said that was good for heavy hydraulic equipment that sat outside and basically not that important. .... but it did have some very good characteristics such as resisting condensation. Then improvements came along with GL2, 3, 4, 5, far superior oil. ..... By the time GL4 came out, the automobile manufacturers were no longer using copper, bronze, or other soft metals in gear boxes. ..... They stopped adding the needed additives to protect these softer metals .... then there were failures in older vehicles and many complained . Not sure when the oil companies started back at adding the correct additives for older vehicles .... maybe not all oils have it. So you have to read the label to see it does have it! I'm using walmart supertech synthetic oil GL5 85-140 because thats what available to me .... it has the correct additives ... or claims too for our old cars. Thats what you need to look for ..... you may have your own oil brand preferences, you need to see it has the additives for your vehicle. The research I have done on walmart super tech engine oil, The 5/30 I run in my daily driver is the same as Mobil1 synthetic. .... It is made in the exact same plant but it is put into different bottles with different labels for walmart ..... And $10 cheaper. Choose your own oil, just be sure it has correct additives for older vehicles.
-
Interesting question. Since the heaters were offered as a option and not shipped with the truck. They were either installed at the dealer or bought aftermarket and installed from the owner. When I went through my heater I wanted to test it to see the motor actually did work. I had no idea which wire was ground or positive. I just connected them to a 12 volt battery .... It truly did not care which wire was hot and which was ground .... it ran really fast since it was a 6 volt motor on a 12 volt battery. I'm only suggesting that this type of motor does not care, it will run and spin in the correct direction no matter which way you wire it up. I have been wrong before , I have no idea which motor you have by reading your post .... just touch the wires to a battery and watch it spin. I get it, sounds like a really stupid answer to a honest question .... Honestly the way some electric motors are made or wound .... they really do not care. The electric heater motors are one of them ..... in my experience.
-
Looking good!
-
You do incredible work and making great progress on your project. While taking care of the home life. I think what it is, time management. Some people are just better at it then others. I'm now medically retired .... I remember a time when I could manage time .... direct the sub contractors keeping them happy while lead carpenter on the job site get my job done also. ..... Today I work 10 minute, sit down for 20 .... work 15 minute then go get a sandwich Last couple months have been dealing with a brother inlaw in the hospital. Lots of driving 75 miles one way .... He has now passed away and that is over. The weather has changed, seems like spring here and I do work under the carport .... so been back out getting things done. First thing I needed to do is clean up the back yard and take care of the garden, things I have been putting off. Then with all the driving with my chebby truck the pinion bearing went bad. .... I was crying on @Sniper shoulders last night about it He has big shoulders. With a clear head today I finally figured out exactly what rear end I have and was able to order all new bearings for it ..... hoping and praying I have not damaged the ring & pinion .... I inspected it a few months ago when I changed the oil .... everything looked perfect so I hope it is just bearings and no further damage. So now I'm going gung ho on the Dodge just to complete the task that requires it to be on jack stands. putting the gas tank in today, got one fender almost on .... only goal here is to get as much done as I can, so I can get it off the jack stands and out of the work area. So I can pull the chebby in when the parts arrive. I will have updates in a few days on my build thread, just not a lot to report today.
-
Question on installing fuel sending unit.
Los_Control replied to Los_Control's topic in Mopar Flathead Truck Forum
OOOPS! did I do that? What a idiot I am, I looked at it again this morning .... I was in the wrong hole. The tank is setup for a universal 6 hole electric fuel pump. The basket is for the sock on the fuel pump to sit in. I did need to cut a couple inches off of the float rod because it hit the basket ..... now it looks right. I did install it with the float about 1.5"-2" off the bottom ..... looking at it last night, it just looked wrong and I was questioning it. Also put a dab of epoxy on the set screw .... looked a little wimpy and could vision it loosening up and the float rod falling off. Now the epoxy will probably fall off and plug the fuel filter -
Back when these cars were in daily service, it was common to have a mechanic at the local gas station do rings and valves. Simply drop the pan and pull the head and then do what work was needed with the engine still in the vehicle. I understand that you are too busy yourself to do the work ..... Here on facebook we have a mobile mechanic that is local. .... just a idea. If this is true, and the engine sat for a long time not being used, it is common also for the cast iron rings to stick to the aluminum pistons. Two dissimilar metals causing corrosion. The rings are a spring that expand against the cylinder wall to seal. They also need to freely rotate in the ring landings of the piston. Obviously if they are stuck to the piston they wont seal and will smoke like a freight train ..... Is possible you have just one offending piston/cylinder causing your problem. A compression test would tell you .... also looking at the spark plugs to see which ones are oil fouled would tell you something. Personally I would drop the pan and pull head ... you need to know if the cylinders have been bored in the pass to find out what size rings to order .... top of the pistons would be stamped with size .... no stamp then stock pistons ... in theory. I would want to measure the bores looking for taper just to know what condition they are in .... Hone the cylinders and slap it back together with new rings. Rings are fairly cheap, and if the cylinders are worn and need bored .... you will now know and can make a game plan from there. If the Gods are smiling on you all will be fine .... if not, I bet it will at least be better and not smoke as much and you will be able to drive it again while making a game plan. As far as bearings go, if you have good oil pressure the bearings are probably fine .... but inspect them for wear and replace if needed. Again if it was rebuilt and the crank was turned, the crank will be stamped to indicate proper bearing size. These engines are very forgiving, they do not have tight exact tolerances like modern engines .... No rocket scientist needed to work on one. Seems you should be able to find someone that can help. Machine shops are crazy, seems like they might be getting forced out by rules and regulations ..... there are very few left out there. I talked to one last week about a short block for my wife car. Is a fair price, no core needed they have the block in stock. Pay 1/2 down and takes 3 months to build it. And it is a 3.5 hour drive one way to pick it up ... closest shop I could find. There is a shop closer, but they only do specialty work for off road construction vehicles. And thinking they may add automotive down the road.
-
Yup we all a bunch of slackers ...... except that @ggdad1951 ..... he has way too much time on their hands.
-
Question on installing fuel sending unit.
Los_Control replied to Los_Control's topic in Mopar Flathead Truck Forum
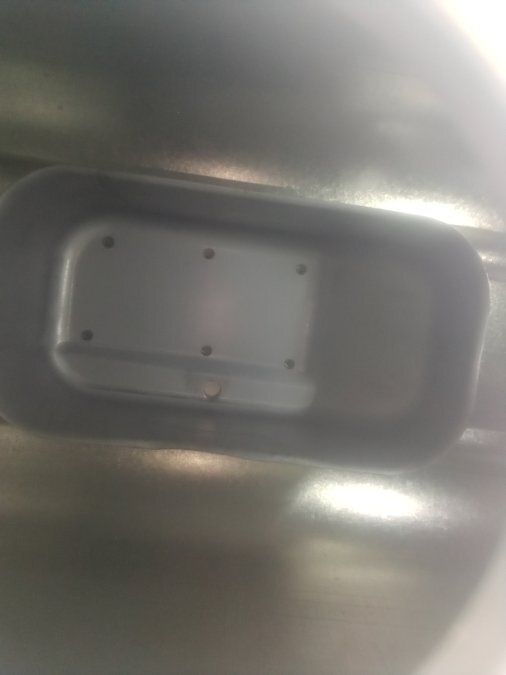
@Veemoney let me ask you this ..... does your gas gauge wander really badly with no basket? I also think you are correct in the basket is there to keep the the float from jumping around too much. I also wonder how effective it is .... Will it really be worthwhile difference if the float is outside the basket? You do not have a basket. I also think a true baffle should reach across the tank stopping fuel from sloshing ..... not just a basket in the middle of the tank. So while I'm looking at it .... I'm tempted to say "thats cute" I really do not think it is effective .... Think I will sleep on it and tomorrow just bend the rod to get past the basket. I simply can not see any reason to keep something that will not work in the first place. -
Question on installing fuel sending unit.
Los_Control replied to Los_Control's topic in Mopar Flathead Truck Forum
Thanks Bob that's good advice to add a ground strap .... I really was not thinking about it. The tank is a aftermarket direct fit for a earlier Dodge 47 and down truck .... For a 49 they actually need a modified rear mounting bracket. So I have modified the rear bracket and actually posted a how to thread for others that wanted to do the same. I suppose I could call Tank's and ask what they suggest. ..... I bought the tank and sending unit 7 or 8 years ago. Just never installed yet. I think I proposed 2 different installation methods .... I'm thinking they want the float in the basket. I'm thinking I would prefer to leave it long and outside the basket. Just wonder what others think ...... I'm often known to be wrong. -
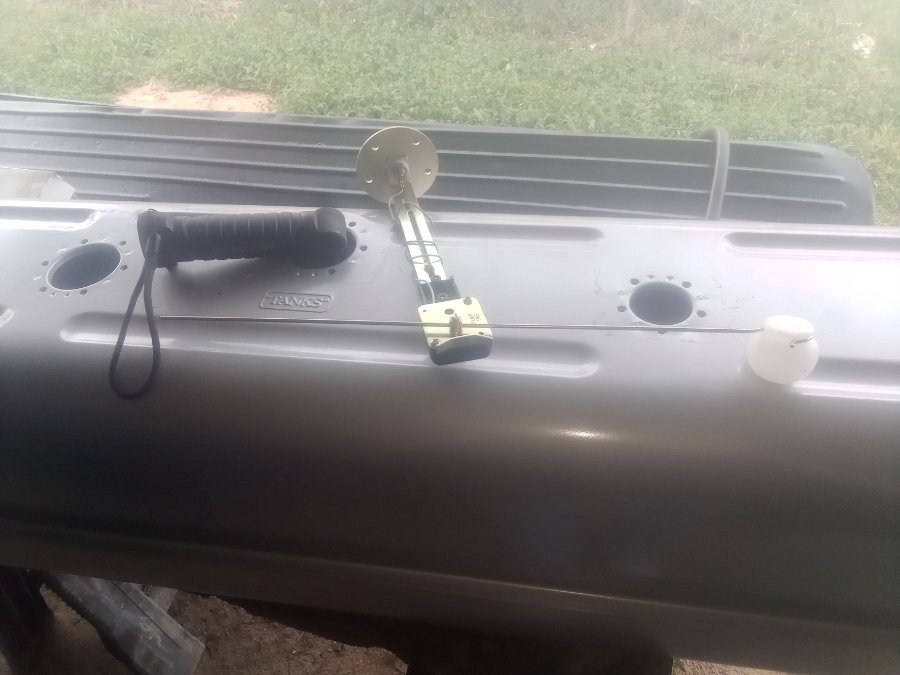
I'm really mentally challenged on this stuff. Looking inside my tank's gas tank straight down is a basket/baffle .... Instructions say to leave the float 1/8" off the floor. I only assume they want the float installed inside the baffle. Here is the float for the sending unit bought from Tanks same time tank was purchased. If I'm to get the float inside that small basket directly below the mounting point ... I will need to cut over 3/4 of the rod off the tail end so it will actually go through the mounting hole & fit in the basket. The photo is still a few inches too long. ..... once you cut it off it would be difficult to put back on. ..... So I'm skeptical. Same time if I leave it long and let it hang over the basket, it sits about 2"-3" above the floor because it is sitting on the edge of the basket. Honestly I would prefer the float above the floor a few inches just so when the gauge reads empty I still have a couple gallons reserve before running out. Butttt, if the float arm was sitting on the edge of the basket, the gauge would never read empty. Too correct this I would need to bend the rod to clear the basket at least 2 bends so it clears and the sending unit still bottoms out and the float is a couple inches off the floor. Pretty sure I'm overthinking this .... Should I just cut it short and stick it in the basket? Or bend it so it operates outside of the basket ? What you all think about this?
-
Very cool you tried though. I'm still skeptical about this year .... it has been unusually warm down south in TX .... 84 degrees today, just 2 days ago it was 25 degree when we woke up and went up to 35 in the afternoon. ..... Just not a normal weather pattern this year anywhere.
