
Los_Control
-
Posts
4,284 -
Joined
-
Last visited
-
Days Won
27
Content Type
Links Directory
Profiles
Articles
Forums
Downloads
Store
Gallery
Blogs
Events
Classifieds
Everything posted by Los_Control
-
At least NPT is the same in both Canada & USA Same deal with my tank, from Tanks. Uses NPT. ..... I used a flexible line from the tank to a filter mounted on the frame rail. I thought about running hard line to the frame then add a filter ..... such a short run on a truck just not worth it.
-
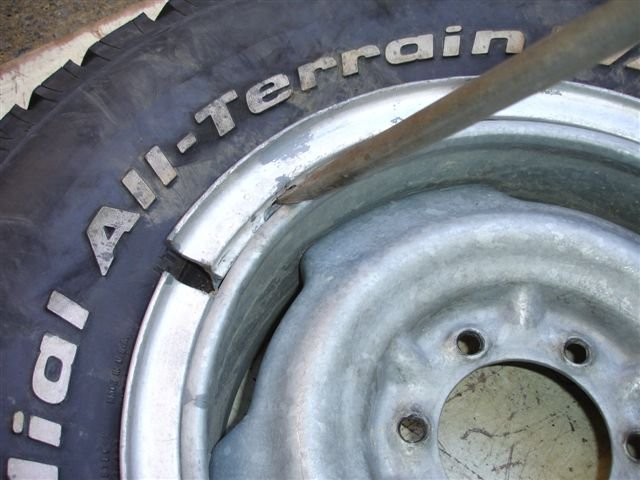
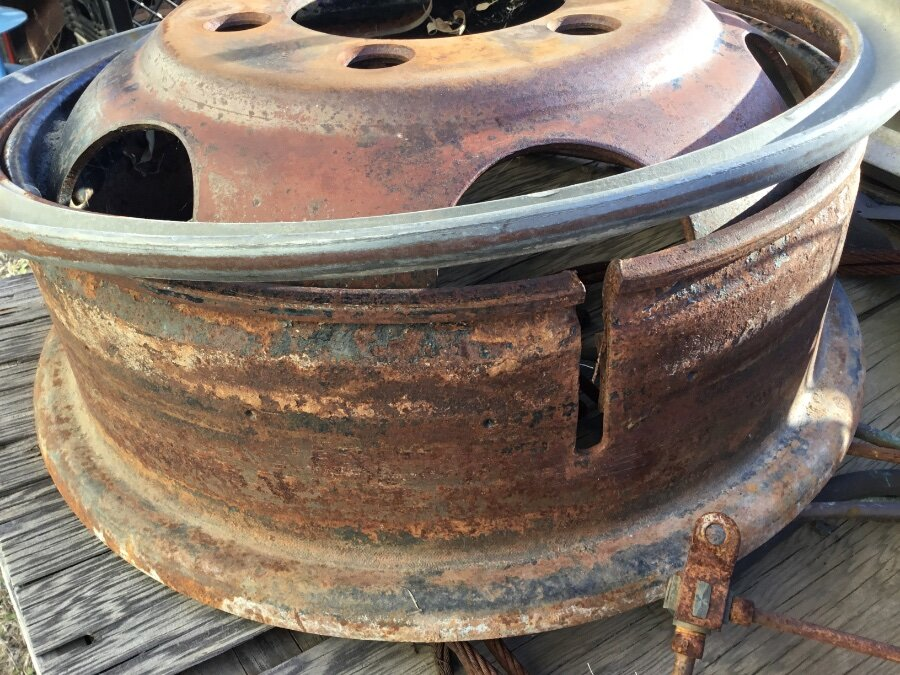
Going to steal some photo's from the internet ..... You need to break the tire away from the wheel. .... here soap and water helps. Then as 9' box says, there is a notch in the ring. That notch is there exactly for removing the ring from the wheel. .... you just get it started and work it loose. First you want to smack it around a little bit to get it loose. Rust forms and wants to stick to the rim .... you do not want to damage the ring though. .... If the tire is loose & the ring is loose .... ring comes off easily. Just remember, the ring is a spring of sorts. And we can see the lip on the spring as it is being pulled out of the wheel. If that lip is damaged in anyway from rust or bent ..... You do never put it back together. Because the ring is a sort of spring. when you lay it flat on concrete .... it may not lay flat. If there is any damage or bends to the ring .... it is junk. If you take apart a wheel and it looks like this ...... I would never put back together a wheel that looks like this. The wheel may be just fine, it needs to be sandblasted and inspected thoroughly before deciding. Your carefully inspected lock ring needs to mount to the wheel ..... If the wheel is heavily rusted .... you might lose your head. Nobody should mount a tire on that wheel in it's present condition ..... unless you a farmer, they play by a different set of rules. There is a bit of a process to remove the tires from your old wheels, not really difficult though. .... I say get them dismounted and show pics of what you have. Then we can move forward. I suspect any full service truck stop that takes care of 18 wheelers can change the tires ..... because of current condition they just do not want to waste time on them .... welcome to classic vehicles where we do the work so they do not have to. ...... Bring them fully restored wheels and they will be happy to take your $$

-

Imteresting project $3600
Los_Control posted a topic in Ebay, Craigslist and External Site Referrals
nowhere near me but would be curious to know more about it. This is a 1940 Plymouth sedan has a 413 Chrysler engine with the 727 transmission. Engine and transmission and steering column professionally installed. It is a project car it does need to be finished. https://www.facebook.com/marketplace/item/440774855160232/
-
Potential cheap shock relocation Mount option
Los_Control replied to Dan Capeci's topic in P15-D24 Forum
Sadly they nay or may not have them .... They do have a nice goodbye letter .... just selling off what they have in stock but think they wrote it 2 years ago. https://www.rustyhope.com/ -
Reminds me of a story about old Uncle Cletus. ..... The girls in town would claim he needs to go home and clean that input shaft up .... What the heck do they know? IMHO, the splines on this shaft look really nice with sharp edges on the teeth ..... little wear on the front of the shaft. To me it is like the first 1" of the shaft that inserts into the pilot shaft bushing ..... I would want that really smooth . I would use some emery cloth to smooth it up .... same time i would not want to remove any material and make it smaller ...... I would put some grease on the end of the shaft and shove it into the bearing. I doubt I would ever have a issue with it years down the road. The 2nd photo you showed, looks a little awkward ..... It may work also. If needed.. The very front 1" of the shaft sits in the bearing. Just saying the very first 1" sits in the bushing. The clutch disk is splined and rides on the splines of the input shaft. The pressure plate is behind the clutch disk, and the throw out bearing is behind the pressure plate ..... Nothing matters between the the splines and the front of shaft .... Only that the front 1" is smooth for the pilot shaft bearing. Thats why I say the 2nd photo is awkward .... It looks good 1" in front but then has a groove cut into it ...... That area is simply not in use .... nobody cares .... the factory cut a groove in it for some reason ..... Just pick the best one to use. You will be fine.
-
I admit to going to tractor supply often also. My jack stands, floor jacks .... Boots, bolts, the paint on my truck, plants and garden supplies. I think of it as a big convenience store that sells things I like .... I recently went there to look at oil. I buy my oil from walmart usually, I need Dexron III ATF for the wife car. Walmart did not have it. So I looked at TSC ... they did not have it either. I will order from Amazon now. What I did see was some pretty incredibly high prices for oil at TSC. Oil at walmart was $20-$40 for 5 quarts, $40-$65 at tsc for same stuff. I like tsc but not for oil. .... And the shelf's were pretty bare.
-
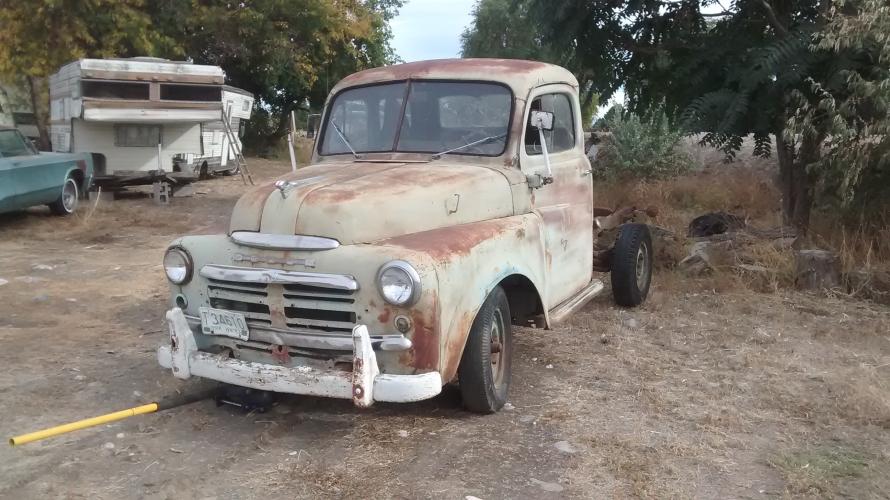
ANSWERED Getting the truck ready to drag home
Los_Control replied to Bobacuda's topic in Mopar Flathead Truck Forum
C'mon now, my story and get to tell it the way I want .... 🤣🤣🤣 Not sure what is more important, chatting with my 85 year old Uncle on the front porch on a spring day telling me the story ..... Or the actual truth to the story. I sure would like some more days with Uncle telling me some stories .... -
51 B3B build thread - after all these years
Los_Control replied to bkahler's topic in Mopar Flathead Truck Forum
Interesting here .... left side looks centered while right is not. Is it possible one of your frame horns is bent? Have you checked bolt hole alignment with your bumper? Just hard to say which side is off. Myself I think I would get the sheet metal lined up and bolted in place. Then figure out which side needs adjusted and how much. But, if one was bent the bumper holes would not line up .... If they do line up .... then both would have to be bent equally? If you raise the front nose up to fix door gaps, will the alignment of frame horns improve? My frame horns have approximately 3/4" space all the way around the horns ... top and sides.
-
51 B3B build thread - after all these years
Los_Control replied to bkahler's topic in Mopar Flathead Truck Forum
On my truck when I took it apart, there were rubber spacers in the very front bolts for the core support. Adding spacers there, will raise the front and close the gap at top while opening the gap on the bottom. No idea if you have them in place. I have some new 1/4" rubber I cut mine out of, and were about the same as I removed. I also assume you have new rubber cab mounts .... they probably sit a little higher then the old dried out originals. So even if you installed the same rubber spacers up front ... you probably need to add more to match the new cab mounts. Just my best guess assuming you like the way the doors fit other then that. Just a 1/8" washer may fix the gap you show. -
In the past I always just used a correct fitting socket to drive in a new pilot bushing. I like the idea of using bread to remove the old one ..... hydraulics work great. Driving a new one in was always just clean up the hole and pick a right size socket to fit the bushing. .... Then drive it home. I think it was one of those cheap 5/8" spark plug sockets we never use last install of my pilot bushing. ..... Just suggesting a special tool is not needed. What you want is a socket or spacer or something that actually fits well. A special tool is not needed, you just need a correct fitting socket from your tool box to install it. Same difference driving in a wheel bearing race or any other bearing .... You just need something that fits the race and will not destroy it while driving it in. So buying a special tool to drive in a pilot bushing ..... It might be a good tool, you might be better off just searching through your old junk sockets and drive it in that way. I'm just saying that a lot of cheap tools are available and never actually work. A cheap socket that cost you $5 to replace, may be the best tool. You are looking for a tool that will fit inside the hole .... sane time it will provide protection as the bushing is driven in ..... A screwdriver will cause damage ..... but a correct fitting socket will drive it home with no damage. ..... Never in my life did I buy a pilot bushing tool ..... For a $$$ you can buy a set of tools to install any bearing....thats up to you.
-
Glad you may have it figured out. Or think you do. I once rebuilt a carburetor for my Uncle 7 years ago. And when I opened it up I saw terrible looking goo. It looked like water in oil .... A chocolate milkshake. 85 year old Uncle complained because the carburetor had just been rebuilt and that did not fix it. I just never seen gunk like that build up in a carb. It was obvious to me the problem was coming from the fuel tank .... the 1979 Dodge truck had sat for years .... then revived and put back on the road. Uncle claimed he put $20 worth of gas in it every 6 months, but it was always adding fresh gas to old gas ..... Modern fuels to pass regulations today simply do not last more then 1 year .... just turns to goo. While it may be water in your fuel system, it could just as easily be old gas that has gone bad sitting in the tank. I'm only suggesting, thats what my Uncle did .... just kept adding new fuel on top of old. .... Ended up with a pile of goo. My understanding, modern fuel starts to deteriorate after 1 year. .... It simply turns to goo. ...... I have seen no evidence that adding new fuel on top of old rejuvenates it. I personally will drive the fuel out and then add more fresh fuel. Back in 1970's, Grandpa went and filled up every gas tank in his wrecking yard because the gas would last a long time .... Modern fuel is designed to implode on itself to help with evaporation. 1 year is considered it useful age and needs to be removed and replaced. Either way, drain the tank and flush the system may be a good idea here.
-
My first thought, a pinhole in the line can cause issues ..... the electric fuel pump should point it out quickly. .... I'm not positive a electric pump will overcome a leaky line to make it run ..... it should show the leak though. I'm going to throw a different idea out of left field. ..... When was the last time you got fuel and when did the issue happen? If you have water in your fuel, it is heavier then gas and goes to the bottom .... then you drive and you mix it all together and it gets passed into your carb ..... It might look like a air bubble coming through the glass filter? .... Just a idea .... It will cause issues that are hard to describe. .... It has been known to happen that a gas station gets fuel delivered with water in it ... by accident, and then there is condensation and other things that could cause it. We used to be able to buy a bottle of HEET at the local gas station for $1, pour it in the gas tank and it enables the heavy water to mix with the gas and it just runs through the system as a lower grade fuel .... then the next time you fill up you have no water and quality fuel ..... In theory. I fought a strange issue for a long time and spent many hours and $$ trying to fix it ..... a $1 bottle of HEET was the cure in the end 6 months later. If you drain gasoline into a white coffee cup and let it sit. If it has water in it, it will look like a air bubble sitting in the bottom of the cup. It is possible that is what you are seeing passing through the fuel filter ..... Just saying it may not be your issue ..... I see now they switched up the bottle and now is $3 ..... it just wont hurt to try it.
-
There is a youtube channel I watch sometimes ..... guy is a pretty fair mechanic and has interesting content. What he uses is bar oil for chainsaws. He thins it down with paint thinner then uses a pump up garden sprayer to apply it. The paint thinner evaporates leaving the sticky oil. Then he drives the vehicle down a dirt or gravel road and coats the fresh oil with a layer of dust ..... just helps give the oil a protective layer to keep it in place. This is what he does to his daily drivers, not sure he would do it to a classic car ... that he would not drive in the winter. I like the idea because it is cheap, easy to do, and it is not permanent. He says he needs to repeat the process after about 3 years .... If he needs to work on it he has a lift and can just raise it up, pressure wash it to clean it and when finished just apply more. Compared to spraying undercoating on that is permanent and a pita to get rid of .... I would choose this method if I needed it .... Texas I do not need it.
-
This car was covered with the stuff under the hood when new. I mean on the firewall, inner fenders, all heater .... It was a dual heater car and of course underneath the car. I imagine it was done at the dealer when it was new ..... what a mess to try and go through and remove it all .... Under body is one thing, but inside engine compartment is another.

-
Just do the best you can to embrace the suck. Mask and glasses and various tools to chisel away the junk ...... Not sure if common today, it was common back then to apply undercoating and charging extra for the process. Who knows what works best to remove it ....they used different products back then to try and be the best ..... Maybe warming it up with a heat gun will help remove it ..... chances are a chisel and hammer will get the job done. Just a terrible job to be lying underneath it and dropping the crap on you ..... Rough job but someone needs to do it!
-
Large or Small Driving lights on my 1939 DeSoto
Los_Control replied to desoto1939's topic in P15-D24 Forum
OK PA, if you have a minute ..... tell us how you really feel about red wheels -
While I say it jokingly, it certainly was a thing. I'm just saying to @Cooper40 cheap tools may be fine here ..... just do not make them too cheap & junk. At home we are just checking for consistency, the machine shop we are paying and expecting 100% accuracy.
-
Thats fine but measuring is still important. If the op finds a journal wore more then most, I suggest taking a break and drink a beer. Then the beer can can be cut up to make shims to make the bearing fit tighter within specs ..... You will never know if not measured. Again if the tool is a 1 or 2 thousandth off, we are concerned with how many shims are needed behind the bearing .... not the accuracy of the tool. The more beer cans needed to be emptied to complete the project ......
-
Myself I'm the guy that wants not the cheapest tool, but am looking for things that might be well built at a reasonable price. I will need to get a ok set of calipers in the future, I plan to use them so little I would not spend a lot on them. Important to measure piston cylinder wear. They typically wear in a egg shape .... As the piston goes up and down, the crank exerts pressure to the cylinder unevenly as it goes around. What you are looking for is consistency. Trying to figure out how badly worn the cylinders are ...... People like to set the ring gap differently for different reasons. So if your tool is a couple thousands off, it is no big deal .... Total accuracy is not important here for checking ..... I'm not even going to take 3 seconds to look, I bet there is a machined block of metal available cheap, to test accuracy of your measuring tool. Just a piece of metal for a couple $$ designed just to check accuracy of your tool. So same deal, the end goal on measuring the rod & main bearings. You use the plasti gauge and measure the thickness with feeler gauges. What you are looking for is consistency from one crank journal to the next to decide if you can use it without machine work. You are allowed a few thousands play .... If one journal is 15 thousands out from the rest ..... you just know it will not work .... does not matter if the cheap tool is one or 2 thousands off .... you are just checking. So my thinking is, I can use cheap tools at home and decide if I can do a quicky ring & bearing job at home. .... I'm looking for consistency not accuracy. If I decide that the measurements just wander to far out of tolerances and I need a machine shop to straighten it out ...... That MOFO better have over $6k in measuring tools. Because he does it for a living and sells his service as a product. Any competent machine shop will stamp the size on the piece. For example bored cylinders the pistons will be stamped telling the size of the bore. Same with crank, I have a engine that was turned 10 thousands on main & rod journals and it is stamped 10/10 ..... it is in a very obvious place and easy to read.
-
1954 Plymouth Belvedere engine and transmission swap help
Los_Control replied to rmon746's topic in P15-D24 Forum
This will be a learning experience for you. I imagine the first step might be to choose a engine/transmission. A common swap for these old rigs is a Dodge 318/transmission. ..... I'm the guy that says use whatever you have available ..... A SBC works just as well also. Then you will need to locate it in the frame where you want it ..... set it on blocks to mock it up ..... then you will need to build mounts for it and properly secure it. Then you will need to address each new item as you go. Modify shift linkage, build exhaust, throttle linkage ..... drive line. There is no book written specifically for what you want. First step is to get the engine/transmission and work from there. ...... If you get too new, then you run into electronic computer controlled systems that just add ccomplexity to the project. For example I picked up a 1970 318/3spd to set aside for a future swap. ....... you may be able to find a good 360 at a local wrecking yard that will work. The 360 replaced the 318 and share the same block ....if you can find a older one without electronic transmission. -
From another friend in Dallas .... They are directly in the path. I'm 3.5 hours West of Dallas but parallel to the path .... I saw it get a little dark is all ..... this video from a drone. Guy is at work and took this. It starts at about 7 minute into it and it really gets dark there in Dallas .... nothing like that here.
-
Pictures are from another forum a friend who is closer to Dallas took them and just posted .... I'm just sharing them. I am not exactly in the path either .... I did wake up the wife from her afternoon nap to show her what was going on and was a once in a lifetime deal to see it .... I put my welding helmet on her ..... I explained the main show would be here in about 3 minute ..... cool she said and went back to her nap. Last photo I think it is Jupiter you see.
-
Sitting here eating some left over pizza for lunch and saw this thread. By golly it is getting dark out there. I put on my welding helmet and went out and looked around. ..... Currently the sun only has 1/4 showing as the moon is covering it .... Radio says 10 more minute and will be totally covered. Make that Z fly!
-
ANSWERED Getting the truck ready to drag home
Los_Control replied to Bobacuda's topic in Mopar Flathead Truck Forum
Must be a Texas thing .... My truck had a female plug coming out by the rear bumper. Good heavy wiring going to it. The only scenario I can dream up, The owner was a night watchman at a construction company. I guess in his free time he would go night fishing. Sit on the tailgate and plug in a automobile head light and shine it over the water to attract fish .... I've heard light attracts fish ... I've never done it myself though. Same time I guess a guy could use a extension cord rigged to a head light and use it for a work light. ...... These were common articles a farmer might have laying around and easy to put together and make useful. ..... A good quality flashlight back then had big bulky batteries and were probably expensive while a old car headlight bulb was probably free in the back pasture.