PT81Jan
-
Posts
211 -
Joined
-
Last visited
-
Days Won
3
Content Type
Links Directory
Profiles
Articles
Forums
Downloads
Store
Gallery
Blogs
Events
Classifieds
Everything posted by PT81Jan
-
Hey Keith, I had a slightly leaking radiator about 2 years ago. ´39 Plymouth truck, non-pressurized, also. My "testing tool" was a hair-dryer. I removed the radiator, drained it. I saw some green spots at the honeycomb structure. Verdigris. Applied warm air flow to the green areas, which of course dried it, but at the same time soaked moisture through the leaking areas to the honey-comb surface. Capillary effect. Means: dry - moist - dry - moist ... uncountable. The 2 or 3 obvious leaks were in fact 10 or maybe even 15. I blow-dried the radiator until the leakages stopped to get moist. Then thoroughly cleaned them with solvent. Applied epoxy resin to the concerned areas and blow-warmed them also -> Effect: epoxy gets a little thinner, soaks into the leaking micro gaps and hardens quicker. Works w/o any further leakage since then.
-
A member asked me about details / specs of the brake adjustment tool I posted on Jan., 17th. (post No. # ? Formerly No. of posts were displayed, cannot see it now ...) I added a sketch (.pdf) to that post in case someone needs it, too. Note: 1. I t is not a true scale drawing and doesn`t contain all dimensions, tolerances and surface specs. Just a little info of the main dimensions. 2. Also I do not know, if there are different axle / steering knuckle dimensions. The specs are for my 1939 Plymouth Truck. 3. Dimensions are in mm (sorry...the member who asked is European also) - divide by 25.4 so you will get inches.
-

ANSWERED Antique truck insurance
PT81Jan replied to 47 dodge 1.5 ton's topic in Mopar Flathead Truck Forum
Ok, a little out of competition, I live in Germany. So maybe at least a little entertaining ;-) When I was looking for an insurance for my `39 Plymouth Truck in 2014, I first asked the insurance company of my daily car and motorcycles (get quantity discount). Offer for annual insurance: Something between 900 and 1000 € (roughly 1100 - 1200 $) - yiiikes .. But: That company is not set up on classics. 2nd: Looking for insurance companies, that are set up on classics: Half the costs. But 500 was still ... hmmm. Asked guys who were driving around with classic cars. Especially US classics. Told me to got to xxxxx -> An insurance I never ever would have asked, because really premium expensive priced. Got in touch with the xxxxx-insurance agent (had to show pictures and detail info). She like my truck very much and gave the best to make an attractive offer: "... is 94 € o.k .. ?" I: "per month .. quarter year ...? She "per year" ... I: "okeey, not too bad"... 2 days later she called me at work and told me to come to the office asap. Issue: They cannot offer an insurance, because the don`t have an Classic + Truck category , just classic or truck .. Sh..t. .. I went to the office one day later. She smiled when I entered the office " Our Insurance Central yesterday decided to create a Classic Truck category ". (Me: Yesss !) "But different conditions !" ... Is 86 € o.k. ?" I pay 86 €* (104 $) per year since then, is a really renowned insurance company. I never complained ? * They assume that you love your car, truck, classic and you are cautious in use. Conclusion, there´s seldom an issue. -
I usually just post tech related stuff and just when I am sure it is not blabla (so also not too many posts in the few years I am a member), but I enjoyed your words so much, that I had to reply. Especially "...wobbles a little and she leaks some..." made my day ? Really nice history and super nice Rosy !!! ?
-
Plan B – what, if parts are not or difficult to get
PT81Jan replied to PT81Jan's topic in Mopar Flathead Truck Forum
Thanks a lot PT81 mate ;-) Haha, my wife said the same when I explained here, what I would like to do with the cleaner cap. I feel honored that you follow this, but I cannot promise I will have much further plan B stuff in the future. I know nothing which is missing or has to be replaced at the moment. But who knows ... :-) The idea behind this thread is to give others an inspiration how to repair stuff / get a alternative replacement for their Mopar, in case they don`t have a source, don`t find a specific piece, or just cannot afford a part and don`t know where / how to start. For the others who are interested maybe just a little entertainment. -
Plan B – what, if parts are not or difficult to get
PT81Jan replied to PT81Jan's topic in Mopar Flathead Truck Forum
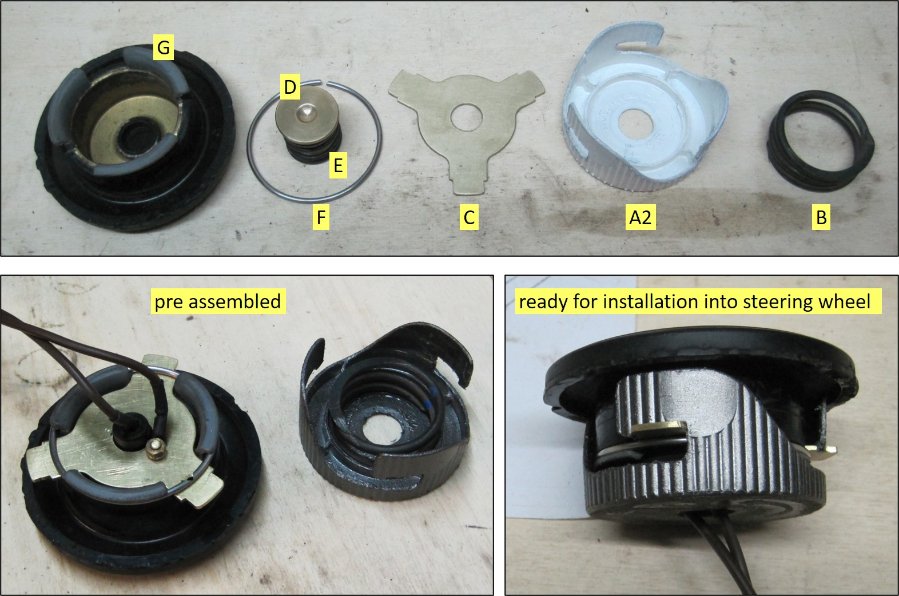
It`s been a while, since I started that topic, maybe the one or the other here remembers ... As the topic says, sometimes it is hard to find parts. Sometimes a little pricey due to $ item + $ overseas shipping + $ customs + $ tax + $ € exchange rate. So from time to time I decide for Plan B. Enjoy, if you want. Anyway, since I own my Plymouth, the horn button was a separate button, located at the dash. The internal parts in the steering wheel were mostly missing, just pretty rotten remnants of the base retainer. A parts kit is available, about 85 $ + ... Horn button This is a smart, but tricky construction. My book shows the parts, but first I couldn`t figure out, how these work together. Found a helpful video in the www. Here a link, in case some need to understand it also -> https://www.youtube.com/watch?v=07IULvpDJaI No. - Part - made of: A1 - base retainer (first attempt) - Powdered sugar sprinkler, stainless steel. The first I found was 10€ ... hmmm, the next 1 € (probably so cheap, because almost impossible to open and close) A2 - base retainer / second attempt) - plastic cap of a household cleaner. Surprising stable and the shape inside was so perfect (large spring mount), had to to have it. Needed to craft a replacement (wife`s "wish" ...) B - large spring - spring collection box - had to reduce the pitch a little with the help of a torch. Heat treatment required to keep spring characteristics. Otherwise would have been soft. C - contact plate - brass sheet. An old motorcycle battery box I made long ago. D - contact disc - brass round bar E - actuating spring - spring collecting box F - clip ring - stainless spoke of my old bicycle G - broken horn button repair - plastic drain pipe H - contact - brass ??? I even don`t know the German word for that thing ... last time I used such a ??? I was in kindergarden and crafted a paper windmill. That ??? was the propeller axle. J - contact holder - black nylon piece of any cannibalized domestic machine (there a re sometimes so nice parts inside ...I have got a good collection) Did I miss something ? Hmm think, that`s all. Ohm meter test was successful. Button works. Ready for installation.
-
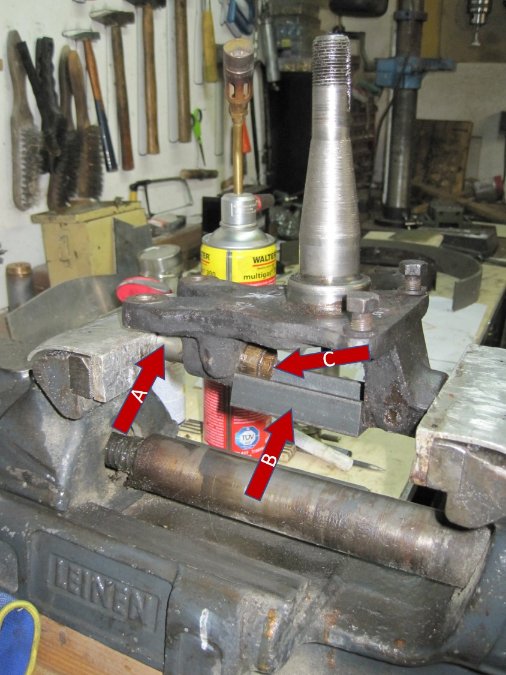
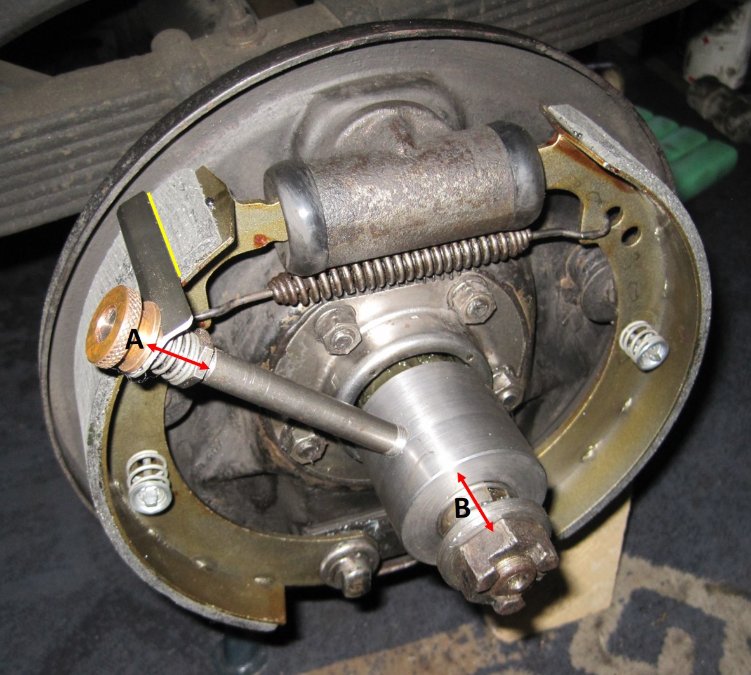
Just the same here about 1 hour ago ... like TodFitch I used the vise as a spindle press. Also like the colleagues a socket ("A" in the picture). I stopped my first attempt when I had a pretty good pre-load and also heat (190 - 210° F) and nothing moved. Did not want to damage the spindle. Second attempt with an additional support piece (U-profile, "B" in the picture) and also a little heat. Bushing ("C") relatively easy came then out. Good success, also.
-
@Dodgeb4ya & @Marcel Backs: Thank you for the compliment ? Maybe it helps someone to fabricate a brake tool, if needed. @Plymouthy Adams: Hahaha, seems you know me in the meantime ... me and my lathe .. The biggest challenge indeed was to get the needed materials. I want to do the brake job now, but due to lockdown all the hardware stores and metal recyclers are closed. For the main body I had to sacrifice a sleeve piece of an older device I made 20+ years ago. The feeler sheet metal finger is a remaining piece of a flooring cover strip (anodized aluminum profile), the provisional spring (B) is made of a spoke of my old bicycle. The knurled nut was already somewhere in my collecting box. I just had to enlarge the bore a bit and cut in a fine thread. The center piece of the drum gauge as already mentioned out of an Allen key. Let someone* say, it doesn`t make sense to collect and hoard old junk ? (*My wife ?)
-
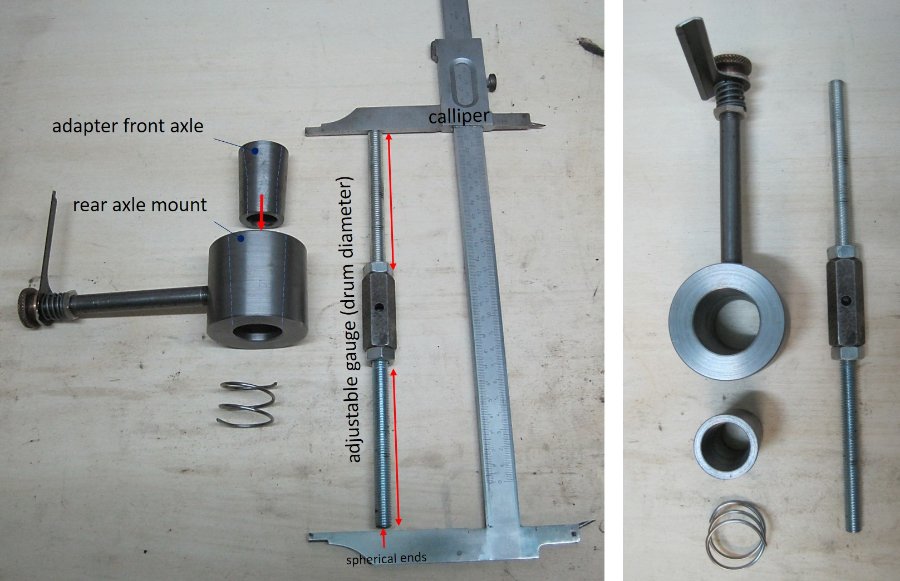
Probably the 254th version of a homemade brake adjustment tool, but since the topic headline is "show your tools", here`s my version ? The main tool body fits on the rear axle, an adapter sleeve fits into the main body to fit on the front axle. Adjustment by the knurled nut (where the A in the picture is - nut fine threaded), so no extra tool / wrench required. Spring A makes it a little easier to adjust the tool`s diameter while checking. Spring B pushes the tool onto the tapered axle. The load is slightly adjustable, just enough pressure that there`s no wiggle, but slight enough to allow easy rotation. The gauge (piece of an old Allen key + threaded rods) is for determining the specific drum diameter. A caliper to take the determined diameter and check the brake shoe diameter (minus clearance). That`s it. brake-adjust-tool.pdf
-
Parking brake? We don't need no stinking parking brake!
PT81Jan replied to 49WINDS's topic in P15-D24 Forum
The drum on my truck looked very similar, the band was also pretty bad. Hardly a chance to get a decent replacement in my area, I put the worn drum to the lathe. Couldn`t get worse .. I just can recommend to try it. Watch out not to remove to much material, the wall thickness of the drum might get too thin. Plus consider to buy a thicker brake band to compensate the diameter change of the drum. I got mine from an ordinary tractor supply. Waaay safer to park the truck since then, works since 6 years w.o. any trouble.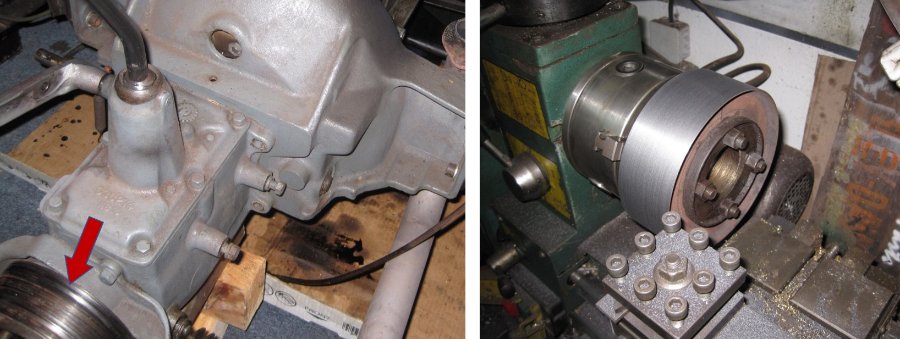
-
I also had trouble with the charging system. Also erratic reading at the multimeter, I felt really stupid at some point. I also thought it is the gen, but had its cause in the regulator adjustment. What I first didn`t notice at the beginning and then underestimated was the polarization recommendation / requirement. Got it adjusted and works now. Anyway, here`s a video, which helped me a lot. Maybe it gives you or others also a better understanding of the charging system.
-
Edward, not in a Dodge D100, but maybe can give you an idea how to create a tray and how to mount it. -> https://p15-d24.com/topic/43933-where-under-hood-battery-location/?tab=comments#comment-467591
-
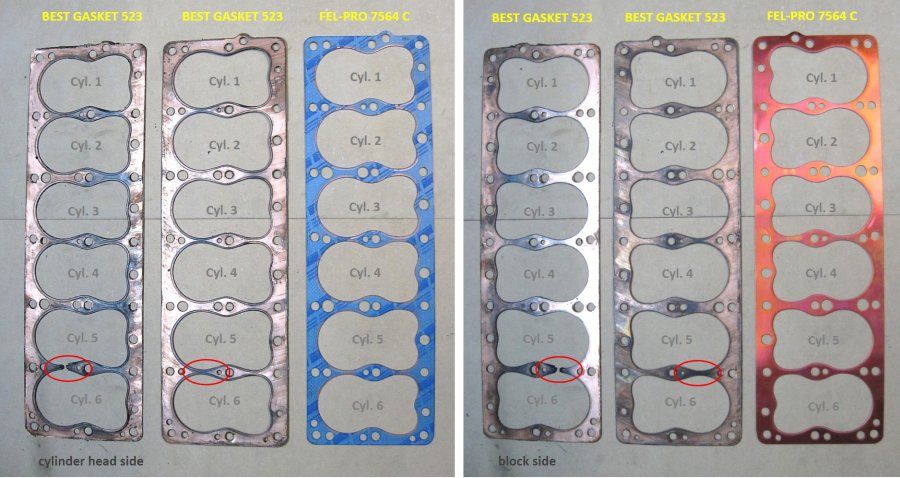
I cannot tell you about MAHLE head gasket, but my experience with BEST GASKET and FEL-PRO. I had to pull the head of my 218 (23" block) after approx. 5k miles after rebuild due to a problem with a bearing. I replaced the cylinder head gasket by a new one then. She same type as before, BEST GASKET 523 (composite - both surfaces with copper layer on a graphite filler sheet.) After another 5k miles I got a gasket failure between cylinder 5 and 6 (left gasket in the pictures, see red circle). Of course, if the head gasket fails, I would expect it there. But I rather would have expected it doesn`t fail at all: Block and head where milled and head bolts really scrupulously torqued. Re-tightened according to specs after a couple of miles until the gasket finally set. Additionally I noticed then, that my first BEST GASKET 523 showed traces of burns a the same place (center gasket in the pictures). I replaced the damaged gasket by a FEL-PRO 7564 C (copper layer just on the block side). Up to now approx 5k miles on it. Observation: BEST GASKET 523 made a good impression to me, looks high quality. 2 times retorqued until gasket finally set. Failed. FEL-PRO 7564 C looks o.k. but not very high quality. The copper layer showed tendency to peel off. 3 or 4 times retorqued until gasket finally set. Works up to now. I cannot tell you, if the FEL-PRO is better, because the running times is the same so far. But since the BEST GASKET failed in one case and showed traces of burn at another gasket despite flat, milled head and block surfaces and correct tightening, it was time to try another type. Probably doesn`t really help to decide which way to go. Just my experience, others may have got other experiences ...
-
Polarizing your 6v regulator....and clutch question!
PT81Jan replied to Al Peterson's topic in Mopar Flathead Truck Forum
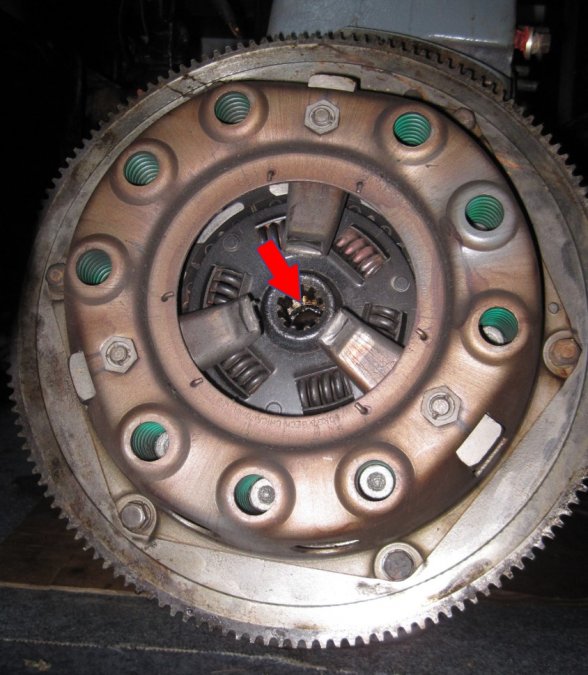
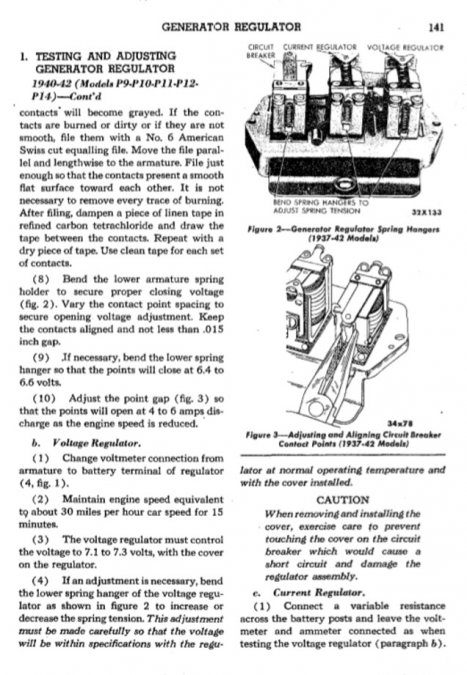
Trying to answer your questions: 1st - voltage regulator: I am not aware which regulator WC`s originally have got installed . The picture below is out of a Delco Remy Service Bulletin. In doubt search the www. using your regulator type / part-No. as keywords, I am sure you`ll find plenty of info. 2nd - clutch installation: easy to not too difficult. O.k., since you asked, I assume you didn`t install a clutch before (?) I don`t know your skills, so forgive me, if I am too basic. > Do you have a manual available ? This will help with the basic questions. > Tools: Essentially you need some spanners, better a ratchet wrench, even better a torque wrench. The only special tool which should be used is a centering guide. Or a tube which helps to align / center the clutch disk (where the red arrow in the picture is) > There are several steps, installation of the clutch parts (pressure plate, disc, springs, cover, etc.) itselves, installation of throw-out bearing, actuating fork lever (sorry, if i use wrong words), clutch linkage ... maybe sounds difficult, isn`t if someone has a bit of a feeling for technical things. If you need more assistance yo`ll get it. Just ask.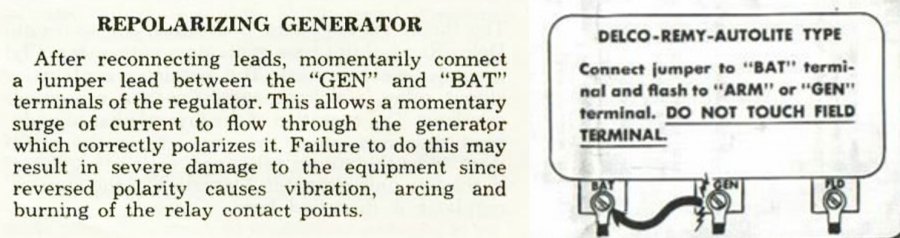
-
B3B differential rebuild - not as expected
PT81Jan replied to bkahler's topic in Mopar Flathead Truck Forum
It is not very complicated to do the adjustment, I have done it also for the first time two years ago. Just a bit patience needed and first to understand how the parts work together. There are different reasons why the gears are hard to turn. Do you have a manual which shows your type of diff ? Sorry mine is a little different. Maybe that helps a bit ? -> https://p15-d24.com/topic/40534-differential-disassembly/?tab=comments#comment-430298 -> #3 -
Watch the cat ... some tend to light the shop ... and then you also will be a member of a burnt vehicle club .. ? (no offend intended !)
-
Hard to find parts (canada)
PT81Jan replied to Tooljunkie's topic in Forum Announcements And Feedback
Most likely I will never have to contact that source (hmm, how knows ...) But because of my location I know how hard it can be to find parts... So I really like your intention to help others with that info. Hey, that`s one of the reasons why we all meet here, isn`t it ?! -
Here you are Roland -> https://www.flipperteile.com/de/Schalter---Kontakte/Kontakt-Einzelteile/Kontaktniete--Wolfram-D-4-5mm.html I didn`t post it, because it is a German source and so maybe not so interesting for most of folks here. My search key words were "Ersatzteile flipper" Yes, I think you alternatively could use ignition points instead. But most of them are also no longer of good quality ... Good luck ! Jan Ah, and: I am very satisfied with the quality of the flipper machine contacts. After one year of regularly use they still look like new.
-
Yes and Yes. > replaceable -> see here in a former post, when I had to replace them: https://p15-d24.com/topic/48964-worn-breaker-points-replacement-source/ (only correction is that I had to solder them in place instead of punching) > adjustable -> see pics

-
My kit included an instruction. Posted that some time ago -> https://p15-d24.com/topic/46957-brass-manifold-nuts-and-washers/?tab=comments#comment-498478 Hope this helps. Jan
-
That is a "Rohrzange" / kind of "Wasserpumpenzange" ? translator says "pipe wrench" also called Sweden pliers, so not Erich`s pliers ? https://www.google.de/search?biw=1600&bih=763&tbm=isch&sa=1&ei=f29-XZvpL9DMwQKGpLOAAg&q=Rohrzange&oq=Rohrzange&gs_l=img.3..0l10.21013.21663..23131...0.0..0.64.228.4......0....1..gws-wiz-img.......0i7i30j0i7i5i30j0i8i7i30j0i10i30j0i30.K11ZhWgOy8c&ved=0ahUKEwjbpN6GqNPkAhVQZlAKHQbSDCAQ4dUDCAY&uact=5#imgrc=tMTjk2pg2F_kaM:
-
Rear axle/differential for 1939 Dodge pickup.
PT81Jan replied to BobT-47P15's topic in Mopar Flathead Truck Forum
Hey Bob, I do not really have an answer for you, just a guess Another forum member here was asking a similar question some time ago regarding his 1939 Plymouth Pickup. His one has got the casting No. 663473-28 My 1939 PT has got the casting No. 663473-4 Both were originally equipped withe the 4.1 ratio gears, same axle dimensions. 1939 Dodge and Plymouth Trucks are practically the same. So I assume the axles are also pretty much the same. Here my guess(es): 1. series =663473, changes marked by the separate No. after the dash (unlikely there happened so many changes in one year) 2. Chrysler had have different foundries / suppliers for one specific part, so to distinguish the axles the different No.`s after the dash. In case of quality issues a way to locate the source (unlikely there were so many suppliers) 3. Mix of 1. and 2. (more likely) 4. Different ratios in different pumpkins (most unlikely, as far as I know there were just 2 different ratios offered, 4.1 standard and 3.9 optional. Eventually also 3.74. Some mention the ratio is stamped onto the pumpkin. So a double indication (encoded via the No. after the dash) would not make sense). Btw, on mine I didn`t find a ration stamp. 5. ....? -
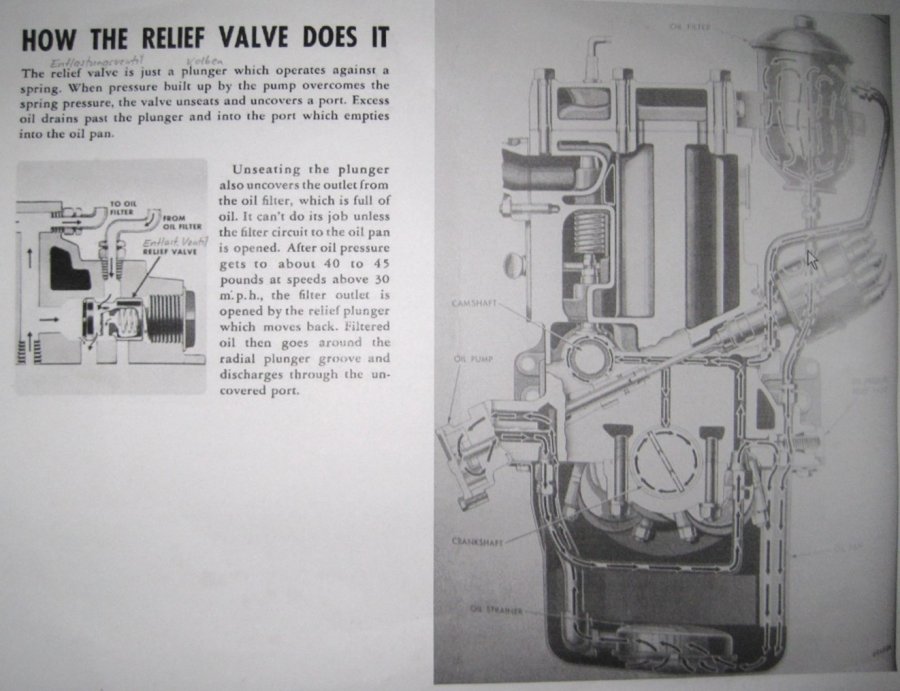
What TodFitch explained in words. Illustration of the relief valve function

-
To bend the steel without damaging its structure it has to bee cherry red / dark orange.* Depending on the type of steel its strength will be reduced more or less after cooling down. But it is possible to give it back the original strength. No professional equipment needed, but a bit knowledge of the tempering colors. A lot of info here -> https://en.wikipedia.org/wiki/Heat_treating Have a closer look to paragraph tempering colors, this will tell you the way to go. You also might try to find more info in the .www, search for `steel heat treating / treatment`. * Notes: Slight bends may be possible without treatment. Larger bends without applying heat will result in a strain hardening. This leads to a higher strength at the bends, but also can cause micro cracks.
-
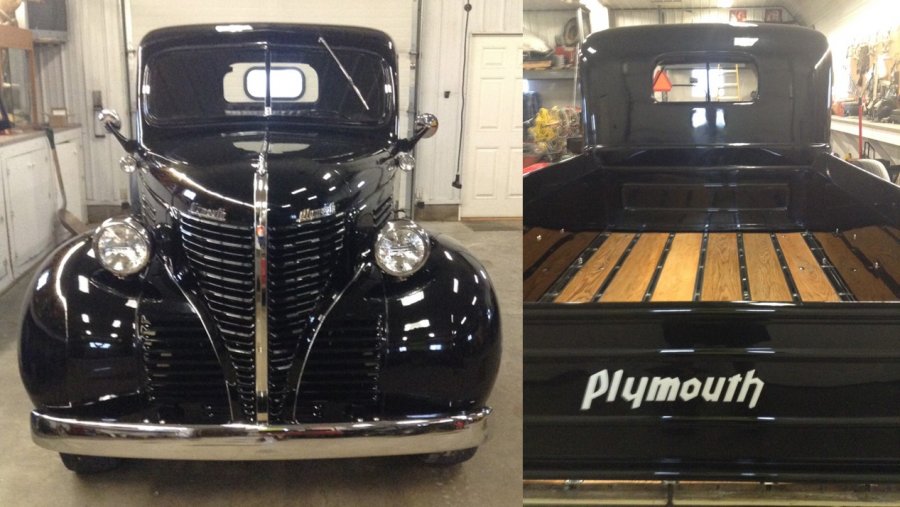
Maybe you also keep the eyes open for a black 1939 Plymouth truck .. it belongs to a Forum member, who did a really nice restoration work last year within a few month ! Most likely he will be there. Forgive me Jeff that I publish your PT pictures here, you did a too good job not to show it to the guys here !!!