Sharps40
-
Posts
759 -
Joined
-
Last visited
-
Days Won
5
Content Type
Links Directory
Profiles
Articles
Forums
Downloads
Store
Gallery
Blogs
Events
Classifieds
Everything posted by Sharps40
-
Quarter twist on the longest open run at the tightest. Half twist is usually fine if belts and pulleys are good shape. About as much twist as you can do with just thumb and finger. Not too tight, you'll bung the bushings in the water pump and generator
-
Finally Found a transmission govenor bail and got it installed on Ol Bessy. Should be able to get back on the road today. Some tuning to do and hopefully Monday we get the vin inspection and schedule her alignment. Cant wait. Got only a few weeks left till Dad is here to drive her for the first time in many years.
-
I'd like to find/make one of the sliding beds for it
-
1 hour due west of Fayetteville/ Fort Bragg. That puts it about 4 hours from oriental
-
If it stays flat head perhaps 3 of the 34mm weber ict/ich would be about right for those siamese runners
-
I guess we are far enough along to safely say I'm buying this one. At least the loan is approved, insurance bought, and I spent all day pushing paperwork. Getting to the last of it and should have the paper end of the purchase in the mail Fri or Sat. Some pics from the seller while I wait. Hope the Coupe looks and runs half as good on arrival. Kinda 2 dream cars for me and Dad....Ol Bessy the Sedan back on the road and a 37 Dodge Business Coupe to bumble around with her.Hopefully Dad/Mom are serious about moving close to us in the next months. (Dad is 81, Mom is 79 i drive from NC to VA once each month to help them for a week.) Just two weeks back Dad indicated he was so proud of having his Bessy back on the road and wouldn't it be great to have a 37 Coupe or Truck to work on and then ride with her. 4 Days later i found a 36 truck and this coupe. Decided to go for the coupe, it still has what amounts to a truck bed and its the same year as Ol Bessy. Plus the truck looked too nice to consider "working on".From the photos and discussions it seems this one still has the original D5 1937 block in place. So, compression checks, etc on arrival and we'll see if it stays flat head with some old speed parts or not, (somewhere around here i have Bessy's original 37 head shaved 40 or 60 thousands for a compression bump)...but during that conversation two weeks back Dad kept referring to the 292 chevy 6, 3 carbs, automatic, etc. For 81 he still has the bug!He dosn't know about the Coupe yet (wanted to make sure I actually got it and got it here first).With luck, I'll have the Coupe here and running solid before they arrive on their house hunting trip in mid to late August. Dad will be tickled.....Mom will probably hit me. I plan to park Ol Bessy and Huddie (the Coupe) in the front yard so they see both when pulling in. Dad has not yet even seen Ol Bessy the sedan since she's had final assembly and been getting out on the road. Should be cool.


-
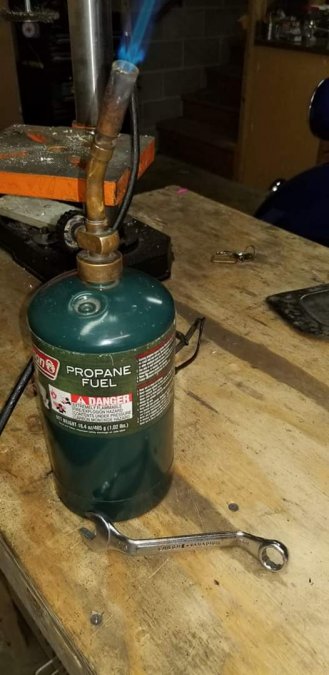
Who says you can't nicely bend Forged Chrome Vanadium Steel with a low output propane torch, 60 seconds of heat and I had this lovely Small Block Chevy Distributor wrench made up, didn't even crack the Indian potmetalsteel! I have accumulated a small but useful collection of inexpensive tools just for such low impact operations. It was two minutes work to save an hour round trip and about $20 at the tool store. But, then I lost the entire rest of the day. Loosened up Ol Bessy's distributor clamp and went to start her up, totally dead. Seems the brake pedal jumped the switch and the lamps stayed on till the new battery was totally dead. Three hours later at 6 amp charge she grunted to life. I bumped the initial timing from 6 degrees before top dead center to 10 degrees before. She smoothed right out and even sounded better. Checked her mechanical advance an it was a solid 32 degrees before top dead center at highway rpm. Added in the vacuum advance and she made 48 to 50 degrees of advance. Just about right for now. I may take out some vacuum advance but for now, didn't hear any pinging or rattles from the motor.. Readjusted the idle speed and took her for a ride. More pep off the line and feels and sounds smoother. Looks like the fan controller is finally adjusted right. I have a 180F thermostat in it so have the fan coming on now at 195F. Seems a good balance for driving as the temps stay at or under 200 degrees and the fan doesn't run too awful long after shut down. The axle seems much happier with the 2 degree shims instead of bigger ones that were in there. I just followed Spicers recommendations for operating angles and such. So, torqued all that down too.....before the test ride. Had her out about 65 mph for 15 miles or so, and feels plenty good. Honked at a few deer and a several folks and brought her home. Put her back on the battery charger at 6 amps for a few hours and later tonight I'll bump her down to 2 amps for the overnight. Should be charged like a bandit in the morning. I don't see any leaks from the new coolant recovery system, so happy about that. So all that done, still waiting on the metering valve kit to fix the brake leak and gotta raise the front end and see what the clunk is, don't know if its steering or control arms or just all the parts settling in to their new old spots.
-
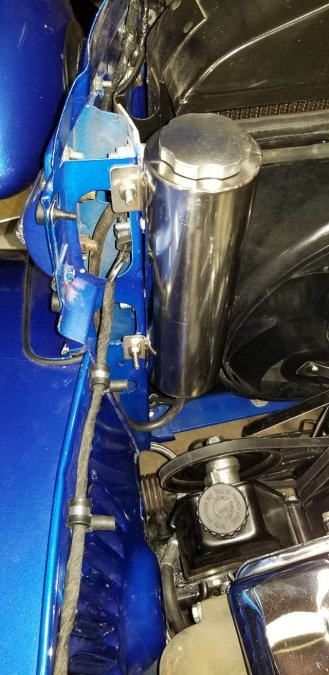
Dad. Coolant recovery tank is in.
-
Jump it with a 12v battery. If she starts you know its an electrical issue. Won't hurt a 6v system (or starter) to jump it with 12v. If your 6v system is still + ground, just set the 12v battery on the floor e.g. don't leave it in a 12v - ground car for the jump.
-
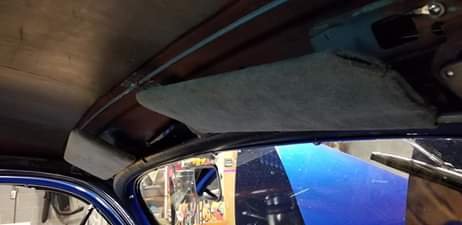
Installing door bumpers and adjusting door wedges.
Sharps40 replied to Sharps40's topic in Technical Archives
If you have to slam the door hard (cant get it shut from the inside while sitting) your wedges will need adjusted. Another symptom would be that when closed the door handles inside are very hard to operate and the door will often stick a bit once you get the handle levered down. Another possible symptom with lift handle locking is with the door shut and locked, you can simply turn the outside handle down, and the inside handle follows it down thereby unlocking the door......pretty much defeating the purpose of raising the inner handle to the lock position in the first place. So, if the wedges need adjusting because they are too tight with the new door bumpers installed: mark the center of your wedge with a sharpie. Make sure the mark is about 1/8" wide and shows on both the wedge and the Pillar. Loosen the 2 screws about 1.5 to 2 turns, this will fully release the strike wedge and allow you to wiggle it forward. In this case, an eight inch made all the difference. I wiggled each wedge out wards until the outer edge of the mark on the pillar aligned with the inner edge of the mark on the striker wedge. See the photo below of a striker that has been moved outwards 1/8" to accommodate the new rubber bumpers. Synch the screws down tight. With the old slotted screws use a tight fitting screwdriver with a pair of vice grips clamped to the handle. Lean into the screwdriver handle with your hip/gut, turn the screw up snug and a bit more. It should be tighter than you can get it without the vice grip on the screwdriver handle but not so tight that you tear off those tender fine threads on either the screw or the captive nut inside the pillar. Check the doors. They should shut firmly when seated on the inside but shouldn't need a glass rattling slam. Get out, shut the doors, lock them by raising the inner handle and attempt to open the door from the outside. The inner handle should not follow down when you depress the outer handle. If all is well, done! Doors will probably squeak less too now that they are riding supported in the frame (top and bottom) rather than just on the striker wedge.
-
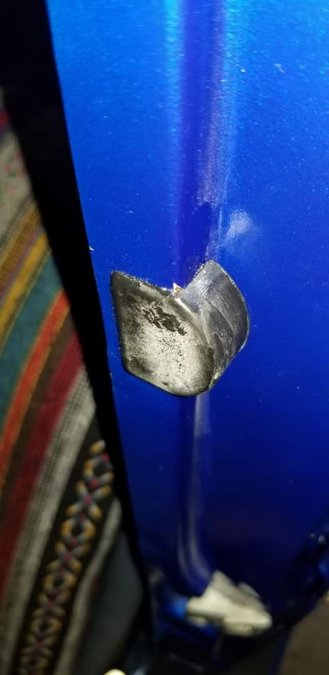
Just received the new door bumpers for the 1937 Dodge Sedan from Roberts Motor Parts. Bumpers are a tight fit and will need a touch of Vaseline to slip into place.
-
Just received the hood bumpers from Roberts Motor Parts. As I thought, the originals were larger diameter in the stem, or at least the holes they fit into are larger in diameter than the new replacement parts. But, no worries. Just install them with a stainless washer on the back side. The same works for the glove box bumpers received.....too small in the stem but a small washer on the back does the trick.


-
Glad yer happy with eggs....
-
Nothing wrong with watching your gauges, especially if they are accurate. But, good that you are gonna get her rolling for enjoyment. She'll be happier and last longer running hotter than 160 to 180. Besides, you'll actually have heat and defrost in the winter!
-
Dad, Flooring is completed. Front floor mat is not down tight yet. I still need to make up the shifter boot and a heel pad for the accelerator pedal. But, mustly looking good and mud and deer blood will wipe right off. I'll have to start disassembling the old arm rests and use them for patterns. I'll get them made up and installed, planning to reinstall both original ash trays in the rear arm rests. No sense in not having a place to smoke cigars! Tomorrow's job is to remove the rear axle, again, from the leaf springs. I stopped reading the internet and went directly to Spicer for pinion angle information. I'll take the pinion shims out from between the leaves and axles and see how she sits with no shims. We'll hope the shop set the axle perches for about 3 to 4 degrees nose down before they welded them in place. Need to get the vibration out of the rear end. Its only on acceleration so that tells me the up angle is too much and the pinion needs to go down. Shouldn't be hard, just a lot of really tight bolts to break loose.


-
OP. You have a fresh motor, fresh pressurized radiator, fresh 180 thermostat, fresh antifreeze, no boil over even in extended traffic and heatwaves, and you are properly pulling temperature readings from the hottest part of the block. Politely then....stop looking for something to fix, it's working like all modern cars, as designed for a pressurized system with a hot thermostat. Just enjoy your ride. Ps, do some technical reading, short of hi speeds that cause cavitation in the pump (and attendant loss of water flow) one cant move the water too fast thru the radiator. That's a myth.
-
I looked anyway. 23 pages of sheetmetal and air cleaner stickers. Not much else.
-
Too late!
-
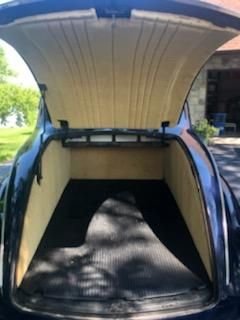
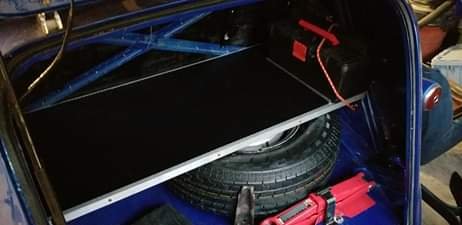
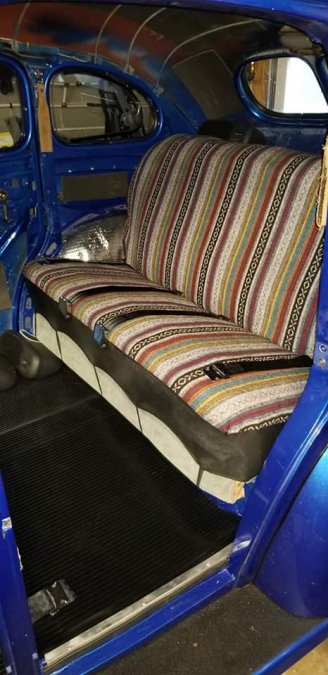
Dad, Continuing to stick close to the theme, "What you wanted to do in the 60s with Ol Bessy", and staying close to the period in materials. Inexpensive saddle blanket seat covers for now. Clean and though the colors are a bit garish, comfortable until the bugs are worked out and we are ready for professional upholstery. As you recall the original floor mats and trunk liners were brown, ribbed battleship rubber. No longer available in brown or rubber I'm installing a good equivalent. Black ribbed (black go's with everything) garage floor mat. Tuff enough to drive on, much lighter and thinner than the original 1/4" or more thick rubber and flexible enough to work over Ol Bessy's driveshaft tunnel. Under it is two layers of buetyl and dense poly foam insulation/sound barrier. In the photos, the rear floor and trunk shelf are completed and permanently applied. New door sills of aluminum and the lower door seals are installed to keep her air and water tight. I'll get on the front end tomorrow and get the front seat back in place for the last time.

-
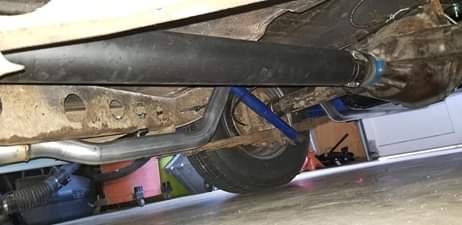
Long day. Went for a ride. Sprung a leak in the proportioning valve. Fluid coming out the reset pin and fitting thread. It was not real tight....snugged it up twice, down to a weep, snugged it up till the head is round with vice grips, went for a ride, no leak. I'll check in the AM but went ahead and ordered a CCP metering valve and a spare pv2 valve. Hopefully I can sort it with just a metering valve replacement. Bumped it into second from third (about 25 mph) by accident, heard a ping/clunk. All was well below 45 mph but then picked up a vibration from the rear at 50 and up. Wasn't there before, I don't think, but its so much quieter now, perhaps it was and I just couldn't note it. Brought the car home and crawled under. Everything looks good, rechecked the angles, trans down 4.2 degrees and diff up 3.97 degrees. Nothing looks broken. While under there I heard another loud ping, something is not happy. I suppose tomorrow I'll check all the bolts and fittings, spring shackles, lug nuts, etc., from the trans mounting all the way back, drop the drive shaft and check the pinion nut, etc. Still have a bit of a hitch in the steering. Rack has a 3/4 ford V shaft with a matching Borgeson joint on it. Can't seem to get it clamped all the way, it'll occasionally clunk when turning, mostly when still. So, gotta get it to clunk then crawl under and see if it'll snug up some more.
-
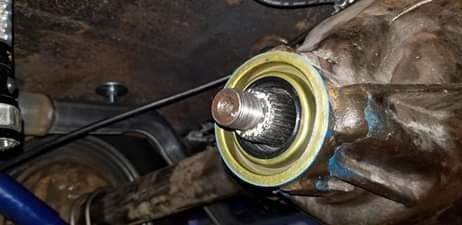
Dad, Got Ol Bessy's pinion seal replaced this morning while still cool out. The old seal on the right was the deeper truck 12 bolt seal, installed with a 1/8" braded wire spacer. Typically, it was leaking. It had been installed sometime back I'm sure after the shallower car 12 bolt seals went off the market. Glad we did this job, the pinion nut was a bit loose, breaking torque was under 60 foot lbs and the pipe dope sealing the splines had long since crumbled away. Good news is Strange Engineering had the proper shallow car 12 bolt seal and the yoke was in fine shape even though the dust cover had long since come loose. I removed the dust cover and tossed it in the junk bin. Too loose to restake it and no need for a new yoke. Got the Strange Engineering Car Seal driven into place with grease and sealant and sealed the splines on reassembly. I pulled her nut up to 100 ft lbs, enough to retain the settings but not enough to crush the spacer sleeve any further. Back together and we'll get a rattle and leak free test ride today or tomorrow. Likely tomorrow as its 12 PM and already murderously hot out. So, off to the garage again to see if the 55 Buick gas pedal can be mounted more comfortably than the current late model jeep gas pedal.


-
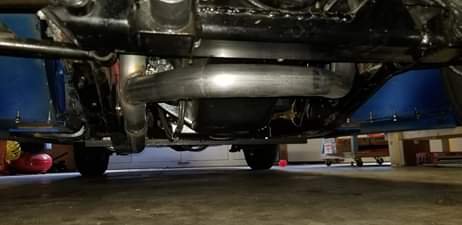
Yep. Pics might be hard to tell. Stock motor. 200 to 220 horse. Way more than any flatty we ever had in her. 2 1/4 single keeps the torque, keeps her quiet, supports 300ish horses. Just like they did/still do on factory cars. Duals would loose bottom end unless pipe dia was rather small. Stock left side fuel tank and battery box locations and x central member make dual a helluva lot of work for about no benefit on a stock mill. I figure the extra money for left pipes and crossover went into a portion of the radiator and fan. Dropped the ancient honeycomb for an all brass walker three row with trans cooler. Finally, fits the theme too, what dad could done on a basement shop in 1960.
-
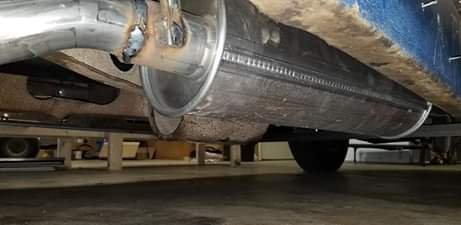
Dad. Modified 51 Desoto passenger visor to fit 37 Dodge. Replaces what the shop lost. Removed ugly Lokar shift knob and fitted up Ol Bessy's original to the shift lever, retained all lock out functions. And, a few shots of the new exhaust, looks like a factory install, right down to the round muffler.

-
Home with a quiet exhaust. Rock solid great job. Very pleased. And while in Wadesboro we had lunch at the Ladybug. Bessy is happy. In the 92 degree heat she stayed cool at 55 to 60 mph never going over 200 degrees Fahrenheit (Small sweep gauges are hard to analyze but the heat gun tells me 205F on the gauge is 195F at the top of the radiator and under 190F at the thermostat housing. She's good for cooling I believe. Speedo is close, it reads about 3 to 4 MPH slower than actual speed at low highway speeds. Just needs a minor tweak.....gonna have to mark out an accurate mile and run it again to tweek the calibration.


-
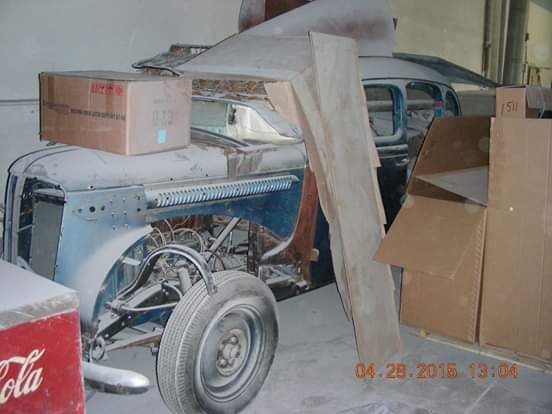
Dad, Here is Ol Bessy in April 2015 when you told me I still owned her (over 20 years after the accident that took her off the road).....hidden away in the basement of the body shop since about 1991/1992. Look at her now!