3046moparcoupe
-
Posts
262 -
Joined
-
Last visited
-
Days Won
1
Content Type
Links Directory
Profiles
Articles
Forums
Downloads
Store
Gallery
Blogs
Events
Classifieds
Everything posted by 3046moparcoupe
-
Bingster, when I attempted flushing mine the 1st time, I purchased a bottle of Prestone Radiator System Flush at Oreilley's, which you just pour in and run/idle the engine for a period of time as directed on the bottle, then drain, and refill the system with your distilled/antifreeze mix. In your case - if your wanting to flush it out before starting it up,...I would remove the upper radiator hose and look inside the thermostat housing to see if their is a thermostat in place,...if so - remove the housing (it's easy enough to make a new gasket if you don't have one, however I think you can get that gasket at either Napa or Oreilley's), and remove the thermostat,...then remove your lower hose to the radiator and point it downward as much as possible,...now you can back flush straight through the block by flushing into the thermostat housing and having it exit out the lower radiator hose coming off the side of your water pump. Radiator same way, with the hoses off you can flush water straight through it - however my experience's would dictate that it's pretty hard to help a radiator much by just running the hose through it...if it's got problems/blockages... Steve
-
Your dead on about the zinc being removed from our automotive oils,...the removed it because zinc getting past piston rings causes catalytic converters to fail....for what it's worth, you can buy a zinc additive at Autozone...
-
Hello Bingster: Almost 2 yrs ago I purchased a stock 46 Plymouth Coupe with the oem 218 flat six in it...it ran quietly and didn't smoke but appeared to be super neglected just like the rest of the car. Before I started taking the car apart, I spent about 2 weeks messing with the motor (new plugs, changed the oil, kitted the carb, etc.). I really wanted to go with modern detergent type oil, but before doing so - I asked much the same question you are asking here....I also spoke with some folks from the historic vehicle society here in the DFW Tx's area about it...and here's what I learned. The old non detergent oil would allow Carbon to settle in the bottom of the oil pan and also to form /collect on other areas of the engine internal surfaces....not knowing about the history of my motor I was advised to pull the oil pan and look before putting any detergent oil or additives in. When I pulled the oil pan, the crud was solid across the bottom about a 1/8 - 1/4" deep....took me hrs with scotch pads and acetone to get the stuff off and cleaned up...I also could see some of the buildup attached to the lobes of the crank, etc... The folks I spoke with told me to clean the inside of the oil pan and also to do the area where the valves are located, then once clean - you should be OK to go ahead with detergent type oils...... I don't know about the history of your motor, or if it's still the stock flat six,...but if you suspect sludge buildup in your motor, you don't want to disturb the stuff with detergents that might break it free, as then it will circulate through your entire engine... My understanding also is that the oil filters on the old flat six motors don't work the same way as a modern engine oil filter does,....the modern filters are more like an in-line filter, filter 100% of the oil when the motors runs,..the old filters were like a bypass filter and they filter only a portion of the oil flow while the engine is running...another reason why the crud you might break free could run around inside the engine longer than you'd like, with the potential to do damage, clog things up, etc.. When you turn your fan blades, all you are turning is the bearing in the water pump, so I wouldn't use that as an indication for thinking the motor is free, although if your car has been sitting inside a garage the past few years, that should not be concern for it trying to freeze up on you...my suggestion to you would be that if you want to turn the engine by hand before cranking it, move down below the fan to the crank shaft pulley to actually turn the motor over, (you could remove the spark plugs prior to doing this and maybe just a small squirt of oil into each piston before hand turning),... Then before starting, unplug your coil wire and crank the engine over a bit with your starter to get oil up and circulated a bit through the engine before firing it up. regards Steve
-
1946 P15 6V generator dis-assembly question
3046moparcoupe replied to 3046moparcoupe's topic in P15-D24 Forum
DB4, I'll give it a try - thanks. S. -
Thank you Joe
-
1946 P15 6V generator dis-assembly question
3046moparcoupe replied to 3046moparcoupe's topic in P15-D24 Forum
Thank you KH and DB4. DB, when I was younger I have used the old Chilton's and have seen the even older Motors Manuals you speak of. A few months back I thought about our local library which has some of the old Motors manuals, but they had nothing close enough to help me...I just rode your link over to ebay and looked through the available Motor's Manuals,..some say 1946 Manual (that being the year they were published) but they all appear to cover a range of years and most automobile mfg's....I have looked at these in the past and had thought that since Plymouth might only show to be a total of 30 pages out of an 800 page manual - that I wouldn't be getting much bang for my buck, so I've not purchased one to date,...but you have given me nothing but solid information so far, so I went ahead a bought one of the manuals being auctioned, it shows to include Desoto, Dodge, Chrysler, and Plymouth yrs 35 - 50 of course along with other mfg's as well, but hopefully it will help me out...thanks for the recommendation and direction,... Heck - I would way rather have a manual to get solid information from than have to send out hollars for help to the forum world. I wrote fiber optic installation instructions for 27 years with GTE/Verizon, it's sorta they way I think,..read the directions - follow the manual... KH/Bob, thank you - your reply is most helpful, glad I stopped pulling on my generator drive pulley with the 3 jaw puller I was using,...I've never seen a puller like the one you show in your pics,...but that's what I need to be looking for,...I'll try ebay as well....this really helps, thanks. Steve -
Again , thank you all so much for your reply's, insight and help. I did pull the tappet covers and it wasn't nearly as bad as the oil pan was,....some of the springs had a small amount of crud on them,..and like someone above said,...pretty difficult area to try and clean up,..I placed a rag across the outer bottom lip of the lifter valley to prevent debri from falling down into the block, and took a small flat blade screwdriver to fish around a little....what I found was a thin layer of black on almost everything. It would easily scratch off with the blade tip of the screwdriver, just about all ya had to do was touch it and it came off onto the screwdriver...there was one small spot (about 1" x 2") towards the front bottom area of the tappet valley, up in the front lower corner of the block, where the black gunk was about 1/8 inch thick, once I started picking it out of there, and had disturbed it,..i figured I better do my diligence to try and get it all, so a half dozen paper towels used with the little finger to wipe through the area appeared to clean it all up. At that point I stopped as it did look like it would be real easy to ( as someone above also mentioned ) just disturb this stuff and cause it to circulate through the engine causing more grief than good...also no way to get to the back side of much of the surface areas,...pretty tight and busy compartment area... I did clean the light buildup off of the inside surface of the tappet covers,..and even though I sure wish it was really clean, aside from the one 1/8" thick spot I did clean, the remaining 60-70 % had no gunk buildup present on it, and about 30% of the surfaces did have that thin (like a sheet of notebook paper thick) buildup of black.... At this point I'm pretty much in agreement with not tempting fate and just staying with the non detergent oil. Thank you for your help, I've learned a lot here on the forum so far, but still have a long way to go and a lot to learn .. Steve
-
Wanting to learn, inspect, and clean up, the 6v generator that came with this 46 Plymouth P15.. I've never taken one apart and hit a road block. My generator shows the following number on the id plate: GDZ-4801-A Again my parts book seems to be of more help than my shop manual, my parts books shows a great exploded view diagram,....my shop manual shows quite a bit of diagnostic information, but in regards to dis-assembly, it just says " dis -assemble the generator".. I was able to find some home made bubba videos of guys cleaning up on some 6v generators off of old John Deere tractors... and I found the following web site for rebuilding a 1944 Jeep generator, and that Jeep generator looks almost completely identical to the generator off this Plymouth, ...it also has the brushes located at the rear, the housing is a very close match, and it has the metal band around the rear of the generator, etc..very very similar.... http://www.1944gpw.com/c-93-G503_WWII_Jeep_6_volt It's easy getting the rear plate off the housing, it is just held on by the 2ea long bolts that run the length of the housing internally, and there's your rear bushing and your brushes and springs, which again look almost identical to the parts shown on the jeep generator. However, at that point I could not see how to get the assembly out of the housing, and I didn't want to be rough with it, by experimenting... The jeep generator video shows removing the front drive pulley assembly as the next step. by: 1) removing the large nut and washers, and 2) using a 3 jaw puller to pull the pulley off the shaft to expose a woodruff key after the nut and washers are removed..... I grabbed my impact and removed the 15/16 nut and large lockwasher, then took a 3 jaw puller and attached it to the backside of the belt drive pulley, (I attached it to the rear of the pulley - not in the belt groove area but to the area I'm gonna call " the cooling blade slots " ....it seemed to have a good bite,....so I started applying a little pressure with the puller, ( along with a few sprays of PB Blaster a few hours before ) but it didn't appear to be budging,....figured I better back off and try for some help before I tore something up.... I think I'm on the right track here, but unsure as you can tell, the front bearing doesn't have play and seems smooth, but from what I have been able to find (reference the video link above), it appears that I need to remove the pulley, to get to the retainer plate that rests behind the pulley, which can then be removed, then maybe a snap ring, to then allow the armature assembly to be removed from the housing......I think This generator appeared to be working well enough to keep the battery charged while the car was running before, but I never had an opportunity to test it with headlights on, etc..so again, I was wanting to go through it, learn, clean up the contact surfaces, maybe some new brushes if needed, and if possible get rid of as much rust as possible, to allow for some new paint. Thank you all for your help.. Steve
-
Thank you all so much for your reply's back...I appreciate it very much. When I pulled the car into the garage (after the purchase) I pulled the oil pan and the oil filter canister and cleaned them out spotless..put the pan and canister back and added new 40 weight non detergent oil and a new filter....rebuilt the carb, changed spark plugs, tried flushing out the cooling system a couple of times,...just basic stuff trying to put a little TLC on our new baby,.....then I started taking the car body apart,.... So this engine probably ran a total of maybe an hour or so with the new oil in it,....before this 1 1/2 - 2 yrs dormant sitting period... I can pull the dipstick and it looks clean as honey,...but yes I had read here on a past forum post, where non detergent oil will allow carbon to settle to the bottom of the pan after about a year of sitting,...in my mind - I would think that statement is in reference to old dirty oil that has a lot of carbon in it produced as a bi-product from the engine running...but I never claimed to be a chemist, so thought I'd play it safe and ask the forum.... I agree 100% with Knuckleharley, on the "be safe" comment,... I couldn't imagine how oil (even though it's a type I've never been around before) non-detergent could do anything negative just sitting in the pan, with no combustion happening, no heat cycling, etc...but again - it just seems way smarter to me, to ask folks with experience, to learn and to avoid problems if possible... The car is sitting in a 2 car garage that's attached to the house, so it's out of the environment, not exposed to direct moisture in any way or direct hot and cold temperature cycling,...I have been able to tell as I've been working metal this past 2 yrs, that the humidity in the garage is a bit higher the closer to the garage door you get,....as I have seen pieces of bare metal acquire surface flash rusting quicker if they were allowed to sit for extended periods of time in the garage closer to the garage door rather than on the opposite side of the garage by the door going into the house... I definitely wouldn't have an issue with changing the oil again before starting her up - when that day comes,...oil is cheap compared to just about any other kind of repair,..and I'd pull the pan again and clean it out again if needed,....whatever it takes,....I really like Don Coatney's statement "failure just isn't an option" ... cause far as I'm concerned, with this super sweet 46 Plymouth car,...short of my health going south, we'll do whatever it takes to get to the finish line with this baby.. Just wanted to try and give a bit more info, as I appreciate the folks who took the time to reply back..... I need to go ahead and pull the valve covers in the next few days, get them cleaned up and painted, (already have the new gaskets),...then I would be considering and really like to change over to modern oil....I know when I had the pan off, I could see a bit of buildup on the bearing caps, even on the sides of the crank shaft counter weight lobes,....so I'm not sure if the engine would be clean enough to go the detergent oil and still avoid problems with crud breaking free and circulating through the engine,...from what I've read, it seems as though most folks have good results in regards to this, when they have just cleaned out by hand - the interior oil pan and valve area as much as they possible could... Thanks again for the reply's and please feel free to add anything else you could share with me in regards to this. Steve
-
I'm wondering if there are any issues with me letting non detergent oil sit in my oil pan for the past 1 1/2 - 2 yrs while working on this car ? Prior to, I did remove the oil pan, cleaned out all the old black build up gunk inside, and re-installed the pan with new gaskets. Then filled with non detergent oil (didn't use detergent oil at that time since I had not yet pulled the valve covers and done the clean out thing up top),...now the cars been sitting for almost 2 years in the garage, up on jack stands, pretty much completely taken apart, no wiring harness, etc...while I've been building as weather permits, new floor pan, rockers, etc.. getting body panels shot in urethane, crawling all over and under this baby.... I wouldn't have thought that the non detergent oil would coke up in the pan just from sitting idle inside my garage, but I have zero experience with the old non detergent oils....the engine should be ready to fire up again by mid to late summer - should I be taking any measures, changing out, etc...while this car continues to try and make it's way back ? I did add a zinc additive to the non detergent oil.. Thank you all for your help Steve
-
I'm sure this is old news to many here on the forum, but I just discovered today that there are a series of original Chrysler training video's on You tube focusing on the 1948 Mopar Automobile.....Pretty fascinating - reminds you of the movies also from that time, and there's an animated little guy that sorta looks like the Pillsbury doe-boy or better yet the Michelin cloud man,....anyway - great info from Mr Chrysler himself.....I've only watched (2) so far,.... one on the voltage regulator, and another on front end alignment,.....you senior forum members know all this stuff in your sleep - but if you haven't seen them I know you'll appreciate the history. Search You Tube for " Chrysler Master Tech - 1948 " Steve
-
loctite 2422 product for manifold studs ??
3046moparcoupe replied to 3046moparcoupe's topic in P15-D24 Forum
Thank you Don and DB...I appreciate you guys taking the time.. DB, when you say hi-temp thread sealant, something like a permatex ultra copper,...?? Up to writing the post above, I had wrapped the threads in the high temp Teflon tape I described, then I took a pair of channel locks, grabbed the smooth center area of the stud, and torque it into the block a bit...(made me feel pretty clueless when I read your reply about using a stud extractor to install with - why heck yea !!). I've only got (2) in my tool box,...but never thought the other day of something as common sense as using the stud tool to install with.....nope I go grab a pair of pliers,...which won't grip it nearly as even and firm and also chews on the stud a bit... thank you... Steve -
Almost ready to mount the intake and exhaust manifolds back on the flathead six of the 46 Plymouth. When I pulled the manifolds, some of the shorter studs came out of the block, while others stayed in place as the nut was removed....my (2) long studs that go through the exhaust manifold center were a bit more of a problem, as both snapped on me - however I was able to get the studs out at that point with only minimal thread damage to the outside two threads on one of the two studs... After cleaning up the old somewhat rusty threads with a wire type bottle brush, they look nice and clean now. I am now able to thread the studs into the side of the block - by hand - until they seat against the hole...and my two longer studs are probably the easiest to thread in by hand, but really basically they all feel relatively close to the same, in tightness - not a lot of difference. Thinking along the lines of getting a good seal into the water jacket area, and also to try and prevent them from loosening up ..with these engines basically running a non pressurized coolant system - I can see where leakage is not as big a fight as it would be on a modern engine...and again I may be wrong in my thinking (as this is my first time around a flathead motor ),..but I'm thinking that getting the studs anchored well is gonna be more the issue than difficulties associated with coolant leakage - course that said - nothing will ruin your day faster than a coolant leak.. I have found the following.... 1: Actually Plymouthy Adams found this stuff for me on ebay, a month or so ago.....it's a high temp, (690 degrees) slightly thicker than normal, Teflon type tape,...that should seal really well against leaks, but offers no thread-locking capabilities.... 2: Loctite has a product called Loctite 2422, the tech told me it's good in regards to contact with antifreeze, it has the highest heat rating of any of the Loctite products, (650 degrees)...and it's the medium rated blue colored Loctite that can still be dis-assembled with hand tools. Would appreciate any feedback from the forum members regarding the above... I don't know how hot the threaded area of the block at the manifold studs gets,...with the coolant from the water jacket being right there touching the end of the studs (that should help greatly), but still this has got to be close to the hottest place on this engine block,....which is a normal/stock 217 flathead 6 cylinder. Anyone out there with any experience regarding how hot these manifold studs might get ? Not trying to make this harder than it has to be - although I can be pretty good at doing just that very thing from time to time I would just snug them up on occasion, as I've read some folks state they do - but 99% that's gonna just retighten the nut as the stud continues to loosens. Bolts rather than studs would eliminate some of this, as you would be turning the entire bolt when you re-tightened in the future, however I'm hoping to use the tight fit studs I had a machinest make..as a normal 3/8-16 class-2 thread is pretty loose on the first 3 rows of threads on one of my long studs. Trying to exercise the old "ounce of prevention is worth a pound of cure" thang here... Any and all reply's are welcome, thank you all in advance. Steve
-
Senior moment regarding clutch basket
3046moparcoupe replied to 3046moparcoupe's topic in P15-D24 Forum
thank you pcb, dp and dc,......I appreciate you sharing your knowledge from real life experience...and yes sir Don, I did see where my flywheel is indexed to only mount one way,..I have also read from some of your past posts where you were advising others to make note of this,....to eliminate lifting the flywheel up in place a multiple of times until you find the correct clocking,....mine is marked so I'll just have to heave it up there a single time....thank you all. -
Senior moment regarding clutch basket
3046moparcoupe replied to 3046moparcoupe's topic in P15-D24 Forum
thxs for the reply SunT... -
Senior moment regarding clutch basket
3046moparcoupe replied to 3046moparcoupe's topic in P15-D24 Forum
AustinSailor, THANK YOU ...others here are in agreement with you,.. S. -
Senior moment regarding clutch basket
3046moparcoupe replied to 3046moparcoupe's topic in P15-D24 Forum
Thank you DB4Ya....that's good news to hear....I will do that very thing,....this forum and it's members are amazing. Steve -
Haven't had enough experience around manual transmissions and clutch's to mention,.... Removed my clutch basket, clutch and flywheel out through the bottom side of the bell housing,.. ( engine still in the car, 1946 P15). Real proud of myself in regards to carefully and slowly removing the basket bolts, evenly, 1/4 - 1/2 turn at a time,...didn't drop anything, yea !! and about the time I was standing back congratulating myself looking at my flywheel and clutch on the garage floor, I realized I had not marked the clocking of the clutch basket to the flywheel before removing the thing,.......well, they say your mind's one of the 1st things to go,.....I guess I'm about there - because I knew I was supposed to do it and somehow had a senior moment and just plain forgot. Sent the entire clutch basket to Randal at Tennessee Clutch, and they did their thing,...(resurfaced the pressure plate, new throw out bearing, pilot bearing,),.got it all back and everything looks great.. I can think of examples where a person would be in this same situation for other reasons, probably best example would be in building a new drive train for a project from scratch, where parts have not been mated together before.... All feedback and comments are welcome and appreciated,... Do the flywheel and basket need to be re-balanced together ? ... Things sure are easier when you pull your head out and get it right the 1st time - The following taken from the Golf Brooks song - " Senior Moments" "Ooh Senior Moments, Brain Farts, I try hard to remember - but the process never starts, I can have em by the dozens doc and sometimes there off the charts, Senior Moments, Brain Farts " Steve.
-
Good suggestion Niel,..I've actually had more success (so far) using my oem parts manual than I have had in using my shop manual... The (parts manual) does show to have lock washers on everything, but it also shows only 3ea of the smaller 5/16's bolts - and we know that's wrong, as there are a total of 4ea...so far we have found a few errors in the manual - anyway - I still cherish it... Just thought I'd throw this out there and see what responses might come back, thanks for taking the time to reply. I'm not trying to build a purist/concours type project,...but these original bolts have cleaned up nicely, and by the time they go through the bracket, then you add a good 1/16 inch thick lock washer, you loose some thread,...so then you go to the bolt store and get longer ones (and they only have sizes that jump by 1/2 inch increments, so you cut your new ones down to fit,..(which is great fun, I enjoy it,easy breezy stuff)....and in this case isn't such a negative as the cut off end of the bolt is enclosed up inside the eng block,...which will protect it from immediately starting to rust and degrade from day 1.... S.
-
Wondering if any of you P15 owners out there, with the original engines and tranny setups (3 speed manual), might do me a favor next time your under the hood, and take a look at the brackets that attach the lower rear of the engine block to the bell housing. Each bracket uses four bolts (2ea) 3/8 and (2ea) 5/16,. our P15 only had lock washers on the larger 3/8 bolts going into the bell housing, and no lock washers were present on the smaller 5/16 bolts going into the block.. Just wondering if that's the way they were originally put together, or if half of ours got removed over the years, (which would mean that either the tranny or the engine got pulled sometime in the past),....or who knows - maybe depending on availability at the exact time a car was going through the assembly line, it might have gotten lock washers or not.. Thanks again for all the knowledge and help here on the forum.. Steve
-
1946 P15 flatsix (218) flywheel identification help needed
3046moparcoupe replied to 3046moparcoupe's topic in P15-D24 Forum
DB4ya: Thank you - this kind of info helps so much. I really appreciate it. I'm not trying to invent questions about this or make it harder than it has to be, just trying not to be that guy that just throws money at it - and then still has to put it in and take it back out 2-3 times like I have read about folks doing here in the past on this forum. Course we all know it ain't a perfect world, and many of you old school guys had to learn that very way (by trial and error) because there was no one to baby sit you when you were there dealing with it...so again, much respect for you guys and your willingness to share your knowledge and experience. I would appreciate also being able to bounce this off you, as you seem to be the type to reply back with sound information. Since I've learned that my flywheel has a round clutch disc wear pattern in at that I measure at 24 thousands deep....I would hope to avoid having it re-surfaced and re-using it,..to discover later that the flywheel was out of spec (too thin) causing troubles,...I've read everything I can find here on the forum and the internet - regarding this, and it makes sense that surfacing the entire flywheel keeps the geometry of the clutch pressure plate basket in spec with the flywheel,....but as one fella pointed out,...you are however, moving everything away from the clutch fork,....so there has to be a limit to how far you can go (resurface),..I have seen where others have asked this same question and the only reply back I have found was a fella who said the flywheel needed a minimum thickness of 1.3 " he was having adjustment issues and his flywheel had been turned to a thickness of 1.1".. At present, when I measure my flywheel thickness at the worn clutch disk area with calipers, I get 1.5" and I am seeing some very slight heat stress cracking that would need to be ground out/re-surfaced, (nothing that your fingernail will hang into, but they are present),...so if the minimum thickness dimension of 1.3" is correct, and with .200" of an inch being about (3/16 ") I would think I should have enough meat there to have this flywheel re-surfaced and it still be way within spec.... Would you be able to shed any light on this. Thanks again for your help so far Steve -
1946 P15 flatsix (218) flywheel identification help needed
3046moparcoupe replied to 3046moparcoupe's topic in P15-D24 Forum
Rich, thanks for the input...I appreciate anyone and everyone willing to take time to try and help with my questions....You know I'd love to do just that,...but so far - my experience has been (and honestly they're not any different than most business's would be) ,... they are fairly short with you even when your ordering parts and spending money,....you start questioning them on their parts (cause I've gotten stuff that didn't match and didn't fit from both of them that resulted in some of this type of conversation and once it required them to pull a part) and they didn't seem to be too happy about it...I definitely get it,....they're there to make money, and we need them to do just that - be profitable so they can provide us with these badly needed parts,...I could see where they would have to police it - or they'd end up going broke answering questions over the phone...I guess I'm trying to say - I see both sides of it..... Steve -
1946 P15 flatsix (218) flywheel identification help needed
3046moparcoupe replied to 3046moparcoupe's topic in P15-D24 Forum
Thank you FGF, I appreciate your input...my opinion's not worth much - but I would have to say I'm also now thinking this must be wear on this flywheel...I didn't know if some of the old mopar's had stepped flywheel's,...from the responses so far it appears that they did not. Again, I hate I'm having to gain knowledge at the expense of others, as I'm having a time trying to figure this out by the available documentation.. Steve -
1946 P15 flatsix (218) flywheel identification help needed
3046moparcoupe replied to 3046moparcoupe's topic in P15-D24 Forum
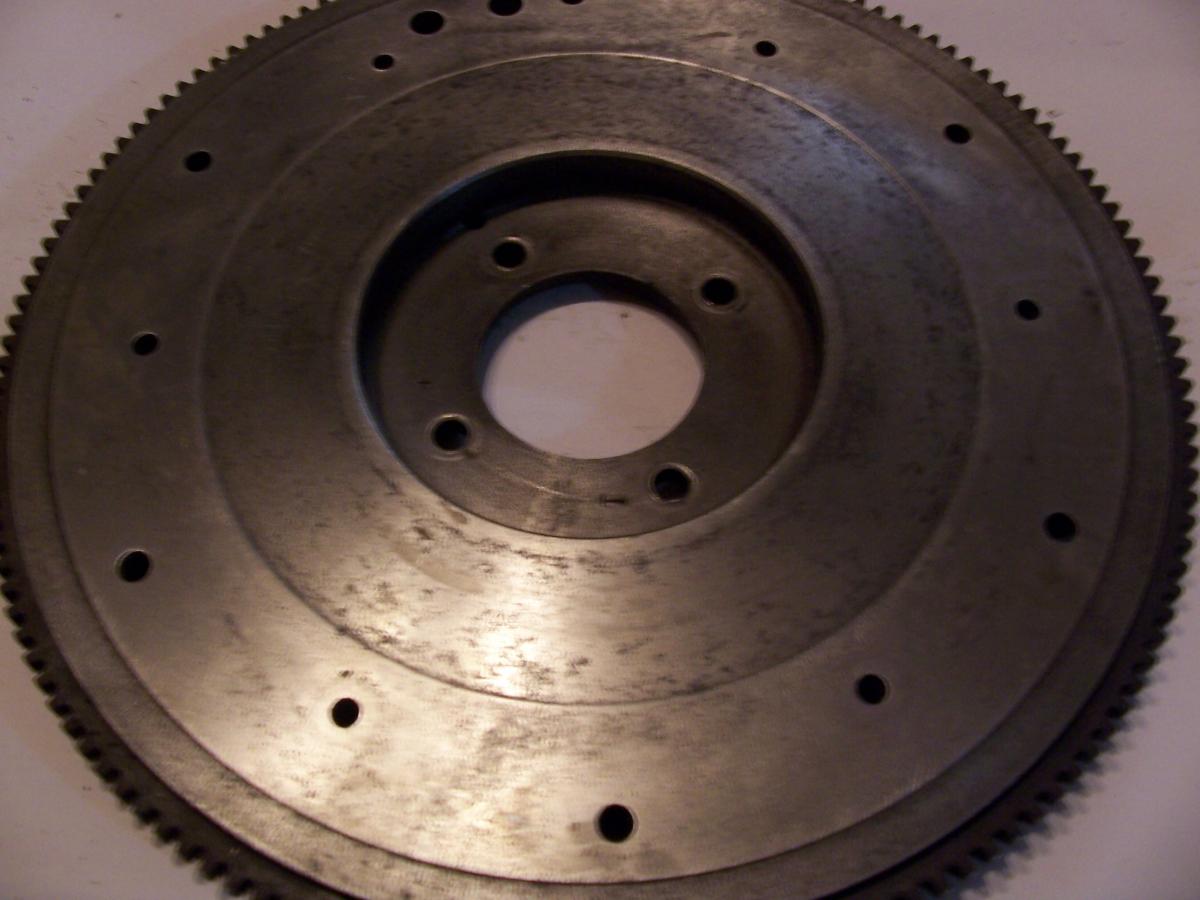
Don, I can see the clutch side of your ring gear in the picture and the teeth look to be cut 90 degree square, but on the opposite starter side, are the teeth beveled ? It kinda looks like there might be an angle but hard to tell for sure. At 1st I thought your flywheel in the picture looked like mine, I thought I could see the set (6ea) of clutch basket holes for the 9 1/4" clutch basket, and then also the additional set (6ea) of wider spaced holes, which I'd assume would have to be for the larger clutch basket, but in looking again closely the spacing doesn't look right, I think I'm just seeing what must have been holes drilled for balancing. I'm thinking this motor is in your car now, so if that's the case - I don't expect you to get under it and remove the inspection plate to look. Maybe you know this however - The ring gear currently on my flywheel (no part # on it) is 3/8" wide,... The pp#675175 ring gear I have for a replacement is 7/16" wide.... The book says 146 teeth (which matches both ring gears) but it doesn't give a width spec.... I have found this part # 675175 listed throughout web sites on the net (for exp: nosmopar.com shows it as follows: pp#675175 desc:ring gear flywheel 33-59 Plymouth,Dodge,Chrysler,Desoto. thanks Steve -
1946 P15 flatsix (218) flywheel identification help needed
3046moparcoupe replied to 3046moparcoupe's topic in P15-D24 Forum
For some reason, the attachment pic showing the clutch side of the flywheel never would display (on my end) in my original post above. I tried editing it and re-attaching the pic two separate times, and it still would not work for me, however it did allow me to add the pic here, as shown below. No matter where ya go - there ya are !! !!