


9 foot box
-
Posts
586 -
Joined
-
Last visited
-
Days Won
14
2 Followers

Recent Profile Visitors
3,052 profile views


-
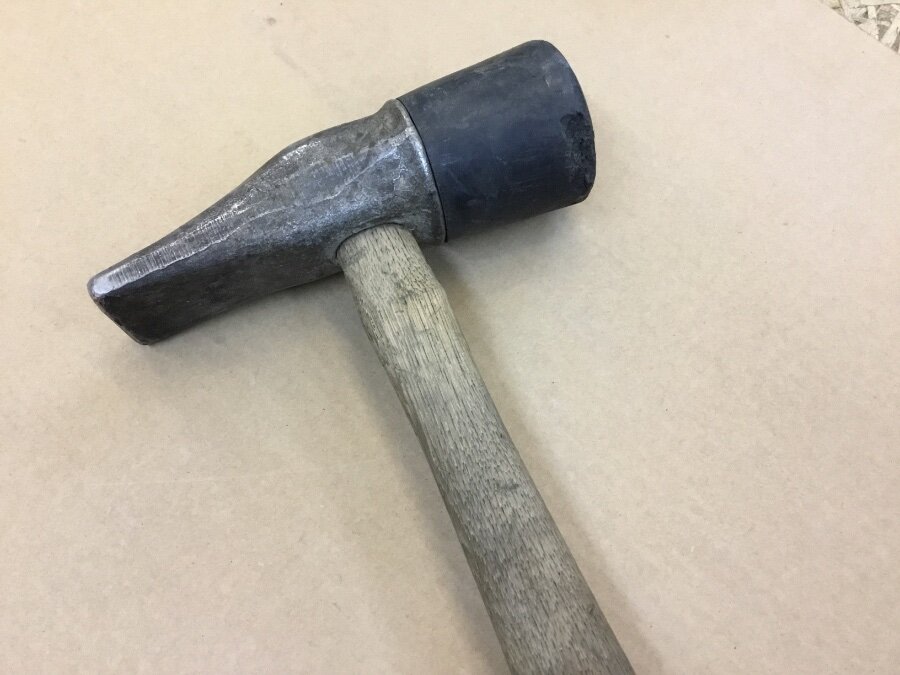
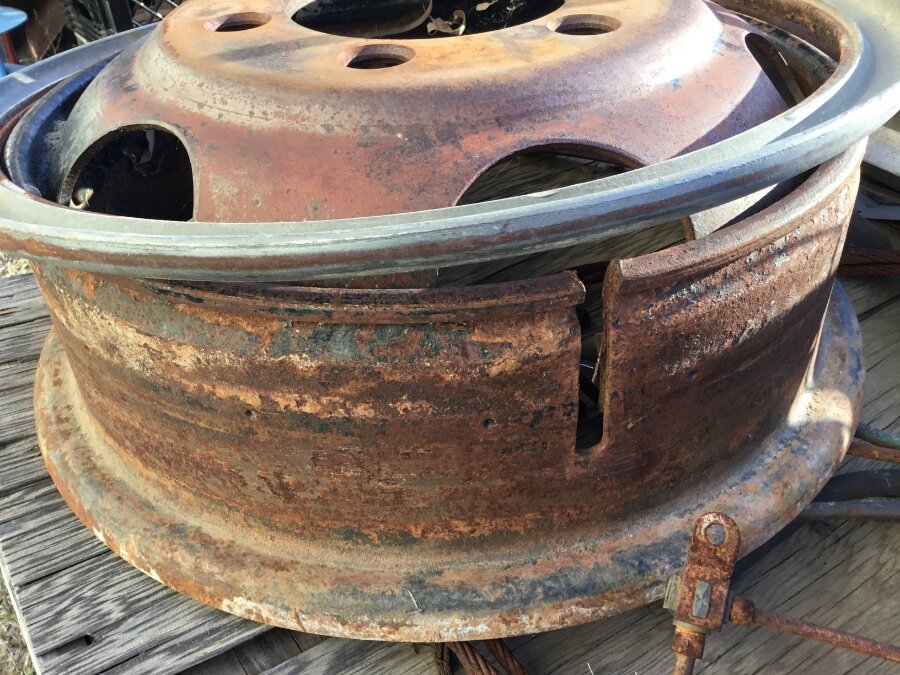
I have a couple 20” wheels. They are the narrow style. You wouldn’t have to feed the stem into a center hole. The assembled tire, tube and flap should drop straight in. My previous pictures are one ton 16” wheels. The flap covers the gap in the slot for the valve stem in a larger wheel. I’ve seen metal reinforced valve stems, maybe that’s what you need. I use this hammer to assist the lock ring to seat properly. A rawhide, dead blow or rubber mallet would probably work, just don’t use a metal hammer. When you dismount your old tires, you need to break the bottom and top bead, to be able to get the tire and lock ring off. That’s the hard part because the bead is rusted to the wheel. That’s why the rubber lube is important, not soap and water. It makes repairs a lot easier also. There is a slot on the lock ring to insert a flat bar to get it above the flange, I use another flat bar and tap it around the circumference to remove the ring. It prevents distortion of the ring. I’ve seen people pull the ring off after releasing it, but it stretches the ring. You can see that this wheel needs bead blasting or knotted wire wheel cleaning and my preferred aluminum paint. You got a long way to go, till new tires. Get though the front wheels okay, you got it figured out. Your wheels are probably cleaner than the flat tire I took off this wheel. Rick D.
-
I like aluminum paint, it dries without any buildup. Check the inside of the tires for any tags, that could eventually rub a pin hole in the tube. I wiped the inside of the tires and the tubes with corn starch with a cloth. It doesn’t need a lot. I paint the bead of tire with rubber lube, so the bead slides easily on the wheel as it sets, you can put the lube on the wheel seat to ensure a soft seating of the bead. The flap doesn’t need any lube. Set the opening of the lock ring opposite the valve stem. I have a special hammer/mallet with a duck bill on the other side. I use the rubber part to tap the lock ring into place as I fill the tire slowly by adjusting the pressure on my regulator. This assumes that your rings are clean and no cracks, they have been painted and the notch in the wheel where they lock is perfectly clean. I’ve trashed wheels and rings that had been beaten with metal hammers. The lock ring ends should be almost touching when done correctly. Any questions, ask, it is a risky job even if you’ve done it before. These are 16” wheels, but the same design as the 20” wheels that I have. Once the bead is set and the lock ring is secured properly, I let the air out and refill with the valve core installed to eliminate any tube wrinkles. After you get it to pressure, you can bend the valve stem for access when the wheels are on the truck. If there is anything you don’t understand, ask. Rick D.


-
Hello all, I’ll be adding a 47 WD21 to the forum
9 foot box replied to Eric WD21's topic in Mopar Flathead Truck Forum
This is a 3.9 differential that was handy. The upper flat is where a fill plug could be tapped, the lower flat is where the gear ratio is stamped. My guess is 4.3. Rick D.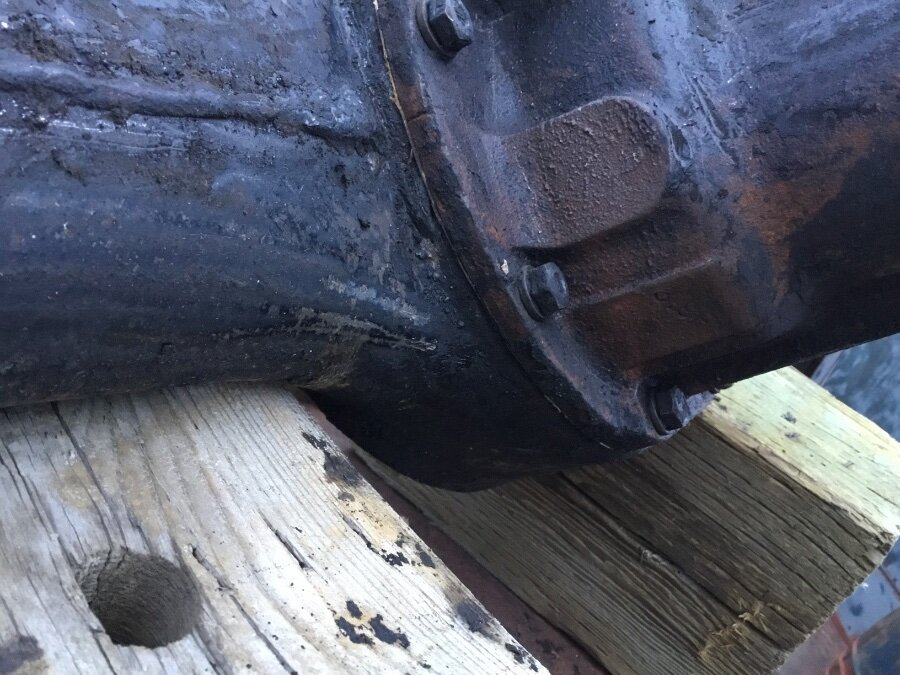
-
ANSWERED 1948 plymouth coil spring insulators
9 foot box replied to firemunkey's topic in P15-D24 Forum
Maybe try searching for coil spring silencer. That’s what the parts book calls them. Roberts and A. Bernbaum have them. The book calls for a spacer on the top driver side spring. Silencer 691144 spacer 657770. I don’t know of a source for a spacer, or if they are metal or what they are made of. I put Aerostar springs on my 46, I believe that they are a progressive spring, that gets firmer as it compresses. I didn’t cut any coils. -
Show a picture of your other clutch plate. It shouldn’t have the spring steel supports, like the one that broke. If you go to the web site, you can see the difference. I didn’t know that there was different clutch plates for Dodge until your post.
-
Andy B. has the best price. It looks like a clutch plate for fluid drive. Could be why most of the springs broke.
-
An updated picture, without shadow. Modello sent me an email with a $30 off my next purchase. That’s nice. I would have them add tire tread on the next one. I’m looking at a couple different Plymouth ship logo’s to do also. This was a whim purchase. It worked out OK, but I need carb and fuel pump rebuild kits. Rick D.
-
The eBay item number for the carburetor that I was referring to is 315193868798. It would be a direct fit. I don’t see the one you bought, working with a Gyromatic transmission. Like PA says, you have to pay to play if you don’t have the correct parts. I wouldn’t pay $700 for a E6U2 carburetor. But the D6M1 is affordable and should work in your application. Rick D.
-
In a Google search, type D6M1 2146357 carburetor. Other carburetor that may work E6U2. The eBay carb is missing a throttle piece, but you can use the one off of yours. Some of the price’s I’ve seen, $267 delivered is a deal. It has the electric dash pot and what looks like a kick down switch. Rick D
-
Will 1951 DeSoto car A arms bolt up to my 1940 Plymouth Coupe?
9 foot box replied to Noonan's topic in P15-D24 Forum
Second page.
-
Will 1951 DeSoto car A arms bolt up to my 1940 Plymouth Coupe?
9 foot box replied to Noonan's topic in P15-D24 Forum
From a Hollander 46-56.
-
I saw an add for Modello Turbo that interested me. I sent a picture of my 46 P15 and they replied with a sample line drawing. I had them eliminate the spotlight and antenna, and this is what I went with. 27” wide, 16” tall, $118 delivered from Turkey, took 13 days from start to receiving today. I’ll probably white out the hanger bracket with touch up paint. I like it but the problem is I have an idea for a perspective of a 47 Dodge truck and it means more stuff, I have enough stuff. They are neat and affordable though. The shadow is from my lighting in the shop, it sets out 1/2” from the wall. A flash picture works better. But that’s on my PC with a digital camera. You get the idea. Rick D.

-
You can’t beat the price and the Texas sun has the paint striped off. It may have a 51 title, but the dash is a 52-53. I’m not knowledgeable in B-Series, just an opinion. The chrome center on the grill and vent windows may just indicate a Deluxe cab with electric wipers and two visors. That’s a nice project to bring back home. Your last project was a Chevy wagon, how did that turn out? It seems that if a person bides their time, a good deal will eventually turn up. It worked for me, in a recent 48 Ply Club Coupe for a 41 Dodge truck trade. The Coupe needed everything, I’m driving the truck daily, after changing a few cobbled changes that were done to the truck. Rick D.
-
There should be a notch in the bottom of the dash, under the key switch. It gives you access to a screw that holds the switch in place. Remove the screw and the switch can come out the back. That’s how mine are.
-
The exhaust manifold nuts and washers at the front and rear of the exhaust manifold are tapered and should go into concave bronze washers. The castle end of the nut shouldn’t be outward. A manifold stud kit has four castle nuts and washers. It allows the manifold expand and contract. Look in the spare parts that you may have gotten. Maybe you’ll find the correct parts. Rick D.

