


Joe-Bob
-
Posts
16 -
Joined
-
Last visited
Recent Profile Visitors
602 profile views


-
Soth 12230- To adjust my float I loosened the set screw and rotated the entire float rod straight down and tightened the set screw. At this point it will drop to the floor of the tank and raise to a point several inches lower than the top level of fuel in the tank. since the rod is longer than the depth of the tank it seems like it should never reach empty.
-
Soth 12203 - That I can understand, but I have a ground wire from the sender connected directly to the trunk floor.
-
I had read the manual some time back and just read through it again. It's a little "techy" for my old brain, but it doesn't answer the question of why my gauge works with the sender out of the gas tank with the engine running, doesn't work correctly with the ignition switch on accessory and the engine off, and doesn't work when installed in the tank with the engine running or off. I've heard both that I need a runtz and that I don't need a runtz, but what difference would it make? Stock was 6 volts and with a runtz it's 6 volts... And, when I adjusted the float to drop far too low in the tank, it should raise sooner and send the gauge higher sooner, but it doesn't. After reading the manual, I switched the wires on the sending unit and started the car. With the car running I have 17.5 ohms on the left terminal of the sender and less than one ohm on the right terminal. The gauge did move to a little over half full. I'm still confused because earlier, with the wires unswitched and the sender out of the tank, grounded, and operated by hand, the gauge worked as it was supposed to. I can't seem to locate a constant that might allow me to adjust things without just being random.
-
I'm frustrated. The fuel gauge in my '42 won't register full, or anything else accurately. The backstory is that I converted to 12 volts and completely rewired the car myself about 15 years ago. I installed a NOS fuel gauge with a Runtz reducer. I installed a new fuel sender and grounded it by wire to the trunk floor. I'm confident everything is correct, because if I remove the sender from the tank and raise and lower the float the gauge reads correctly. I decided the float's angle of the dangle was off so I monkeyed around with that to no avail. In fact I have it set so that the float hangs straight down and would touch the bottom of the tank long before it reaches the end of its swing. The tank is eight inches deep and has about five inches of gas in it. The gauge reads almost empty. I don't see where the float is restricted in any way. And here's another weird thing; if the ignition key is set to accessory, and the fuel sender is out of the tank and in my hand, the gauge reads just over 1/2 tank when it should read full. If the car is running, it will read correctly as full. I don't understand what that would have to do with anything. The float does not appear to be gas-logged in any way. I did recently have a 318 installed in the car with the idea to take it on longer drives. This is the main reason the gas gauge is more important to me than it was before. What in the world am I not doing or understanding? Any helpful advice?
-

How do I re-hang front fenders so that they appear level?
Joe-Bob replied to Joe-Bob's topic in Technical Archives
Solution? My brain just doesn't understand logic... When my car was at the fab-shop, they installed a Fatman front clip as well as new Posie dropped leaf springs in the rear. They installed new shocks all around. I had the shop recently correct some things not pertaining to any suspension work, and somewhere along the line they leaned on the car and discovered that one of the new rear shocks was not working correctly. After installing a replacement for the non-working rear shock the car appears nearly level in the front as well as the rear. It's not perfect, but very few will notice anything unless I point it out. I'm calling the problem solved, but my brain just doesn't understand it. LMAO! I hope this gives someone in the future a new way to look at this problem. Thanks everyone! -
How do I re-hang front fenders so that they appear level?
Joe-Bob replied to Joe-Bob's topic in Technical Archives
This will never be a show car, I just want it to look pretty good from 20 feet or so. I did just reconnect with an old high school buddy of mine who is a retired bodyman. He's going to take a look and may be able to give me a hand. I will try and get some pictures up soon when I'm just a little happier with how it looks. Thanks for the encouragement and pointers!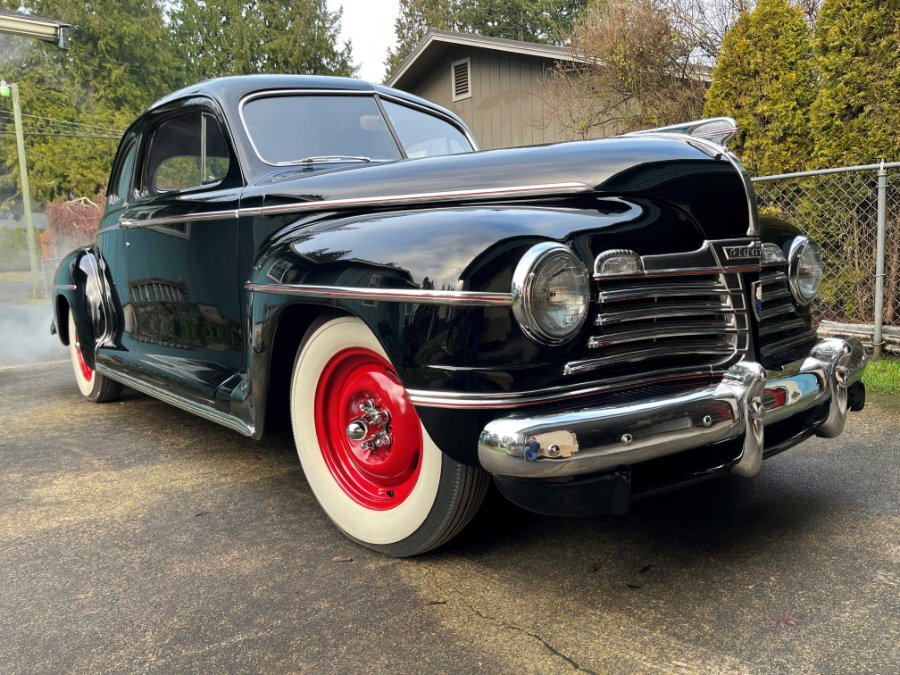
-
How do I re-hang front fenders so that they appear level?
Joe-Bob replied to Joe-Bob's topic in Technical Archives
The driver's side is wider at the top than the bottom, but it's flush to the top of the fender where it begins to level out over the wheel. That point where it begins to change contour is where the extra space is, compared to the passenger side where it is tighter. The fabricator kept all of the front sheet metal, with the exception of the hood, together as a unit. There is one mounting point in the center of the new cross-member where the radiator support is mounted. Fatman had me take plenty of measurements and everything came together right where it was supposed to. The frame is square and level side to side from the ground. They've made this stub for a few years now, and the fabricator was very thorough with that part of the work. They just seemed to have issues with hanging the sheet metal and mounting the hood. Toward the end, I had to quit paying them by the hour to scratch their heads and farm stuff out to more guys that scratched their heads. What started out as fun began to turn into a financial nightmare. On the other hand, it's not as expensive for me to scratch my head, and it is driveable at this point.
-
How do I re-hang front fenders so that they appear level?
Joe-Bob replied to Joe-Bob's topic in Technical Archives
Thanks for the reply. The gap at the cowl on the driver's side is about a 1/4 inch wider than on the passenger side. It seems like if that were closed up, it might raise the front of the fender, which is what I need. But I'm not sure how to do that. To me, it looks like there are four bolts that hold the fender to the body and one more at the top/cowl. Would I loosen all except the bottom bolt, lift up the front and retighten? Is there a way to adjust one side of the radiator support? I didn't opt for coilovers, so they are not adjustable.
-
I had a fab shop install a Fatman front frame clip. It appears to be square, level, and correct. However, when they rehung the front sheet metal clip, it now sits 3/4 of an inch lower on the driver's side. Again, the frame sits perfectly level from side to side, but the front wheel cut-out is 3/4 lower than the passenger side. I'm sure there is a way to rehang a fender to raise it but I'm unsure where to loosen bolts and how to go about it. Right now the driver's side tire rubs when turning and I'd like to raise the fender to clear it. Do any of you guys who do bodywork have any suggestions before I muck it up even worse? ? And taking it back to the fab shop is not part of the equation, we no longer see eye to eye.

-
ANSWERED How do you bench test a two wire fuel sender? P14 Plymouth
Joe-Bob replied to Joe-Bob's topic in P15-D24 Forum
Ok, I'm opening myself up to certain ridicule but my problem is solved and here's my theory. First of all I admit I'm no mechanic and I know even less about ohms, volts and multimeters, in fact I don't write too good and I mix up my facts when I try... There, we got the disclosure out of the way. Above, when I wrote "Ok, maybe I figured it out... I went online and studied up a little on multimeters. I'm not saying I understand very much, but here's what I think I got. Voltage is 12+ volts before my runtz resistor and about 8 volts going to my gas gauge. If I disconnect the battery and both wires from my fuel sender and do a continuity test, both the #1 wire and the #2 wire test ok. No shorts there. Then for no reason, with the fuel sender still installed and disconnected from any wiring, I ran the multimeter from ground to the #1 terminal. No continuity. Then I ran from ground to the #2 terminal and there we HAVE continuity. I believe I have a short circuit to ground on the #2 terminal inside the fuel sender." I stated my facts back-asswards. I think continuity means you have a connected circuit to ground which means you have a closed circuit with no shorts (check with someone who knows electricity because I could very well be wrong again) so I should have stated "I ran a ground to the #1 terminal. We have continuity. Then I ran a ground to the #2 terminal and there we have NO continuity. Anyway, I deduced that the fuel sender was shorting out through most of it's swing cycle causing my gauge to read full and only dropping very slightly as the tank went empty leaving me thinking the tank was full when it was indeed empty. Whether that deduction is scientifically correct or not is up to the experts to decide, but since the gauge seemed to move from full to empty and back, depending on whether you crossed the wires or not and the wires from the gauge to the fuel sender had continuity I spent the big bucks ($97.00 including shipping) to buy a new fuel sender from Roberts Motor Parts 978-363-5407. I put it in tonight and voila, my gauge shows 3/4 full. So, whether my hypothesis was right or wrong, it appears my problem is solved (knock on wood). So now as soon as it quits raining I'm going to put a few miles on my car and see if the gauge continues to drop. I WILL make a final report when I know for sure. In the meantime if I had to pay someone to diagnose this issue I would have spent even more, I'm happy. And I got a free catalogue with my order that has lots more parts for old Mopars - check them out, they seem very reputable. -
ANSWERED How do you bench test a two wire fuel sender? P14 Plymouth
Joe-Bob replied to Joe-Bob's topic in P15-D24 Forum
Yup, P14's are 1942's. Most were built before the end of December 1941. After Pearl Harbor they manufactured the "black-out" models and I think most of those may have been used as staff cars. I've owned two over the years and seen less than ten others on the road or at car shows. You see quite a few on the internet, but I think they are spread out fairly thin across the country. -
ANSWERED How do you bench test a two wire fuel sender? P14 Plymouth
Joe-Bob replied to Joe-Bob's topic in P15-D24 Forum
Ok, maybe I figured it out... I went online and studied up a little on multimeters. I'm not saying I understand very much, but here's what I think I got. Voltage is 12+ volts before my runtz resistor and about 8 volts going to my gas gauge. If I disconnect the battery and both wires from my fuel sender and do a continuity test, both the #1 wire and the #2 wire test ok. No shorts there. Then for no reason, with the fuel sender still installed and disconnected from any wiring, I ran the multimeter from ground to the #1 terminal. No continuity. Then I ran from ground to the #2 terminal and there we HAVE continuity. I believe I have a short circuit to ground on the #2 terminal inside the fuel sender. Can I get an Amen? Is my hypothesis correct or am I still on a wild goose chase? By the way, I pulled the fuel sender, grounded it and moved the float manually. From fully up to nearly all the way down the fuel gauge does not budge from full. When you drop the float the last quarter inch or so the gauge does move about an eighth of an inch and that's it. You'd have to be watching pretty close to notice it before you ran out of gas. -
ANSWERED How do you bench test a two wire fuel sender? P14 Plymouth
Joe-Bob replied to Joe-Bob's topic in P15-D24 Forum
Thanks for the response. I've read and reread my manual. The first sentence starts out with "The most convenient method of testing for a faulty gauge is to use a spare tank unit known to be in good condition." I'm afraid I don't have a spare tank unit. Then it explains how to connect this spare tank unit to the gauge and if the gauge works, then you know that the original tank unit is faulty and needs to be replaced. There's also an explanation of cleaning the points in the gauge if it fluctuates and how to calibrate the gauge if it reads incorrectly. Mine just stays on Full. There is nothing on how to test the original tank unit. I'm pretty sure that I read something somewhere about how to bench test the fuel sender with a multimeter. It's supposed to register a certain ohm value when the float is up and another value when it's down. But I'm not sure how it said to hook everything up and what the readings should be. For all I know I accidently did it correctly, but I don't feel like I did. I'm just hoping someone can point me in the right direction. I scanned the repair manual but have no idea how to upload or paste it to this topic, in case someone could point out what I'm missing... Sometimes I just stay in frustrated mode. -
I have a '42 Plymouth and I'm tired of running out of gas. I have a NOS gauge that I believe is in working order. I have a trouble-shooting guide that I found, and with a full tank of fuel my gauge reads FULL. If I ground the #1 wire it reads 1/2 full. If I disconnect the #2 wire the gauge reads EMPTY. If I reverse the #1 and #2 wires the gauge reads EMPTY. Now that the tank is about 3/4 full the gauge still reads FULL. I rewired the car several years ago with an aftermarket wiring kit and changed to 12 volt negative ground. I used a runtz thingamajig to drop the voltage to the fuel gauge. To be honest I don't remember if the gauge worked when it was still wired as a 6 volt positive ground. Today I disconnected the battery and pulled the fuel sender out, hooked up a multimeter to it and tried to figure out if anything changes when you move the float up and down. I know NOTHING about multimeters. I set it to ohms and shoved the red probe in the #1 contact and the black probe in the #2 contact. I think the meter read "1". That didn't seem right, so I left the red probe in the #1 contact and grounded the black probe. That set a little buzzer off and caused the meter to go up and down when I moved the float. I think the range was from 1 to around 67 or so, but the readings weren't steady; they wavered up and down but in a general direction of lower to higher and back. I thought (hoped) I jiggled something loose and maybe the fuel gauge would move lower when I reinstalled the fuel sensor, so I put it back together. I even ran a separate ground wire from the sender to the body hoping that might make a difference. The gauge still reads FULL. I'm sure I'm missing something simple, because "I'm" simple... If anyone can help me out with this I will be very appreciative. And then we'll move on to the odometer which also doesn't work. That's the other reason I keep running out of gas... I apologize in advance if I'm in the wrong area, or this subject has been worked to death already. I tried to find some answers using the search function and was able to get some ideas, but I can't seem to find anything in my manual or on here about bench testing the fuel sender. I don't mind buying a new one, but I would be a bit P.O.'d if I did and that wasn't the issue.
-
I have a '42. I believe the deck lid is the same, but the license plate bracket and brake light are different so you may have holes to weld up.