


Andydodge
-
Posts
5,528 -
Joined
-
Last visited
-
Days Won
28
Content Type
Links Directory
Profiles
Articles
Forums
Downloads
Store
Gallery
Blogs
Events
Classifieds
Everything posted by Andydodge
-
There "should" be a gasket between the bellhousing and the gearbox that covers those holes in the gearbox..............at least thats what my cars had........, andyd
-
I learn something every day.........only 4 bolts on the crank/flywheel flange.........also a tip............when you remove the rear main check if there are any small seals either side of the main bearing journal that sit in a recess in either the main cap or block...........I'm unsure if these seals exist in a 1934 engine but certainly do in the late 30's onwards and there are at least 2 different shaped seals also..........as for what type of rear main seal you "should" have my understanding is that it should be a rope seal BUT could well be a neoprene type seal also..........the only way to be certain is to remove the rear main cap and see whats actually there...........lol....... ...............BTW......the flywheel looks nice, the clutch will thank you for it...........lol............don't forget to use a new throwout bearing and lubricate the pilot bush or if possible instal a new one and still lubricate that one anyway in the end of the crank and a small amount of grease on the clutch throwout arm pivot point ..........andyd
-
So do you have all radials at present?.............are they the same size front to back.........also the wear pattern on the tyres and air pressure?........the same all round?............and finally are you swapping a tyre from one side of the car that rotates in one direction to the opposite side of the car where it rotates in the opposite direction and does the tyre have an assymetrical tread pattern?...........andyd
-
Can you advise exactly what car or brand of brakes you have on the front & rear, what master cylinder and booster..............andyd
-
Other than to say installing the Langdons HEI was the best thing I had done to the 41 Plymouth when I owned it.......the car had been converted to 12 volts when I bought it, I bought the HEI & the round style coil, shipped and delivered promptly to me here in Oz, I installed it without any issue......new 8mm plug leads and regaped plugs to, from memory, 45thou and it ran great......started even better.......as my car had had a late model key start installed when it was converted to 12 volts I could have the drivers window open, lean in and turn the key and within a couple of turns over it would start.............ran well, seemed if anything to have more get up & go......I thoroughly recommend the HEI........unfortunately I sold the car like a dope..........these are the only pic I have showing the HEI & new leads..............andyd


-
Nope......supposed to be straight............I've made tie rods from cold drawn seamless tubing, using, from memory 11/16th taps.........whether LHD or RHD the tierods should be the same from 1940 to 48 if that helps at all........I've probably got one somewhere but I'm in Australia.......how bent is it and whats the steering been like with it bent?......andyd
-

Who's decorating their Mopar for Christmas?
Andydodge replied to bamfordsgarage's topic in P15-D24 Forum
Thanks guys, made me laugh & smile...........I know its a bit early but wish you both & families a Happy & Safe Xmas & New Year............regards, Andy Douglas in Oz. -
'47 P15 Special Deluxe Head Gasket Advice Would Be Helpful.
Andydodge replied to 47P15Cruiser's topic in P15-D24 Forum
47P15cruiser.........I'm in Australia, South Grafton, Oz country on the east coast......... ...............I was in the process of collecting parts to build a hotted up 230 for the 41 Plymouth Coupe I had, twin carbs, cam, finned head, split exhaust, etc but sold the engine & bits when I sold the car due to financial issues a few years ago, still got the 40 Dodge tho' ............... ...............I got the Finned Head from Earl Edgerton in L.A. who had these cast up, the Montana Mopar Boys who post on this forum now are apparently doing these heads......the twin carb Offy intake I got from Speedway Motors tho' it and various other types appear on ebay, a HEI Dissy from Stovebolt Engineering in the USA( I installed it on the stock 201 in the Plymouth Coupe & was the best thing I did to that car), the 230 Cam I got reground to 1/2 race specs by Waggotts here in Oz, the finned side covers I got from Patricks in either Florida or Arizona(?) I think, the exhaust manifolds are a pair of the two different outlet 23" cast iron exhaust manifolds I cut and had a local blacksmith weld up(US sourced tube & cast headers do not fit as the Oz RHD steering box lives between the Fuel & Oil pumps so I had to find stock exhaust manifolds with outlets that I knew cleared the RHD steering box & column), various engine parts including the new oil pump, lifters, valve guides & springs, timing chain and gears all came from listings on USA ebay BUT were actually from guys in Turkey, yep, that Turkey......... ..................Mopar apparently had their Middle East Distribution Centre based in Turkey & when it closed a large number of parts ended up still there.........I used to search USA ebay in listings covering 1948 to 1959 Plymouth & Dodge and all these parts were brand new, USA sourced still in their brand name or mopar boxes......the parts were about 1/2 the relevant US prices which was about 1/4 of the current Oz prices so it does pay to search around once you know what fits what............I think from memory the brass water tube came from a guy here in Oz..........but I would not use a mild steel tube unless I had it copper plated or made sure I ran proper coolant in the radiator.......... ............the 230 engine I was using was an ex Sydney Airport Tug engine, 23" engines are not that common here in oz as most mopar sixes used after WW2 were the 25" DeSoto/Chrysler variants due to being imported from Canada via the UK.......just the way it was done to reduce import taxes and tarrifs.........removal of the original water tube was a PITA, even as I had just the bare engine block to deal with.....lol...........regards, Andy Douglas

-
Well, the 36-42 Dodge part list posted by Rich does indeed confirm that Dodge & Plymouth used the same stub axles..........this info would be worth giving to all three of the disc brake adaptor companies.....they may even appreciate it............lol.........andyd
-
Dunno if this is any help but I have a USA 1936-42 Plymouth Master Parts List, 480 pages, a reprint of a 1946 book by Chrysler Corp. and it confirms the right/left steering knuckle part numbers as indicated by ratfinkxxx above....... ................but the interesting thing is that the addmitedly only drawings, show that the steering knuckles or what I would normally call the stub axles appear to be the same type as used up to and including 1940, ie, with a pair of bolt threads above the stub axle and a pair of large holes cast into the stub axle below the stub axle for the steering arm bolts to pass through.......... ..............these stub axles as shown I know are different to those used from 1941 onwards, although the kingpins interchange. ..........and for what its worth the Oz workshop manual issued in 1953 by Chrysler Australia for the Oz 1936-1942 Dodge,Plymouth and Oz DeSoto models(all based on the relevant Plymouth each year) show a 1938 axle & knuckles and state its "typical of 1936/1937".......... ...........I would make a cardboard or better still sheetmetal or plywood template of your stub axle showing the location of the upper threaded bolt holes and lower open holes and send this to Rusty Hope, TSM and Scarebird.......at the very least this may help them to expand their kit coverage.........and answer your questions.......regards, andyd
-
But as Ken says use the number stamped onto the bearing.........obviously if you do not have a bearing then thats a problem but I've never bothered with a car brands part number when I'm looking for a new bearing, I just use the number on the bearing......and when I decided on using discs on my Dodge years ago the main consideration was that the ID of the new bearings in the 11" vented discs matched the OD of the 1941-54 style stub axle which they did, then it was just a matter of getting a spacer machined for the new grease seal to run on..........and that was again relatively straightforward as I had the stub from the OEM disc application so measured the OD on that and the relevant spacing and the OD on the 1941-54 stub axle which when reduced by a couple of thou gave me an ID that would allow the new seal piece to be a shrink fit...........and then just had to make the caliper brackets.......as I had the OEM stub with its cast on caliper brackets then it was just a matter of transposing their dimensions and making that from steel plate..............and still working 47 years later........andyd
-
My 1941 plymouth with the stock 201 cube engine had the neoprene seal instead of the stock rope seal but the previous owner had installed the neoprene seal without either of the 2 different shaped side seals..........I had a full Best brand gasket set but had to order the rope seal separately and then after teardown found I didn't need it as it had the neoprene seal and that really wasn't the issue...................lol................after installing the correct side seal it still had a small leak but no way like it was previously.......so I'd suggest checking first or order all 3 types of seal to have on hand b4 teardown..........lol.............andyd
-
Educate me about wheels and tires (and hubs and axles)
Andydodge replied to Racer-X-'s topic in P15-D24 Forum
Racer....those two holes you ask about in the chassis ARE for the original brake hose bracket that is held onto the chassis by small self tapping 1/2" AF head bolts, these are a fairly common bolt on mopars and you should find others holding various brackets onto the chassis........ ......as for the wheel size 1947 was a transition year......started off with 6.50x16 tyres, finished with 7.60x15 tyres........width would have been probably 5" to start going to 5.5" maybe 6" but doubtful..........I ran 15 x 6 and 15 x 7 Wheel Vintique Chrome Smoothies with their stock backspace and 195/65 x 15 and 235/65 x 15 Coker Classic Radial Whitewalls on this 41 Plymouth Coupe without any issue, cleared front/back,inside and outside and lowered 2"........bolt pattern should be the same as other mopars( and Ford from 1949), 5 x 4.5"..........andyd

-
The shape of the pictured steering arms is factory stock due to the "dogbone" shape of the stock pitman arm which has one tie rod end attaching from above and the other from below to enable the pitman arm to have full unobstructed travel left to right.........using the "undropped" or straight type of steering arm on both sides is possible and quite o/k to accommodate a rack & pinion........ ...............however an issue arises in using a rack in place of a steering box due to the reduced "throw" that racks tend to have resulting in a reduction in turning circle......... ...........this can be overcome by the use of custom made shorter steering arms which then allow the racks shorter throw to move the arms sufficently to allow for a "normal" turning circle.......... ............another method is to mount the stock steering arms 1 bolt forward on the stub axle bolts which effectively "shortens" the distance between the tierod attachment and king pin pivot again resulting in a normal turning circle........ ............and the third method is to shorten the steering arms which I had done by an Automotive Blacksmith 45 yrs ago......... .............I used a rack & pinion due to space limitations after trying to accommodate the original steering box and not finding any steering box that would fit......the rack & pinion fitted and worked, initially it was a stock width rack from a Morris Minor then replaced with a stronger, narrowed 9" Austin 1800 rack about 5 years later and still working fine.........andyd.
-
Kevin.......looks like Petes won the prize.......thats a neat job he has done.........and interesting that his cars lock is a different length again.........in 3 years they did 3 different length lock assemblies but each have the same basic tongue design........bazaar..........lol.........andyd
-
My setup probably isn't much use to you as I'm in Australia, but my car uses an Austin 1800(front wheel drive bigger version of the BMC Mini) rack & pinion that I narrowed 9", I also have shorter steering arms to address the common problem using rack & pinions, ie, that of a reduced steering tie rod "throw" so that my car has a decent turning circle.....brakes are 11" Oz PBR vented discs with the mopar bolt pattern rear brakes are 11" non vented discs on the 1990 Oz Ford rear axlethe rack has been in my car since the late 70's, the 318 Poly V8 since 1973, I've owned the car since 1971, 50yrs last September......its probably travelled 20,000 kms since I built it, so far without any issues........the steering arms are the stock Austin 1800 threaded into 1" dismeter steel bar stock that have machined adjusting flats, with Oz Valiant tierod ends threaded into the bar stock and the correct taper for these tierods in the shortened steering arms.......regards, Andyd


-
'47 P15 Special Deluxe Head Gasket Advice Would Be Helpful.
Andydodge replied to 47P15Cruiser's topic in P15-D24 Forum
There are 5 of those welch plugs on the distributor side, from memory its best to remove the generator & starter to get at them all.......also the dissy maybe in the way............firstly I'd undo the bottom radiator hose, then the water drain tap which from memory uses a normal right hand thread into the block......the actual tap uses a left hand thread to open its "port".......due to sludge etc even undoing the tap may not result in any water coming out as the sludge tends to block the drain opening..........so remove the tap...completely clean it and then start at the welch plugs......depending on how much clearance in the engine bay you have you maybe able to drill a 1/8th hole in each plug, tape aroung the drill so it does NOT go thru more than 1/4-3/8th then screw a self tapping screw into the hole and using a claw hammer gently use the claw to remove the screw with the plug attached.........or get an old straight bladed screw driver or VERY small cold chissel and use either to make a tear or cut into the welch plug & again, remove it...........from memory these are 1 &13/16th diameter and I would try to obtain BRASS ones....steel if you have to are fine but brass don't rust............ojnce removed use and insert a piece of stiff wire, say 12-15" long which should give you ample chance to loosen any crud......then use a hose to wash out crud.............clean the area where the plugs sit in the block, use some non hardening gasket goo/ permatex gasket stuff around the recessed area in the block and sit the new plug on the recessed area........using a 3/8-1/2" diameter drift give a solid tap in the centre of the new plug which pushes the centre in, resulting in the outer edges of the plug being forced into the hole edges and sealing itself in the block .............the Water Distribution Tube lives directly behind the water pump in a "d" shape hole in the front of the block and can be an absolute PITA to remove or a simple job, depending on its condition.........it seems that the original tubes were made just of mild steel ands so rust becomes an issue and they can fall apart in being removed.........they are not held in the block with anything, just by being inserted into a very tight area.........once removed I would never place a new or old tube made of mild steel back in the block........brass and copper tubes have been made and for my money a much better alternative............the attached pic shows the water tube I had which from memory was a brass one.........note the taper and the holes cut into the top edge which allows water to feed under the exhaust ports............also try & get hold of a paper workshop manual........a much better deal than a computer disc in my opinion............have fun............andyd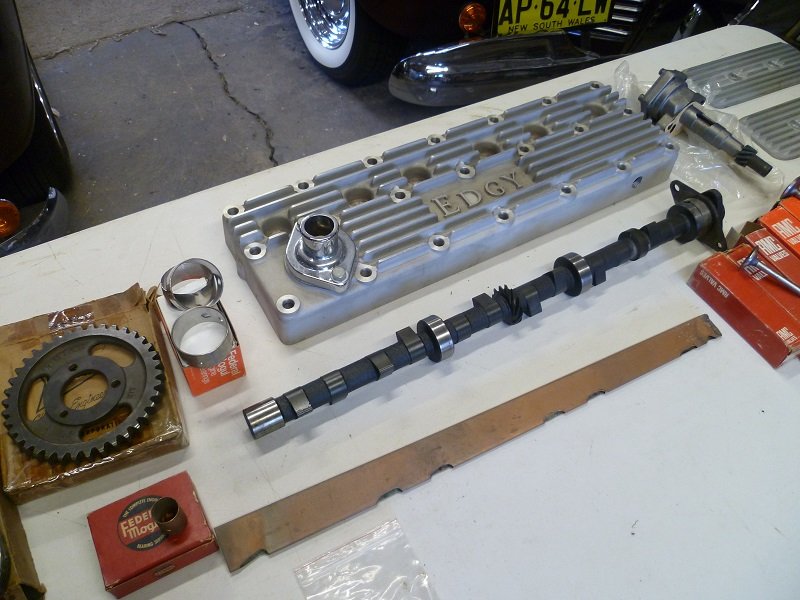
-
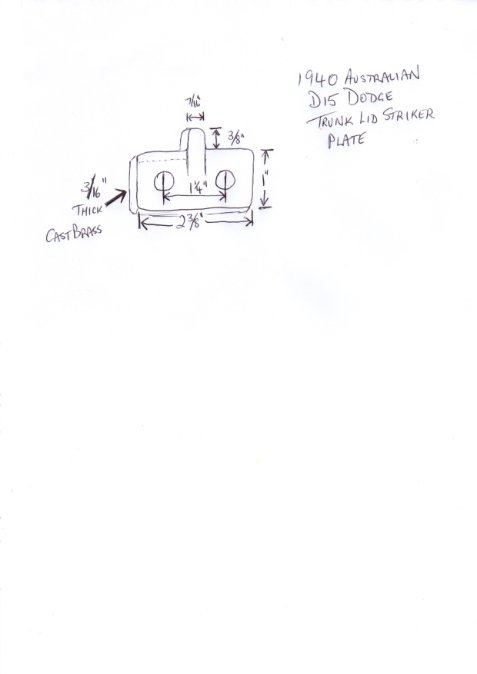
Kevin........finally got the pics from my camera........as you can see the lock is essentially the same catch as your car but much longer.....and works in the same basic way, the catch curves around and under the protruding "tongue" of the striker plate, but it would seem that your cars striker plate would be a bit higher or thicker than the 3/16th that my cars striker plate is..........mine as mentioned is brass and I, being a hotrodder got it chromed many years ago.........lol.........hope this helps...........andyd


-
Need some pics of original type interiors for 46-48 DeSoto
Andydodge replied to MarcDeSoto's topic in P15-D24 Forum
I first saw references to "Naugahyde" in the 1960's hotrod magazines I started reading around 1965/66 and even back then I am pretty sure that I saw that naugahyde was a brand name for a particular type of leather patterned vinyl upholstery.........its interesting seeing the pics of the various cloths, leatherettes and I suppose wool blends that were a common feature of USA cars......here in Oz I have read that real leather was more commonly used in Oz cars up to even the 1960's due to the various Oz tax & duty laws........... ............my Oz assembled & bodied Plymouth framed 1940 Dodge is a D15D( D for Deluxe) model and had genuine leather on the front & rear seats with a leatherette material on the door & kick panels, the hood lining was felt and the floor was carpeted front & back as were the bottom 4-5" of each door. ...........It also had fore/aft adjustable armrests which were originally leather on each front door with a centre fold down armrest in the rear seat and assist straps on each rear pillar which were also leather and across the back of the front seat a blanket robe or rope. .........The back of the front seat was the same leatherette material as the doors with a carpeted foot rest built into the bottom of the seat back.Three interior lights are fitted, one above the rear seat/parcel tray which was originally a piece of carpeted cardboard and a smaller version of the rear light at the top of each centre door pillar............andyd -
I took some pics but having problem getting the pics loaded.......the striker plate will try to sort the camera out today..........lol......tongue on my car is pointing towards the front of the car, actually its slightly angled "down" at the front..............this pic taken a few years ago just shows the striker plate on the bottom edge of the pic.........sorry its not real good.........lol.........also noticed that your trunk lid has a "hole" which would make sense as the striker plate would sit "into" this hole or recess and then the lock would come around and secure against the striker plate..........my setup is slightly different........will get back asap........andyd
.jpg.ca85ce483617fdfb1197ee7a19f621d1.jpg)
-
Here in Oz the GM designed OHV Holden 6 in capacities from 132/138/149/161/173/179/186 to 202 have had the single barrel downdraft factory stock Stromberg replaced with triple English SU carbies ranging in size from 1 &1/4" to 2", these were a common aftermarket "hot up" usage and worked well using cast aftermarket intake manifolds, also the LJ series Holden Torana XU1 used a 202 cube six with triple Stromberg CD side draft carbies from the factory & was/is the hot setup for these Holden sixes which use a triple intake port arrangement similar to the Mopar six, albeit into the OHV cylinder head so these type of carburetors may also be suitable on the Mopar six..... ..............in fact the Holden intake manifolds can be used on the 23/25 inch mopar six except that as they are used on the opposite side to that on their original Holden engine the carbies need an angled adaptor to bring the carbies back to the vertical.......the Holden sixes were in 2 distinct series, the early 132/138 series and the 149-202 series, intake manifolds to suit the early engine have the same port measurements as the 23" mopar........the 149-202 intakes have the port measurement that works on the 25" mopar engine............... ...............intake manifolds to suit the Holden sixes include twin & triple downdraft Strombergs, twin & triple side draft SU, Stromberg CD & DCOE Webers, two barrel WW Strombergs and 2 & 4 barrel Holleys have all been made over the years............andyd
-
Years ago......lol......maybe close to 45 yrs actually...a local car yard had a speed boat of some sort........clinker hull with a side valve mopar six in it.......I saw it after the yard had closed for the day & it was parked behind all their cars with no one around to ask details but it had a set of triple sidedraft Weber DCOE's and a weird exhaust setup which I later realised was some sort of water cooled manifold arrangement ..........didn't notice what their size was(its cast into the body) but each carby had a small 2 into one manifold that bolted up to the block with a tube running between each "manifold".............back then, around 1975 the 250 cube mopar six was a common install in Oz speedboats but this was the only one I've seen with side draft Webers......no idea how it went nor who owned it as I didn't check with the car yard afterwards but from memory it appeared to have certainly been used so I assume it worked..........lol..........andyd
-
Kevin......my cars lock assembly is much shorter than yours, but the "tongue" and how it "swings" around is the same.........I have taken some pics but my camera is playing up......but I measured the striker plate on my car and the measurements are attached ..........I've also looked at the $199.00 striker plate on US ebay for the 1938-1939 Plymouth thats very rustyand it appears to be the same except that mine is made of brass and does not have the pronounced piece sticking up that the lock tongue would mate with..........making a striker with my measurements would work except the it would have to be thicker to correspond with that shown on ebay.........does this make sense?.............lol.........will try to get my camera working and send pics if I can..................hope this helps..........andyd
-
Kevin........that pic of your trunk lock shows basically the same lock "tongue" as what my car has, however the actual lock assembly on your car appears much shorter, but I'm pretty sure what my car has would be the same, ie use the same style of catch on the body.........I'm not sure if I have a spare lock catch...I'll check....... but I'll take a pic of mine and also measure the catch and get back........andyd
-
The funny thing is that the 3 window dodge, DeSoto & Chrysler 1941-1948 Business coupes for years were worth next to nothing but I think that the popularity of these mopar coupes is in a large part due to the popularity of both the 1937-1942 Willys Coupes and the same in the 1937-42 Lincoln Zephyr Coupes, both the Willys and Lincolns have virtually priced them selves out of the market, to the extent that both brands are now available as fibreglass copies which I think has made people go looking for a similar body style in a more common, ie, cheaper brand............dah, dah.......the 1941 -1948 Dodge/DeSoto & Chrysler 3 window Coupe........this is only a personal view but I do wish I had discovered these mopar 3 window coupes myself years ago............lol..........hindsight is a wonderful thing........the closest I came was at 16yrs of age in 1970 buying the 1940 Australian Dodge coupe pictured & pulling it apart.......its been a downhill ride since..........lol...........regards, andyd


