

The Oil Soup
-
Posts
651 -
Joined
-
Last visited
-
Days Won
2
Content Type
Links Directory
Profiles
Articles
Forums
Downloads
Store
Gallery
Blogs
Events
Classifieds
Everything posted by The Oil Soup
-
Mine has the under bed mount with an original 6.00 x 16” bias ply that is flat, and I need to get around to a new exhaust system also.
-
The shop manual for the ‘53 218/230 states: Flywheel nuts..........7/16”—20 55 to 60 foot-pounds.
-
Tractor Supply has cotton picker grease that works well also. https://www.tractorsupply.com/tsc/product/super-s-cotton-picker-spindle-grease-00
-
You might also run additional grounds from the engine to cab, engine to frame and from frame to cab.
-
That looks a little different than mine in that the bolt goes in from the bottom and has a castle nut and cotter pin on the top.
-
Here are all the pieces put together except for the mount on the frame. The tube that runs inside the rubber pads prevents the bolt from over compressing them and allows the nut to cinch the lock washer. I’m not aware of any rubber washer in the assembly.

-
I’m right in the middle of changing out my tired original motor for a fresh rebuild. The rear motor mounts have a piece of tubing joining them which mics out at 0.450” id x 2.500”+/- so I believe the bolt is 7/16”. The larger pad on the top, smaller pad on the bottom with the large washer underneath. My truck is a ‘53 but all the casting dates on the motor and trans are ‘52.


-
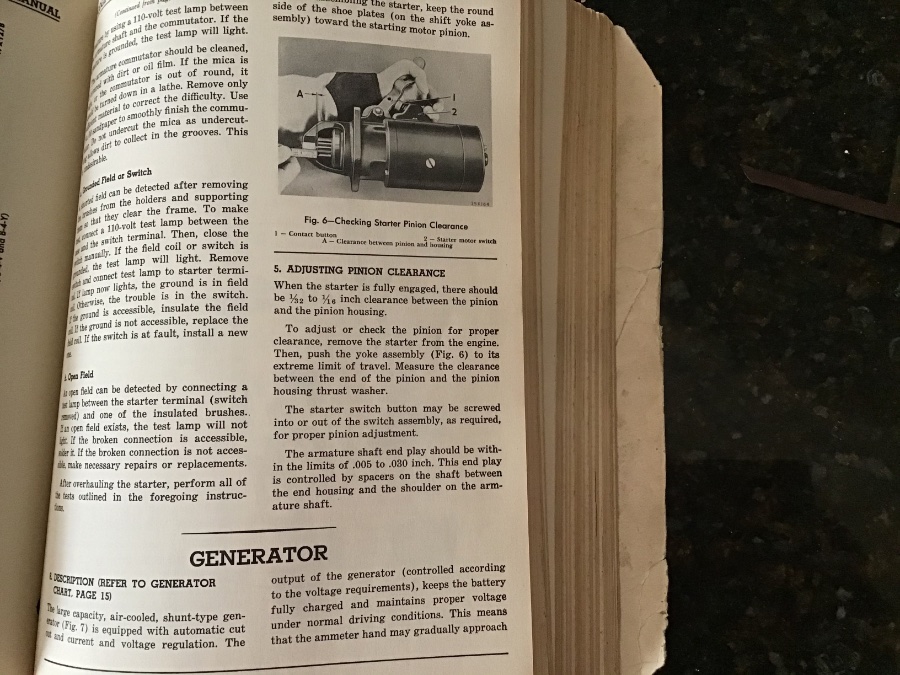
The button on top of the starter can be screwed in or out as to when the electrical contact is made, so it sounds like the” button” needs to be unscrewed to allow the starter to engage the ring gear before the starter begins to turn. Here is the section in the shop manual.
-
I am in the process of pulling my old motor and putting a new rebuilt motor in, so it will be a few weeks before I get things sorted out and report on the results.
-
I just purchased 2 Daytona UN2 carbs, they look like copies of the Carter B&B.They feature an externally adjustable main jet. Haven’t run them yet. https://daytonaparts.com/m/replacement_carburetor_chevy.html
-
splt windshield installtion
The Oil Soup replied to ruff1148kr's topic in Mopar Flathead Truck Forum
Another thing to consider is filing off any snags that are along the pinch weld. -
It sounds like the problem is in the regulator not keeping the glass level as it comes up. You should be able to inspect it with the window fully down.
-
The trick to get old JB weld off is to use a torch. I used it on a muffler once, didn't last too long.
-
The plug I pulled from a '51 218 was original and was steel so perhaps being in contact with motor oil rather than coolant is the reason for the steel. Maybe the Dorman 550-019 1.375" would expand enough? I'll give it a try.
-
Does anyone have a part number for the expansion plug on the back of a 218/230 block at the camshaft? The hole is about 1.384".
-
1952 Dodge Cornet convertible, Six cyl flat - unable to start
The Oil Soup replied to anils50's topic in P15-D24 Forum
I have a glycerin filled pressure gauge between the fuel pump and carburetor that works fine as long as you drain the liquid from it. -
1952 Dodge Cornet convertible, Six cyl flat - unable to start
The Oil Soup replied to anils50's topic in P15-D24 Forum
If you have fuel in the carb throat it is percolation, so it's flooded and you need to put the pedal to the plastic and crank it, that'll start it. Also the shield may help a little but won't eliminate the problem. Plymouthys advice to adjust the float level lower should help. -
The sediment bowl will remain full when the tank runs dry or has blockage, it has to have constant supply. I think you're out of fuel.
-
Engine Sputter & System Charging; Engine runs fine & no charge.
The Oil Soup replied to Noah's topic in P15-D24 Forum
I don't see a ballist resistor in your diagram and it sounds like you are frying your coil. -
Good price for 230 engine
The Oil Soup replied to 1942DodgeTruck's topic in Mopar Flathead Truck Forum
You might find a complete vehicle for the cost of hauling it off and score a good engine! -
Starting my B2C restoration.
The Oil Soup replied to Bdblazer1978's topic in Mopar Flathead Truck Forum
Wow! Looking good! -
I repaired my gauge several years ago and it still works fine. Buy a mechanical temp gauge that has a flexible metal line ( not plastic, under $25 ) put the bulb in a cup of water and freeze it, cut the line a couple feet from the bulb so the splice will be hidden under the dash and find a piece of brass to join the new bulb with the old gauge. Make sure the hole is open in the line when you cut it, slip the two ends into the brass sleeve and solder together or as I did JB weld them together. Test the gauge in boiling water.
-
Could just be a stuck valve?
-
Auto-lite distributor swapping
The Oil Soup replied to PT81PlymouthPickup's topic in Mopar Flathead Truck Forum
Perhaps that was an industrial engine, most I've seen have casting dates on the head and or driver's side of the block. Industrial engines generally lack a vaccum advance so maybe that is why it may have the incorrect dizzy. -
Air Cleaner / Air Filter help
The Oil Soup replied to PT81PlymouthPickup's topic in Mopar Flathead Truck Forum
Wix #42011

