


James_Douglas
-
Posts
1,923 -
Joined
-
Last visited
-
Days Won
22
Content Type
Links Directory
Profiles
Articles
Forums
Downloads
Store
Gallery
Blogs
Events
Classifieds
Everything posted by James_Douglas
-

EDIT: ready!!: installing new core/ freeze plugs
James_Douglas replied to Go Fleiter's topic in P15-D24 Forum
I have had problems with the disc type leaking. The issue is the walls of the block where the disc's sit get rusted up over time and even when a block is acid dipped it is rough in there and it weeps. I had some brass discs pop out many years ago. Turns out the brass ones were slightly smaller than the steel ones. One can try and find my posts on that from 15 years ago... When I do the 265 block we are going to machine the holes through and perfectly round to use a cup style plug. James -
Hello, I would replace the silent block (front of the rear leaf spring) and the rear shackle bushings. Then I would make sure you grease the from end VERY well. Check the grease in the front wheel bearings and set them to the book specification for end play, not the tighten the nut then back off one flat shade tree approach. You may have to get a shim or sand the thrust washer behind the nut to get it perfect. This last step can make a much larger difference in these old cars than most people think. Then take it for a ride. If it still feels bad when driving it, then you may have to pull the king pins and the spindle and have new bushings put in. I STRONGLY recommend that you try and find a king pin set that has the bushing-bearing not the bushing-bushing. See my old posts on my 1949 Convertible. The bushing-bearing combination makes for MUCH lighter steering. Then take it into a shop and have an alignment done. Have them do a "Tram" measurement to make sure that the 9 inch ford was put in parallel to the front end. Check the castor and have them give as much as you can get within the specifications. Also, make sure you are using the narrowest tires you can get if using modern radials as the contact patch was much smaller on the old tires and the steering is stiffer with wider ones. DB Tire makes a radial with a small contact patch that looks like the old tires, but they are not cheap. Go through the steering box adjustments in the service manual to make sure it is correct. After all that you should be ok. If not, then some more serious is going on. James
-
I have one late 1940's Victor rear main seal in my stuff. Never used. I have posted photos of it before. That seal, which is the same style as the Best 3675, is MUCH different at the sealing line. The seal has much more surface area on the crankshaft. In addition it has a vulcanized material of some sort over the rubber. Much more contact area and much stronger mating material at the point of contact. I suspect that the available seals of the 3675 type are a cheaper to manufacture versions of the original seals. I know that I had a talk with the owner at Olsen's Gaskets and their take is that many of the seals and gaskets being made are not nearly as good as their earlier version. The cost to tool up to do the better versions is not warranted in the market place. Case in point is the copper sealing rings in the head gaskets. The NOS or early NORS ones had the copper sealing rings around every hole that had water going through it. The replacements that Best makes do not. The cost of tooling for those ring would triple the price I am told. Like I said, the rope seal in the 1949 Desoto engine that was rebuilt in 1963, stored in 1966, and not run again until 2012 leaked less than of any modern seals I have had in any of my flatheads. I do think there are way to many parameters when dealing with main seals. The size of the journals, the condition of them, the exact type of seal and the installation. Conclusions as to which is a better seal may be a fools errand. Over the next year it will be interesting to see how the seal is when I use a rope. James
-
It all depends on what your plans are for your car. If you plan on doing a full restoration then I would concentrate on more ordinary items. Things like the #14 (not 1/4 inch) screws which MOPAR used in these years to attach the main dash structure to the body. I had to rob some off of several cars in a bone yard to get them. Things like every single molding clip you can get. Pull out a couple of window runs in the event any of your look like the base may have rusted. On the same vain, get the door or back seat window bottom channels as inevitable some may be rusted. Grab the heater motor and the radio for spare parts. The other thing that can wear out is the clutch over ride spring, and the clutch linkage. In fact take all the throttle and clutch linkage. One can rebuilt all that stuff with the car running and then just swap it out on Saturday. Grab the drive shaft and the universal joint blocks. See my posts on that as for why. Grab the all the parts associated with the parking brake. last but not least if this a fluid drive car get the fluid coupling. BUT! Make sure you read up on the posts to make the little blocks to wedge between the coupling and the flywheel plate with wire to the plate can not move when you pull the trans out and the coupling out. You want to protect that seal in the coupling at all costs. Do not balance or pry or anything else on that flywheel plate in removing it, moving it, or storing it. My two cents worth. James
-
I have used the Best 3675 seal type in the 1947 Desoto. It leaks too much. I have tried it 3 times. After the last time I wrote an email to Best asking for the seal shaft specifications. What is the shaft ID-OD tolerance for this seal. I got bull **** back with no numbers. If they do not even know or will tell you what the shaft size the seal is for...how do you and ones machine shop know how to check if the seal area is too large or too small? My crankshaft in the 1947 Desoto is NOS. It has never been turned. It leaked from day one. I even had a shop that I trust replace the seal in the chance that I am an idiot. Same result. My 1949 Desoto engine that was rebuilt by an outfit in California Called Automotive Engineering in 1963 hardly leaked at all. It has a rope seal. The 265 I am working on is going to get a rope seal and I am also going to use a plate seal on it as well. Since if the block is tapped for the plate seal, not all were, one can use both and they do not interfere with each other as far as I can tell. James
-
Anyone ? Somebody has to have one of these on the bench or on the floor at the moment....
-
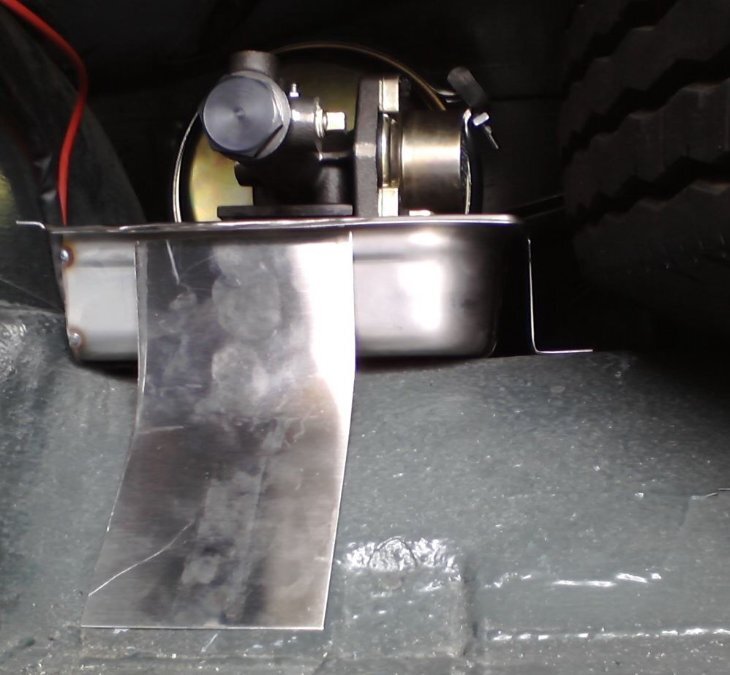
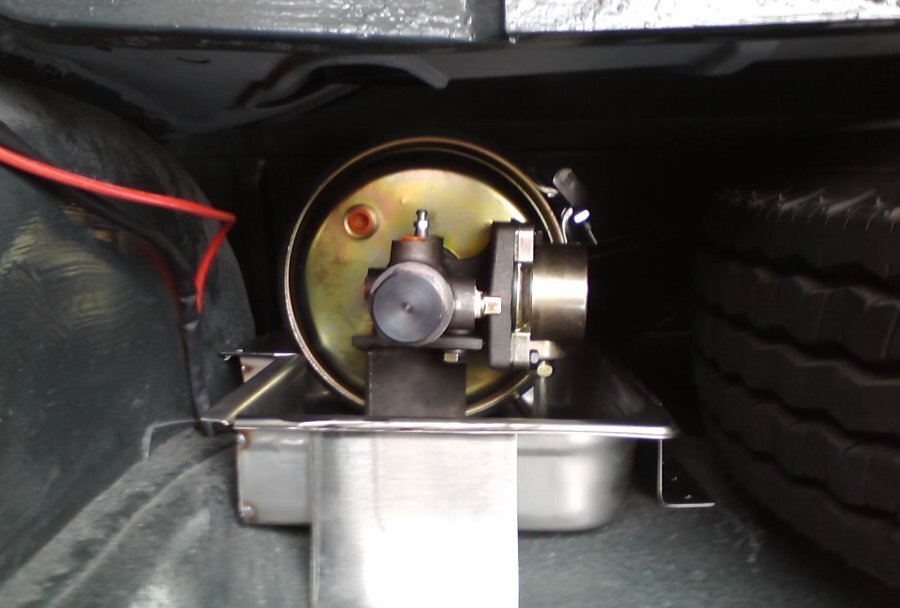
A couple more photos.... What we did is to make the pan so that the unit would bolt to it. The pan bolted to the trunk externally so the pan is water (fluid) tight. We welded the brackets for mounting the unit to the pan. Any number of variations one could do with this. The stainless baking pans are cheap and easy to get. James

-
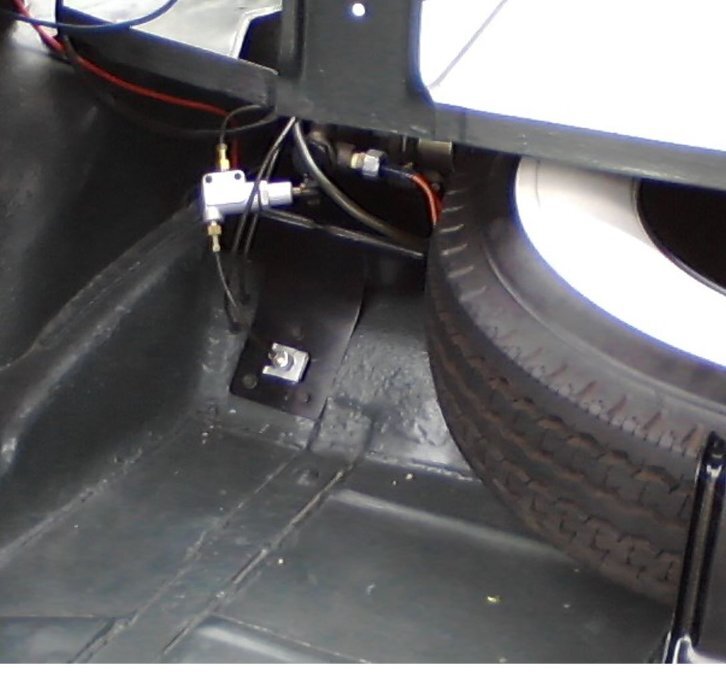
What I did was to run the "master cylinder" line to the "midland ross slave master cylinder" in the left side of the trunk. In the convertible the spare tire rests on the right side of the shelf. We took a stainless steel oven pan and cut it to fit the area and then placed the midland ross unit in it. That way if a leak happens the pan will catch it. I also re-routed the brake light switch to the midland ross unit so that it could be changed without having to get under the car at the left rear frame rail which they did in 1949 on Desoto. From the midland ross unit the lines go out from there to the four corners. I also ran a vacuum line down the passenger side and up into the trunk. You can see I ran a steel line through the trunk wall and the bracket wall (notice the brake line clip) and then added a proportioning valve. I also placed the brake light switch right were you can get to it easy. The painted black stainless steel pan would catch any fluid while changing it. I then made a little plate to cover the area and the result is in the second photo. One can get one of these units from the Ford T-Bird Suppliers. James

-
This morning I took the 1947 Desoto out for a drive to test the rebuilt transmission and the overdrive. It appears to be working as expected. I did notice a couple of things. One is that is it a little sticky going into gears. The other is that the shifting of the OD is even smoother than it was before the needle bearing failure in the old OD planet gear. I do have a very little drip in the gasket. I am not a fan of the Best Gasket Products. I am using SAE 50 weight motor oil in the transmission, I had been using SAE 10W motor oil. That may account for some of the stiffness in the shifting. We will see once I get 100 miles on it. The transmission is all but new. Every part in it, save a couple of minor items, are NOS. Same with the overdrive except the planet gear assembly. The OD has a NOS Sun Gear and a NOS Ring Gear. All the specifications as to tolerances are in the middle to low end of the specifications. Time will tell. When I took apart the trans to deal with the OD failure, I found an entire tooth missing from the second gear as well as most of one tooth on the reverse idle gear. Yet the transmission itself worked just fine and made no noise. Go figure. I have a second transmission with overdrive on the bench. I plan on assembling it in the next couple of weeks and crating it just in case I have a problem in the future. The drive shaft universal joints, the new manufacture ones, with the block cups are not real nice. The Universal shaft company that I have used (through three generations of the same family) also though they were crap. I plan on taking a bunch of old blocks (cups) and sleeving them so they can be used on an off the shelf good quality joint. I have a spare driveshaft (Two with center bearing for long wheelbase cars) and will rebuild it and put it into a crate as well. Do remember that we use the 1947 as out daily driver. I need to stock my own spares. The trouble I went through getting parts these past few months, as compared to 2006, is starkly different. The bearings that are not available or no longer made, the universal joints that are no longer made correctly in the USA, and on and on tell me we are at the tipping point I knew was coming. Parts are going to get exponentially harder to source from now on. Thanks to all who helped both on this forum and in direct communication. James
-
Hello all, When I put in the 3-Speed with over drive there was an issue. The Chrysler and Desoto’s from 1946 to 1948 as a rule did not come with overdrives. They Chrysler and Desoto’s also used a larger parking brake drum than the Plymouth and Dodge’s. This presents and issue when changing a Desoto to a 3-speed with OD. The bracket that holds the passenger side of the Parking Brake Band from a Plymouth or Dodge will not work as the drum is smaller. I do not remember if George made up the bracket (aluminum) or if my welder did. In any event, the geometry is not correct and proper adjustment is a PITA. What I would like help with from the group is the following. Can someone who has an overdrive out and the brake parts out take a few photos and post them. The bracket on the passenger side is what I want to see. Then take the bracket and lay it on a sheet of white paper and sketch is out. Both on the “flat” side and then on the “edge”. Then measure the length, the distance between the mounting holes and the “step” in the bracket and record it on the drawing. Then post it up. I also need the exact Plymouth/Dodge drum outside diameter. What I want to do is to take those dimensions and do the math as to what the bracket needs to look like for the larger Chrysler – Desoto unit. I will either attempt to buy a Plymouth/Dodge bracket and modify it or just make one from scratch. Since the brake drum adjustment is in the thousands of an inch, I need very exacting measurements on the order of plus or minus a 16th of an inch. Thanks, James
-
I thought about using one of the later units in the 1949, but the parts for the valves are not all that easy to get. It is all aluminum or pot zinc. In the end I opted for the midland ross version and put it in the trunk. I have two complete, apart, 1950 -1945 under the car units sitting around collecting dust... James
-
Ok, There used to be an industrial water pump business on San Francisco Bay. The owner was into old Dodge Trucks. Now this guy built pumps you could walk into they were that big. He also did all kinds of smaller industrial pumps. He decided that he did not like the impeller on the MOPAR flathead water pumps. So he designed one of his own. He cast them in bronze and then he ordered up from his supplier a Swiss sealed bearing and shaft. Basically all new guts and much better quality. I have one someplace in my stuff. He was on his last legs and his son did the work on a pump for me. What happened was the housing which has to be bored for the larger bearing cracked after 5 years. I pulled it and never got back to building a pump with the the guts. It did move a lot more water. They moved the business to Tracy California (https://armspumps.com/ ) one could call and see of they still have any of the impellers and the matching bearing-shafts and will build a pump if you send it out to them... James
-
On mine the tube was hammered out to fit the hole as perfect as I could get so that all the water went into the tube. I also port matched the place to the size of the hole. I also had my general, not auto, machine shop jet cut stainless steel backing plates for my water pumps. James
-
Ok, Something is not right. When everything is working correctly I have never had one of these engines over heat when running down the freeway. Now that said, the couple of times I went up large mountains like going from San Francisco to Reno over Donner Summit or going over Grants Pass from Oregon to California I did it fairly early in the day. A couple of things come to mind. A LOT of these engines has a lot of crap in the engine blocks and one has to go to some effort to clean them out. My present engine even was "acid dipped" to get the mineral scale out of it. Lucky I live in San Francisco so the water in the block is almost perfect (Hech Hetchy) and will not add back mineral scale over time. Now, assuming the block is good an clean I would look to the following: 1. Timing. It is possible that the mechanical or the vacuum advance is wrong. Too much advance can cause over heating. If that advance is happening at higher speed then that may be a cause. 2. The step up piston in the carburetor. The Carter BB uses a little tiny piston (brass) on a spring in the carburetor. What this does is move with the engine vacuum. I have noticed with ethanol in the gas that the vapor (ethanol) from the fuel bowl that gets sucked around that brass piston starts to gum up around it in the zinc diecast bore of the carburetor. If this little piston is not free to move and hangs up one will get a lean or rich condition. If it is a lean condition this can cause over heading at freeway speeds. I had this happen but it was not enough to over heat. It did however melt the tip of a a spark plug! The piston was fine. 3. An air bubble in the cooling system. Try to find the highest place in the system. Usually the heater hose connectors and crack it open while filling the cooling system to make sure it is in fact full. When water starts to run out tighten the hose clamp. 4. I am assuming the radiator is on very good shape and that the thermostat was tested in a pan of water on the stove to confirm it is opening all the way prior to its installation. 5. Make sure the fan belt is not slipping. That is it until I get some of my morning coffee in me. The next time we visit my sister in law near Munich if we make a run up the Rhine toward the North Sea I will let you know. Good luck. James
-
Exactly when is it over heating? In stop and go or on high speed freeway runs? James
-
Check very carefully the step up pistons. Read my old posts on the subject. Also, ethanol requires about an 8% increase in jet size more or less. James
-
Like I said above, I do not have any problems even in 110F heat. As long as the car is moving at more than 15 MPH. One thing people need to keep in their mind when talking about this is the very big difference between cars that have a fluid coupling and those that do not. When stopped the drag on the inside of the coupling equipped cars puts a load on the engine. The heat generated from that load is more then the cooling system can take unless the car is moving well. My '47 Desoto is one of the more heavy cars to be using a flathead six, so it is a good benchmark on such things. I climbed out one summer from Yosemite to the north and even though the temp hit 205 or 210 it did not boil over. At at 6000 feet it should have boiled over below 200F more or less. I do run water wetter and soluble oil. No antifreeze. If in stop and go traffic I clutch it the engine does not over heat. If let the engine "buck" against the fluid coupling for 10 to 15 minutes it will overheat. That is why I am going to replace my mechanical water pump and fan with an all electric set up. If need be it can emulate driving down the road at 50 MPH when standing still. Not to mention the HP saving be getting rid of the mechanical fan. James
-
One thing I will be doing on the new 265 is fitting it with a Davies Craig electric water pump. I have only had heat issues with the fluid drive engaged in traffic at a stop or crawl for extended period of time. If fact, Chrysler stated that one should not have the fluid drive engaged at a dead stop for more than 5 minutes. I have noted that stop and go speeds, like waiting to merge at bridges here in the SF Bay Area or out at freeway chock points, causes the same heat build up issues as a dead stop with the coupling. The internal drag of the weight of the fluid couplings causes the heat to climb on these engines. If one clutches it, it does not heat up. I am hoping that an electric water pump and fan at stop and go speeds will do the trick. James
-
Ok, I had to look at one of the heads to remember that. If the deck is cut and the piston is flat with the deck and the head is cut... The final compression ratio may be too high. One could mark and have the head flat area milled twenty thousands to make up for the deck and head cut and provide plenty of clearance. That is assuming that one can take material off that area and not weaken the head. In the end, custom pistons with exactly calculated compression ratio's is the way to go or find a better block or head that has not been cut. James
-
I do not get it if the piston is flat with the deck or even a little over it but below height of the top of the valve... The valves which stick up above the deck, plus their over .3xx lift, will hit the head long before the pistons... What am I missing? James
-
Sniper, the 265 rods are unique and very hard to find. They also have a unique rod bolt that is also hard to get. The nut is also unique and hard to get. All in all 265 rod assemblies are a PITA if you do not have them in hand. I have a 265 engine complete that I will rebuild for the '47. I also have a few spare 265 rods. I doubt that Bernbaum or Mitchel has them. Once in a very blue moon I see one come up on ebay and I buy it. I have not sen one in the last year or two. James.
-
Tony Smith will make up a set of Carrillo Connecting Rods and Forged Pistons for about $4K.... I have given it some thought... James
-
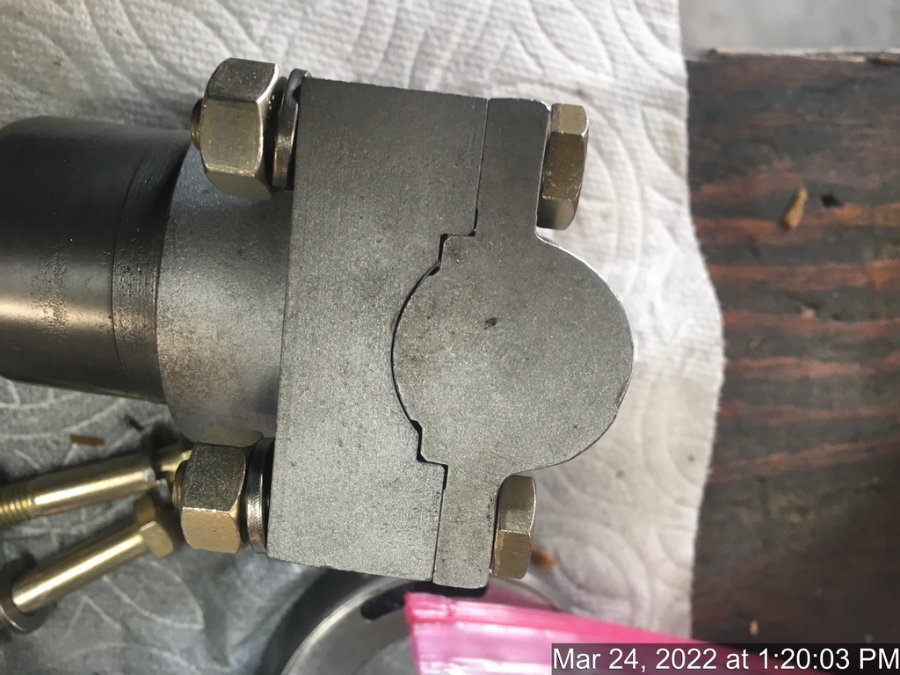
You can see from the attached what is available. The first photo is the one that was on the car. Purchased about 15 years ago. USA made. The second is a NOS Mopar factory correct 947550. It is a little narrower than the one one the car as can be seen in the cap area. The third is "new" manufacture that you see on ebay. The NOS joint has a much smaller trunnion. What one can see is that the new manufacture joint is poorly done. The part that indexes into the yoke is a poor casting or forging. It was NOT milled after it was made. What I worry about is the shear load transferring to the bolts as opposed to being taken up by the yoke and block itself. I may just use three of them and then rebuild a second driveshaft over time and mill the blocks to sleeve them. That way I can get good fitting blocks. The other option I am considering is machining an adapter that would allow one to use a regular joint in the existing yokes. Are we having fun yet? By the way the NOS or NORS universals...some have cork grease seals like the one I just got. The cork is junk after 50 years. I need to get some o-rings for it. Also the stock joint does not have a grease fitting. zoom in and take a good look at the parting line. Ugly is it not? Anyone doing a driveshaft, I suggest you hang onto the "blocks" or wings as if I come up with a way to rebuild them, you may want to have them around. James
-
I have three blocks sitting in the corner and two in cars. ALL had different piston deck heights when I took them apart. Some as much as a 1/4 inch difference. My advise is to stop thinking about what is "THE" piston deck height. It is a fools errand as there were many deck heights as my blocks are examples of it. Have the block decked even if it is only slight so you get a good gasket "bite". Put the crankshaft in and measure the deck height. Then find the head you want to use and CC it. Then take the make and part number gasket you want to use and buy two. Put one on the block and stick the head on and torque it down. Take the head off and measure the compressed gasket thickness. Toss the gasket. Now you have all the numbers to do the math on final compression and head clearance you need. Go hunting for pistons that will achieve that goal. There are a lot of NOS pistons running around that have different pin locations. Some have thicker heads on the pistons that may be able to be cut a little. I read someplace that someone found a Chevy six piston that can work in the 25 inch flatheads, but I have not first hand knowledge on that. At the end of the day the incremental cost if you have to go the route of a forged piston to spec will be the same if you force the issue and end up having to take the thing apart again for a blown gasket or a piston that wacks the head one day when you are on the engine hard. James
-
You should hunt down two or three different head gaskets. You would be very surprised at gasket thickness differences. A lot more than the differences between pistons you are noting. Deck the block. Mill the head. CC the head. Calculate the compression ratio using the gasket you are going to use. Then go looking for pistons. Not the other way around. If need be, get some forged pistons and specify the height. Also, depending on the casting...ask manufacturer, you can sometimes take a little off the top of a flat headed piston without any real issue. James
