


Dodge_48
-
Posts
19 -
Joined
-
Last visited
-
Seems there are obviously several ways to skin this cat. 1) just change everything to 12v. On that approach, I saw a post that implied all they needed was a 1-wire alternator and bulbs. Well, that doesn’t consider the heater and wiper motors, the fuel gauge, horn etc. The kits are there for a reason. I know of 3 sources now that sell them, and they’re all around $750. 2) put in a hybrid system. I saw a post where the owner preferred the look of the 6v headlights at night. If you have a reason to prefer the 6v system but want improved cold weather starting, you could buy an 12v 1-wire alternator and a 12-6 volt converter to run everything other than the starter, safely. That would also be the quickest installation. The alternator might run you as much as $350, if you wanted it to look like a generator. If you’re resourceful and know where to find it, you can buy a 50A electronic converter and a spare for $75. Alternatively, if you want the advantages of 12v, you still need to protect voltage-sensitive devices, as mentioned above. You could buy the $750 kit, or protect the voltage sensitive-devices with a voltage converter instead of the resistance units, which can develop a lot of heat. You need to move the source leads for the devices to the converter, but that’s no more trouble than wiring-in all those other resistance devices. That’s what I did. It gave me the advantages of a 12v system, and provided protection for the horn, coil, , wiper motor, fuel gauge, and heater motor (if you haven’t already converted it to a 12v motor) for far less than $750. I also added an inexpensive fuse block under the dash for them while I was at it.
-
Your truck looks really straight from the pic you posted. Very nice. I actually have two. I’ve had my 48 for well over 40 years. I can’t tell you how many miles is actually on it, and it still purrs like a kitten. I really enjoy driving that truck. It was my everyday driver for many years. I picked up the 49 about a year ago for parts. It’s pretty rough, but it’s got some good parts. I’m planning to put together one really straight truck out of the two. Both have their original wire harnesses, but being fabric wrapped rubber (or whatever), the insulation will fall apart if you mess with it. I’m on the fence about whether to buy a factory-style wire harness made with the old-style wire, or just run all new modern wire and build-up a new harness myself. I think the last time I looked, a new replacement harness is about $800 these days. On one hand, I could probably use modern wire and do it for a lot less. On the other hand, I’m trying to keep it as close to original as is reasonable. I dunno. Gunna need to decide before long.
-
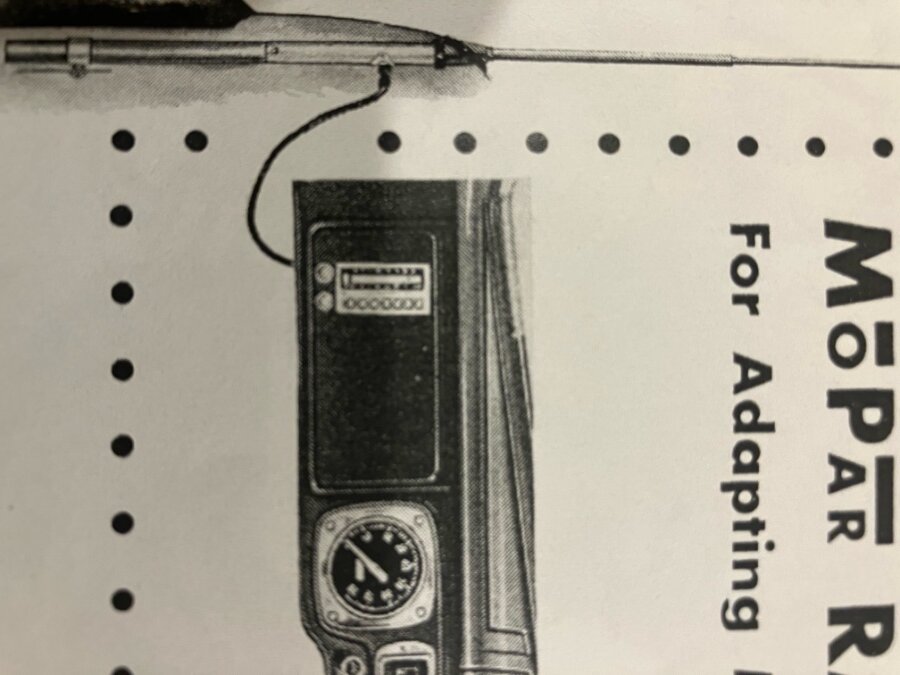
After removing the insulation on the firewall, behind it was an area of the firewall that formed an indentation, as well. Still, it’s going to be really tight. I found a picture of the installation kit in the Mopar accessories catalog for the B-1 trucks (pic below). On the left side of the pic is a depiction of the dash, with the radio on the left of it. On the right, is the installation kit. The kit has a short bracket that connects the back of the radio to the firewall. I can probably guess at its dimensions, or at least get it close enough to make it work.

-
I started quite the discussion on 6v vs 12v. On one hand, if it’s 6v and it works for you, why spend the money? If you want to go to 12v, you’d typically replace the bulbs and coil of course, but the biggest issue is that you have to figure out how to deal with 6v motors on the wipers and heater, and likely the horn. I have been told by many that the 6v starter will be fine. As I pointed out, the previous owner of my truck fried some stuff when he did it. If you want to go with a 12v system, you’ll need to find 12v replacement motors for the wiper and heater blower motor. One option if they aren’t available is to buy a 12v to 6v converter to drive the 6v motors. If you are buying a converter, they are dirt cheap right now, and rather than have mixed voltages in the vehicle, one option is to install a 12v alternator and battery, and buy a converter with enough capacity to drive everything on the vehicle with 6v. If you want to add a 12v stereo, you can drive it off the 12v side of the converter. It’s just an option.
-
It can Bevtough getting a car started on 6v in the winter, and generators are getting tough to come by, though I did find a shop that still rebuilds them. Problem is, they don’t look like original equipment at all. And, you’re right about Chinese parts. They do make some quality stuff. These converters appear to be well made and certainly worth the money.
-
I’ve been really busy lately, but was just out in the shop after posting the previous message. The more I thought about it, the more I was thinking you’re right. It must fit if it was listed as an option. I was looking at the card board covering on the cab side of the firewall in that area. It looks like it’s scored for removal. That’s suspicious. And, I can see a bit of a bump-out on the other side of the firewall that might be there to accommodate the radio. It isn’t much, though. There’s some wires going through a hole at the top of that area that the previous owner put in. I’ll have to move that, too. Additionally, there’s all the cables and wires associated with the heater/vent controls just below it. I’ve gotta pull all that stuff out and see if it will wiggle in. It’s going to be tight, at best. I attached a pic of the firewall with the area circled in red.

-
I bought a ‘49 B-1-D about a year ago. The previous owner “converted” it to 12v. Well, tried to. He burned out the horn, damaged the wiper motor and fried the heater motor. I was able to clean up the commutator on the wiper motor and rewound the horn coil myself. You can buy a 12v motor that will fit in the model 61 heater from Amazon. Search for “35482 blower motor”. I found a 25 amp 12v-6v “buck” converter for $75 on eBay and wired it to power the horn, wipers, and fuel gauge. Works great. But, since I had some stuff on 22v and some on 6v, I had to do a bit of wiring. I would advise anyone considering a 12 v conversion to take the easy and cheap route. Instead of buying a $800-$1000 kit and change over to 12v, just buy a 50amp converter and a single-wire alternator. Replace the regulator with the converter (have someone with electrical experience do this) and everything on the car stays 6v. I found the source for the converters. It’s AliExpress, the Chinese eBay that is operated by Alibaba. China is selling stuff on a fire sale lately. I found a 50amp converter from the same company for under $30 US, and bought 2 for spares. They are robust and well-made by a large Chinese electrical manufacturer - Szwengao. I wouldn’t normally recommend purchasing something from China, but no one in the US makes these. If you’re not averse to a little risk, download the AliExpress app, get a separate debit card to buy them with (just to be safe). 50amps is overkill, but they should last a long time. Hopefully.
-
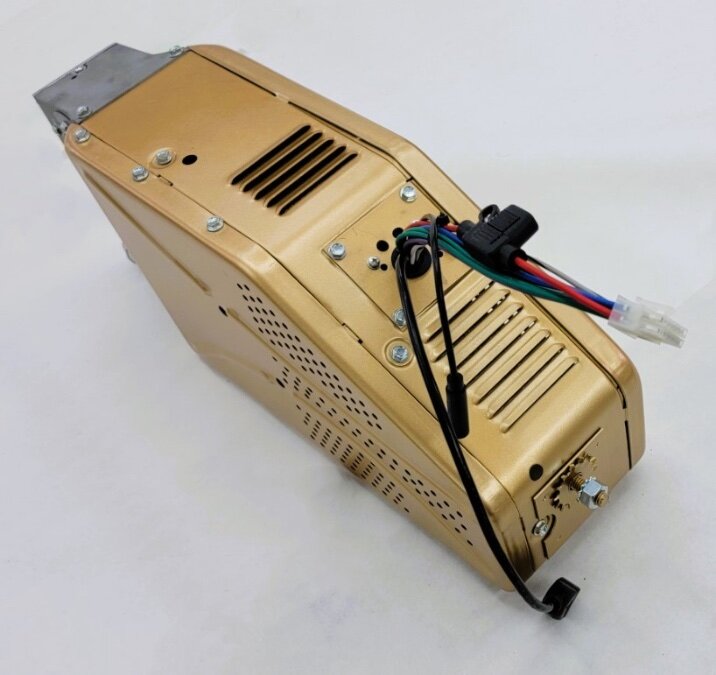
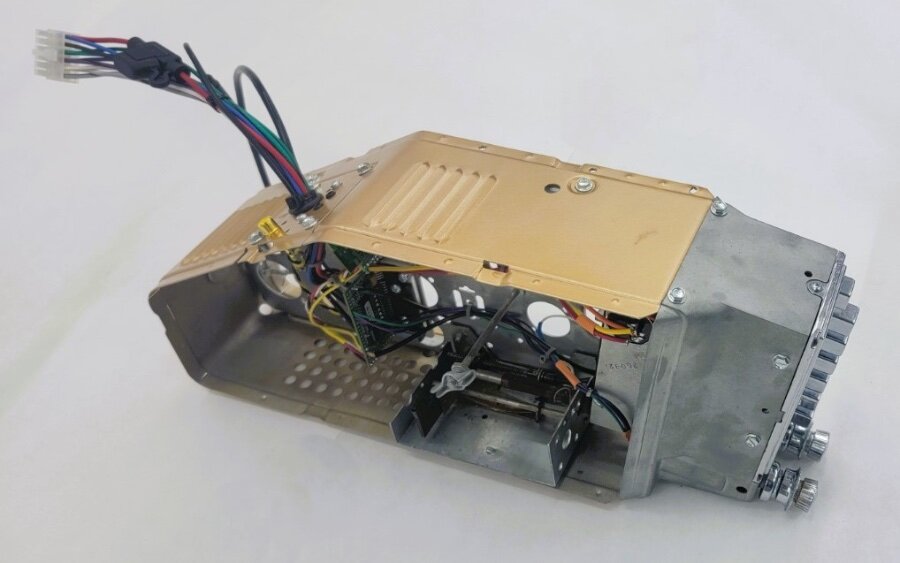
I bought a Mopar 802 last year and had it rebuilt by a guy in Canada that specializes in rebuilding/upgrading vintage car radios. It’s got all the bells and whistles while looking like a new 802. Here’s the “issue” I ran into: while the Mopar Accessories catalog for the B-1 trucks lists an install kit that accommodates both the 602 and 802 models, I can tell you that the 802 is at least an inch too long to fit between the firewall and dash on my ‘49. Now, I’ll be the first to admit it was foolish not to check that critical dimension, but since I measured the opening on the dash and it was a perfect fit, and the catalog says it was an option, I just assumed it would. The guy who rebuilt it said every 802 he’s had were the same size. Fortunately, the new electronics don’t take up much room in the case, so I’ll shorten up the case a couple inches on the back side and it’ll be ok. I’m guessing the 602 is probably shorter due to a smaller chassis, but I don’t know. Seems unlikely Mopar would have built a separate chassis for the trucks, since so few radios were ever sold for them. Anyone else experience anything like this, or had an 802 that did fit? I’m curious. I posted this for those who are thinking of heading down this path. Yes, it was extremely expensive to convert.


-
If you want to make it easy (and as inexpensive as possible), replace the heater motor with a 12v unit. Search for Trumark 35482 blower motor on Amazon or Summit Tacing ($50), then purchase a 20amp uxcell voltage converter from Amazon ($20). That oughta be enough for wipers, fuel gauge, horn and radio. Just replace all the lights with 12v. DO NOT try to run either the wiper or horn on 12v. DO NOT buy the kits with the resistors. They can get really hot and could start a fire, with the exception of a resister used on 12 volt ignitions for the horn to free up load on the converter. The horn is used for such a short period of time, the resistor shouldn’t get hot. Wiper motor doesn’t care about polarity, but the radio has to be isolated as the system (and converter) is negative ground.
-
I also have a nice ‘40s 802 (I recently picked up on eBay) that I plan to install in my ‘49. I don’t have the bracket, either. However, I do have a copy of the Mopar accessory catalogue for the B1s, and there’s a picture of all the parts that come with the radio, which will give you a good idea what it looks like. My radio has knobs that don’t even look close to the originals. The pic in the catalog isn’t clear. Do you have a pic of the knobs on yours?

-
ANSWERED 230ci manifold bolt pattern
Dodge_48 replied to Dodge_48's topic in Mopar Flathead Truck Forum
Ok, so I’ve been tied up and just got to the 2 broken studs. Here’s how it went: one stud was flush and one was broken below the surface. I took Dave72dt’s advice and welded washers to them. One washer I dished to try to get it as close to the stud as possible. I used slip joint pliers on the studs to work them back and forth in conjunction with penetrating oil. The stud that was flush freed up by carefully working it back and forth until it felt free enough to finish removing. The second one felt the same, but after working it back and forth a couple times, it let go. Since it was now even further retracted from the surface (looked close to 1/4 inch), I decided against attempting to weld to it again for fear I might damage the cast iron. I drilled it and worked on it with a Dremel tool to get the remainder out. Unfortunately, I did have to get into the threads a bit because the Dremel and a tap just didn’t want to get all the old threads out. The washer idea was really good. Thanks for the help, Dave72dt! In retrospect, I might have tried another washer on the second stud. It’s possible that I was just twisting the end of the bolt when I was working it back and forth, though it didn’t seem like I was going after it with enough force. Oh well. I’m now looking at a helicoil in that second stud to ensure the new stud holds. Question: use a stainless helicoil from McMaster Carr, or standard helicoil from automotive supplier, which is likely made in China?
-
ANSWERED 230ci manifold bolt pattern
Dodge_48 replied to Dodge_48's topic in Mopar Flathead Truck Forum
I’m not a welder and still a bit concerned with cast iron as a base, so I’ll get my bro in law to do it. Perhaps going with a 5/16 washer would help to prevent the weld from getting near the cast iron, and cupping the washer seems like a great idea for a stud broken off a bit shallow. Stacking washers a couple times if it doesn’t come out with pliers seems like a good idea, since heat and cold cycles supposedly help break it loose. Finally, after a couple cycles with the washers, I’ll try welding on a nut and apply a bit more torque. It only makes sense to try welding first. Hopefully, the worst case is the stud refuses to come out, the nut breaks off and I eventually end up having to drill it out, and in the worst case of all, perhaps install a helicoil. I want to avoid damaging the block at all cost. Opinions? -
ANSWERED 230ci manifold bolt pattern
Dodge_48 replied to Dodge_48's topic in Mopar Flathead Truck Forum
I definitely considered welding. The issue is that they both broke just below the surface of the block, and I was worried whether it’s possible to get any weld bonding to the cast iron. I haven’t done anything yet- just waiting on advice. I do not want to make this worse than it already is. On that account, I’m worried about drilling too. Because the studs are hardened, I’ll need cobalt bits, and they’re brittle. If you break a bit off while drilling, how do you get that out? Same goes with the tap. Jeez. What a predicament. -
Looking for simple dimensioned drawing for intake/exhaust manifold mounting stud spacing. Had to remove the manifolds to replace a bad gasket and 2 studs broke off just inside the block. Was planning to make a guide plate to bolt to the side of the block to guide drilling out the broken studs. Any other advice regarding this disaster would be welcome, as well. I thank you in advance.
-
I assume the outlet is at the back of the engine. Where does the return line go? I heard there should be a fitting at the radiator outlet, but I'd like to see the correct routing. If one of the experts would take a moment to explain the routing, I'd appreciate it. I have a original heater and all the associated vent parts, and I want to hook them up correctly, or at least so they work.
