RouteVanJoe
-
Posts
16 -
Joined
-
Last visited
3 Followers


-

Sealer to use for gutters/drip rails?
RouteVanJoe replied to RouteVanJoe's topic in Mopar Flathead Truck Forum
Thanks everyone for your input thus far. As a little update, I got out my step ladder and some Mr. Clean in a spray bottle, along with a small plastic brush and scrubbed out the drip rail as well as I could all the way around. I then went to my local do-it-yourself car wash (with the step ladder) and used the pressure washer from up top to clean it all out as best I could. It's hard to tell which of the spot welds, if any, have actually separated, but that's my next task. What I can say is that the original fabrication was spot welds every few inches followed by seam sealer. Over the years (and a few paint jobs), the seam sealer largely broke apart and came out, but there's a few areas where it's still visible. Even if a few of the spot welds have separated, the sheet metal pieces do not appear to be in any near-term danger of actually letting go of each other. There's plenty of other welds holding the two pieces together. But if I find that a whole string of spot welds came apart, then I might look at some welding before seam-sealing it. But apart from that, I'm optimistic at this point that I can solve the leakage effectively with seam sealer. It won't completely stop the rust, but there's plenty of other rust on this vehicle that may need some major fab work someday. I like the idea of getting some POR or something in there first though.- 20 replies
-
- 1
-

-
- seam sealer
- gutter
- (and 6 more)
-
Sealer to use for gutters/drip rails?
RouteVanJoe replied to RouteVanJoe's topic in Mopar Flathead Truck Forum
My biggest motivation for taking out those interior ceiling panels (and thus discovering the leak) was so I could pretty it up for Mopars in the Park next year :-) I knew I'd have to step up my game if I'm going to be in the same judging class as yours... Now I have doubts that I'll get it put back together by then! Fortunately, it's still fully drivable though. I won't rule out some welding and I might take you up on that! On the other hand they were just spot welds in the first place, the connections are now just a little less closely spaced. I plan to take it to the car wash before I put it away over the winter, so hopefully I can get these spots cleaned up and have a better idea of how many have separated. -
Sealer to use for gutters/drip rails?
RouteVanJoe replied to RouteVanJoe's topic in Mopar Flathead Truck Forum
I'm not opposed to putting some kind of primer or rust dissolver onto there, though it'll be hard to ensure complete coverage. Naval Jelly is really the only rust dissolver I've had good luck with in the past, but it's acidic and i wouldn't be able to fully rinse it away from inside the gap. Admittedly, the rust will probably continue regardless and someday there might have to be some more major welding to fix it. But I'm hoping I can stop the leaking and push that day to the distant future. -
Sealer to use for gutters/drip rails?
RouteVanJoe replied to RouteVanJoe's topic in Mopar Flathead Truck Forum
Sorry the photo didn't come through the first time. Here it is.
-
Anyone have any recommendations for the best type of sealer to use (or avoid) or other must-do items to fix leaky gutters? I recently discovered that water was coming into the interior up around the gutters, and while I initially thought it might be just a few rust pinholes, it didn't take more than a few seconds up on the ladder to see what the problem was. Of course, on a less-tall vehicle, I might have spotted it sooner. Several of the spot welds appear to have rusted through and/or separated. Water is coming in through the gap between the two layers of sheet metal. Plenty of dirt and even a little bit of moss. See photo... It's depressing. Of course, the right thing to do is to strip it down to bare metal and weld it, but that is not in the cards. You'd have to remove the entire roof to get the rust out in between. My tentative plan is to clean out the gutters as best I can (water, toothbrush, air gun, wire brush, maybe even a pressure washer) and then apply a seam sealer. I'm leaning towards "Dynatron 550" but open to suggestion of other products, prep/application tips, etc. Ideally I'd like something that I can really force into the gap, similar in thickness to Bondo or household painter's caulk (though I understand I can't use house caulk). Self-leveling would presumably run to the end of the gutters and out, so that's no good. The sealer needs to stick to paint and to bare metal and hopefully to dirty/rusty metal too. Needs to be paintable and sun-stable. Doesn't have to look great because you'd have to be 9 feet tall to see it.
-
Congrats on a neat find and what looks like a great project. I haven't done much in-depth engine work on my flathead, but get your hands on a "Shop Manual" and parts list if you can. I got mine from eBay. Overall my experience so far is that almost anything I've needed to fix on my '51 can be pretty easily learned by simply disassembling what's there. But if the block, head, and tranny are still good, there's a good chance you can figure out the rest without any books. Good luck!
-
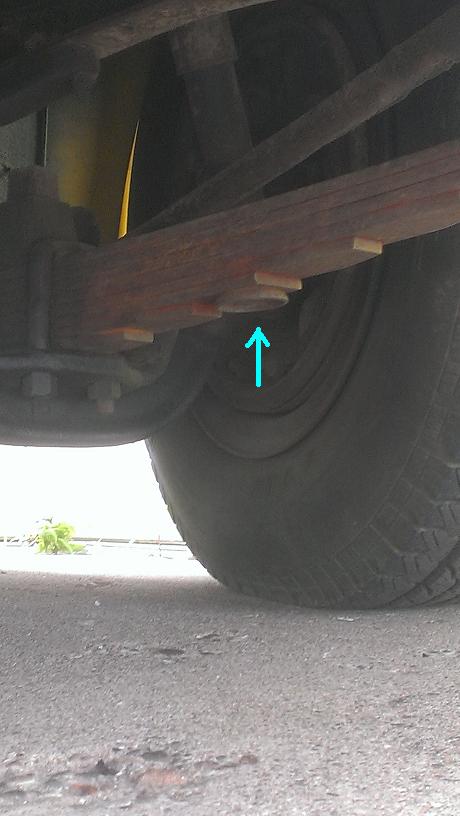
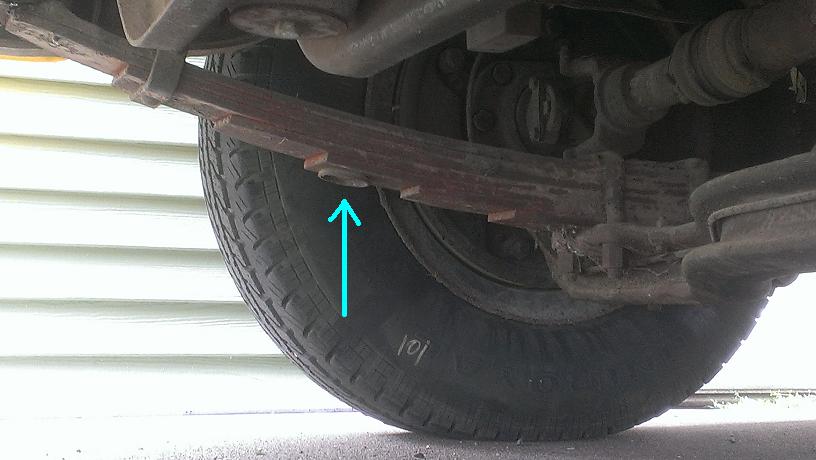
Hmmm... Good food for thought. Thanks for all the pointers! Does anyone have a photo of the Oilite anti-friction devices that were mentioned? The cups don't have holes in the tops of them, they just look like they're welded onto the bottom of the leaf spring. The advantage of using the circular cups would be that it would keep the top of the jack from sliding out of place. Even if I could get a jack under the axle itself, unless the jack had a cup or saddle on the top of it, it would be very risky. The only "secure" jacking spots seem to be the frame (which is high and would require an even higher lift) and these circular cups. The cups are not exactly level, but the cup could keep the jack from sliding out of place. A scissor jack next to the axle (near the u-bolt plate) might work OK, but there's a risk of it sliding forwards or backwards, especially when the axle is a little gunky. And since this is a Route Van, any heavy unsecured object is a projectile hazard, so a jack that I can attach during stowage has a huge advantage.
-
Does anyone happen to know what types of tire jacks, if any, were supplied with B-1 trucks? If so, do you have pictures of the jack top? After a couple of flat tire incidents I have realized the need to invest in a different jack for such emergencies. In the past I've carried a bottle jack, but when placed under the frame it can't lift the frame high enough to get the spare tire onto the hub, as the spring action keeps the hub near the ground. The bottle jack is also too tall to get under the axle, which is pretty much on the ground when the tire is flat. All four leaf springs have a circular cup on the bottom that appears to be intended for jacking, and the placement makes perfect sense, on the rear of the rear leaf springs, and on the front of the front leaf springs. But I'm wondering what type of jack (or jack top) was intended to "mate" with these cups. I looked through the product literature and owners manual and only found information about how to dismount and remount the tire on the rim, but nothing about raising the truck off the ground. Attached are two pictures showing the cups on the leaf springs that I'm assuming are the intended jacking points.
-
Based on what I'm hearing so far, it still sounds like the flasher unit itself is the source of the malfunction, that for some reason the "P" terminal is internally disconnected somehow. The monitor light sounds like it's not drawing enough power to cause the unit to flash. You're not using LED's on this system, are you?
-
Have you hooked a voltage meter up to the "P" terminal in lieu of the indicator bulb? Or hooked the "P" lead directly to the "X" lead instead? I'm starting to wonder if there might be an issue with the indicator lead or socket.
-
Your picture shows that there are only three wires into the turn signal switch. If the flasher is on the upstream (battery) side of the turn signal switch where it's always "hot". The battery connects to the "X" terminal so that's always "hot". The "L" terminal would then feed the wire up to the turn signal lever and on to the signal lights, and the "P" terminal is for the indicator light. If the flasher is on the downstream (signal) side of the turn signal lever, then you'd have two different flashers, one right and one left. The switch would feed power to the "X" terminal, "L" would feed to the exterior lights, and "P" would be for the left and right indicator lights (or have two wires running to one light). If you jumper a wire from the battery to the wire feeding the light, does it light up?
-
For what it's worth, I relied almost exclusively on this webpage when I built my turn signal apparatus (because I wanted my parking lights to flash as turn signals without back-feeding to the brake lights, and I was too cheap to buy a fancy wiring kit): http://www.mg-tabc.org/library/turn_signal_relay/turnsignalrelay.htm It explains how the relays work and also illustrates the correct terminations on the flasher unit, in a way that even a civil engineer can understand. i too have had some bad luck with "modern" 6V flasher units. My old turn signal system used only one flasher, but fortunately I had salvaged that one and it's still doing well.
-
2012 "Back to the 50's" Mpls/St Paul
RouteVanJoe replied to ggdad1951's topic in Mopar Flathead Truck Forum
Sorry to bump an old thread, but oh well... Part of me misses the green too, but unfortunately the green paint was so far gone that it was no longer protecting the steel underneath. Given the height of the vehicle it unfortunately is not garaged during the summer, so the paint is what stands between the elements and the truck. Also I missed out on a chance to have the truck used in the Coen Brothers' "A Serious Man", probably in large part because it had someone else's business and an Oregon area code on the side. It also took months for spectator handprints to disappear from the that paint... Going yellow with the new paint was a no-brainer for me though, as I'm slowly working towards creating a replica of the long-lost one from my youth (shown in my profile pic). And don't worry, I still have the spotlight in my garage, just need to clean up the chrome and get it working again. -
I too would recommend Steele. They had a lot of the right seals for my B1 which others didn't have, and they had items in stock that others had on indefinite back orders. My only problem was one piece that was supposed to be 6 ft long was cut too short and sent only as a 5 ft piece, and when I called they shipped out the 6 ft piece to me right away with no issues. They also send free sample cross sections free of charge, which are carefully labeled so you can figure out if it's the right seal or not.
-
There's one sitting at the Great Lakes Dragaway in Union Grove, WI, or at least there was a few years ago. It was heavily modified though as a food vendor truck, though I don't think it had been used in years.