


mossback44
-
Posts
17 -
Joined
-
Last visited
Content Type
Links Directory
Profiles
Articles
Forums
Downloads
Store
Gallery
Blogs
Events
Classifieds
Everything posted by mossback44
-
I'm a wire wheel fan and have a set of Roadster 56-spoke 15" chrome wheels on my '32 Desoto convertible coupe streetrod. I also have a similar set of 15" 56-spoke McLean chrome wires on my '36 Ford convertible sedan which is still in the build process. I may have had extraordinary luck, but the only problem I've ever had with any of them is a persistent leak in one wheel which turned out to be the result of a spot of rust on the bead of the wheel which kept the tire from sealing. Since cleaning the rust off, I have had no further leaks and no difficulty keeping them balanced. I bought both sets used and believe they were manufactured in the '80s or early '90s. Maybe I'm just lucky, but my wheels have never been a problem, other than the leak mentioned above which had nothing to do with its wire spokes.
-
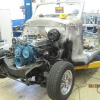
I have a 2-post assymetric Ford-Smith lift that I bought about 20 years ago. I installed it myself in my old shop and then moved it into my new shop a few years ago. Installation is pretty simple for people with the skills generally found on this site. However, the components are heavy enough to require equipment to lift and position them (unless you have some really strong friends). I'd love to have a 4-post lift too, but would recommend a 2-post if you're only going to have one lift as they are more versatile. I also recommend the assymetric style as it offers much easier access to the inside of the car on the lift. Attached Thumbnails
-
I'm sure I bought the same Restoration Specialties channel that you did because I have exactly the same problem with my '47 Plymouth convertible. I did an extensive search before buying the window channel and couldn't find it anywhere else. It's too bad that the catalog picture has an incorrect dimension because that dimension is definitely what we need. I believe I now have a plan of attack that will allow use of this material, though. I did a little experiment with a 2-inch section of the channel liner and the results were promising. I'll explain my plan and let you decide whether to follow suit. First, I found that the U-shaped steel core of the channel liner actually has the right width to fit the channel; it's the rubber covering and whiskers that make it too wide. I also noted that the very ends of the U-shaped steel core's legs flare out slightly. So, using a new single edge razor blade, I carefully followed the valley created by this flare and cut through the rubber cover on both sides of the liner. I then peeled the rubber cover (and a little of the whiskers) away from the outer sides and bottom of the U. The cover peels away fairly easily. The rest of the rubber covering and whiskers remained in place on the inside of the U, A small part of the liner wraps around the very ends of the steel core's legs which limits how far the liner can be pressed into the channel. The modified liner fits into the channel and looks very good, The rubber cover material remaining at outside of the flare stops the liner from bottoming in the channel, leaving a space of about 0.040" under the liner. I plan to put a small bead of weatherstrip cement (of maybe silicone caulking) in the channel before pressing the liner in, so this gap will be filled and the liner will be glued in place. I don't believe this minor dimensional change will cause the window to bind. I will also put a tiny bead of glue along the cut line so the ends of the remaining rubber cover will be less likely to peel away. I know that this seems like a lot of trouble to go through, but it does allow use of what seems to be the only window channel lining that comes close to the correct size. I would be happy to find out that the right liner is available, but I won't hold my breath waiting for that.
-
I have found that the items with the (fits blah blah ...) don't actually have that in their titles, but it is somehow added on by eBay. So, rather than searching for 1932 Desoto, I search for 1932 "Desoto". Putting Desoto in quotes eliminates all of the items that don't actually have Desoto in their title. That simple change reduced the number of items found from 665 to 104 and eliminated all of the (fits blah blah ...) items. I only put Desoto in quotes, rather than including the year, so I don't eliminate items with titles like '1932-33 Desoto tail light' or '1930s Desoto fender' which aren't an exact match for "1932 Desoto".
-
I just painted all the emblems and scripts on my '47 Plymouth convertible following the same method Ralph D25cpe outlined. This method is much quicker than precisely masking prior to painting (which I've done previously) and produced a better result for me. As mentioned by someone else, it does require a sharp break at the edge of the painted area to get a clean line when you wipe of the overspray. If you don't have that, you'll have to use the good blue masking tape and an x-acto knife. To address the problem of sticking to the shiny chrome, I used the new Rustoleum spray paint which contains its own primer.
-
There's a reproduction set on ebay right now, priced at a pretty hefty $299. The item number is 230732099885 for anybody that's interested.
-
I installed a '96 Mustang Cobra 8.8-inch rear end in my '47 P-15. The width from WMS to WMS is nearly identical to the Plymouth and the bolt pattern is the same. It has a 3:27 ratio with traction lock and huge disc brakes. I put it behind a 360/727 and used the Mustang driveline with a combo joint to match up to the Mopar yoke. I had to grind a lot of extraneous stuff off the rear end housing and weld on a pair of spring perches to fit the original leaf springs. This conversion requires at least one-inch lowering blocks; without them the emergency brake return springs would conflict with the leaf spring. I have somewhat smaller disc brakes on the front, so to avoid prematurely locking up the big rear discs, I installed a proportioning valve in the line to the M/C. Other similar year non-Cobra Mustangs would have rear ends with smaller brakes.
-
Some years here in Washington it only rains once in eight months too. Trouble is, that one rain continues for the whole eight months!
-
I think you mean 10/8&9/2011.
-
I have the ones from Harbor Freight. They need to be kept well lubed with wheel bearing grease to work satisfactorily. They are strong enough, but the casters really are the weak link. I have been thinking about replacing the casters with some heavier duty ones.
-
What exactly is rubbing on the rotor? I suspect it may be one or both of the bottom bolts protruding through the caliper bracket plate. If so, grind the end of the bolt(s) off for clearance. Your attempts to adjust the bearings will be foiled by whatever the rotor is rubbing on. My guess is that the rotor is probably hitting the bolts and preventing the bearings from fully seating in their races. Your comment that the wheels are leaning in at the top strongly suggests that the bearings are not fully seated. If you can't cure the problem with a little judicious grinding to eliminate the interference, you will need longer spacers to set the inner bearings (and rotors) farther out on the spindles. As an alternative, you may be able to find some shims of appropriate ID and OD to use in conjunction with your current spacers.
-
I'll jump in here on the question about quality. For the money, I really think these mirrors are one of the best values I have found on eBay. I have a set on my '32 Desoto convertible coupe which has won awards at nearly every car show that I've entered it in, including the Portland Roadster Show, the Forest Grove Concours d'Elegance and Goodguys. Pretty good for less than $30 a pair. I'm happy enough with my first set to have bought a second set for my '47 Plymouth convertible project. Convertibles, of course, have no place to hang the clip-on type mirrors so these work really well. I really like the graceful swan neck design too. If you buy a set, make sure that you set the passenger mirror as far forward as you can because the mirror adjustment range is a little limited. For the record, I am not the seller nor do I even know him/her.
-
I'm rewiring a '47 Plymouth right now using an EZ wire harness. I have used them before and find them pretty simple to install. Don't miss Greg G's point about 6v vs. 12v. Most of the street rod harnesses, like EZ wire, are sized for 12v which allows smaller wires than 6v requires. Since I'm installing a 360 small block and converting to 12v, I don't have a problem with with the wire size in the harness. Most of the street rod harnesses have wires labeled every few inches which really helps reduce the confusion of rewiring.
-
I just finished installing a '96 Mustang Cobra rear end in my '47 Plymouth. It came with disc brakes, traction lock and a 3.27 ratio and is almost exactly the same width as the original rear and the same bolt pattern. Like the Explorer, the Cobra uses an 8.8 inch differential, but the axle housings are 2.75 inches in diameter, rather than 3.25 inches like the Explorer. I had to cut off four brackets associated with the Mustang's coil spring suspension and also removed a pair of bolted on reinforcing brackets before I welded on new spring perches. I fabricated some 1-inch lowering blocks and used them with the original Plymouth U-bolts. I may drop it more later if I locate some longer U-bolts for the right price. I'm putting it behind a 360 engine with a 727 trans and was amazed to find the Mustang drive shaft was just the right length. I only needed a combination u-joint to couple the Mopar yoke to the front end of the shaft. Sometimes a guy gets lucky!
-
New problem - Engine revs fine but doesn't drive well at all.
mossback44 replied to Powerhouse's topic in P15-D24 Forum
When I read your post I made the following two assumptions: (1) You had the car out of gear or had the clutch pedal depressed when it idled and revved OK (2) You had it in gear when it ran poorly on the road. You said that it ran fine in all gears when up on stands. The fact that it runs OK when not under load, but poorly under load indicates that you have an engine performance problem, not a slipping clutch or other drive train problem. You seem to have ruled out most of the possible ignition problems and the sudden onset doesn't indicate a low compression problem, so my guess is that you have a fuel problem. Check to see if you have fuel flow and pressure. If not, it could be a faulty fuel pump, clogged fuel filter or clogged fuel line. It could still be an ignition problem though. The spark may be adequate under no load, but too weak when under load. Good luck finding the solution! -
If only one wheel is turning, as is often the case with an "open" rear end when it's off the ground, it would be rotating at double speed. If that is what happened during your test, it would actually have taken four turns of the drive shaft to rotate both wheels a full turn.
-
Any of you who need to replace the rear spring bushings on your P15 may find, as I did, that the rear shackle bushings are available from NAPA at a reasonable price. Unfortunately, they don’t have the bushing assemblies for the front spring eyes and my search of the internet didn’t turn up anything anywhere. I wanted to get my ’47 convertible back on the road and had to employ a little ingenuity. I hit on a solution which I am glad to share. I didn’t take any pictures during the process, so you’ll have to wade through my verbal description. The front spring eye bushing consists of an inner steel sleeve or tube that the pivot bolt goes through, a rubber liner and an outer sheet metal sleeve which contains everything. This assembly is pressed into the eye of the spring. The rubber liner eventually wears out and you end up with metal to metal contact between the inner and outer tubes. If you have access to some kind of press, and it doesn’t have to be a huge one, you can rebuild the bushings yourself. The key to this is that ¾” heater hose, at least the brand I had, is an exact fit to replace the rubber in the bushing. After pressing the assembly out of the spring eye, push the inner tube out and remove the remnants of the rubber liner. Using whatever method you want, clean both tubes thoroughly to reduce binding during reassembly. Then very slightly bevel one end of the inner tube so it won’t cut into the heater hose when you press it in. Start with a piece of heater hose about 4 inches long and lube it thoroughly inside with liquid detergent. Get the steel tube started into the end of the hose by hand. Then insert a slightly smaller rod into the hose from the other end to keep the hose from collapsing when you press the tube into it. I used a P15 kingpin with a diameter of about 0.80 inches which was a perfect fit. I slipped a 7/8” diameter washer over the kingpin and set the kingpin down through the jaws of my vice with the washer resting on the jaws and supporting the bottom of the hose. I drove the inner steel tube into the heater hose with a rubber hammer, pushing the kingpin out the bottom. Again, the kingpin just serves to keep the hose from buckling during the process. I then cut the hose off with a razor knife to match the end of the steel tube. I beveled one end of the rubber hose slightly, lubed it with a lot of liquid detergent, and used my HF hydraulic press to push it into the outer metal sleeve. Then I pressed the whole assembly back into the spring eye, centering it so it protruded the same on both ends. I cut off the excess rubber with a razor knife and was done. It took about 1-1/2 hours and zero money to do both springs. Of course that does not include removing them from the car or replacing them.