


Tom Skinner
-
Posts
1,372 -
Joined
-
Last visited
-
Days Won
3
Content Type
Links Directory
Profiles
Articles
Forums
Downloads
Store
Gallery
Blogs
Events
Classifieds
Posts posted by Tom Skinner
-
-
Does this help?
.jpg.9d304dd2288544f3ea33ff2fff9063d3.jpg)
-
 2
2
-
-
GTfastbacker,
Wow, Great improvisation! I do remember someone telling me back in the 1970's that 10" or 11" Blades work best on our cars. I have owned different 1948 Chrysler 's since 1973.
Sometimes believe it or not I have seen the Blades at K Mart and or Walmart occasionally for sale on their Wiper Blades Racks. Great work!
Tom
-
1
-
-
GTFastbacker,
I agree with Sniper. Those Splines look FUBAR. There were two kinds of wiper arms Anco and Trico. I was at a car show once and the Windshield Wiper Vender came over and told me I had the wrong Wiper Arms and Blades on my 1948 Chrysler, I have Trico's on mine and they work fine. Yours look like my Tryco Arm. He said I should buy his Anco's for $100 - Arms and Blades - this was 10 years ago. Mine are 11" Trico Blades, of course clipped onto Trico Arms. Mine still work fine. Andy Bernbaum sells the Anco Sets for $99, Arms and Blades as of the last time I looked at his Parts Sight On Line about a week ago or so. Its any bodies call put what you like on there. Be sure to measure your Blades some are 10" and some are 11" since you indicated yours is a 1941, and mine is a 1948 there might be a difference. Maybe someone with a 1941 Dodge will chime in here for you. Good Luck.
Tom
-
1
-
-
I agree with Joecoozie. Coil probably going bad.
-
HCD,
I am 4 Hours Drive from you, so I guess I am not going to be much help other than being here to answer questions.
The Service Manual, Service Booklets (On Line), and You Tube Videos will be a tremendous source of information for you.
Usually any trouble with a M-5 will be electrical, followed by Hydraulic. These Transmissions hold up quite well with only occasional
issues. Feel free to visit here, there are some pretty knowledgeable Members at your service.
Tom
-
Crisjr14,
The things you circled are not going to effect spark at the Coil, Distributor, Starter, or Plugs. Start by turning the motor over by hand to TDC (Top Dead Center).
You will probably need to remove the plugs to do that by hand. Observe and clean or replace the spark plugs. Once at TDC with the plugs back in - turn on the ignition key.
Loosen the Distributor, Take the Center Coil wire loose from the center of the Distributor and hold it 1/4" from a Bare spot on the Engine Block. Rotate the Distributor by hand until a Spark jumps between where you are holding the Coil Wire near the Engine Block. If no Spark you need to replace the Ignition Coil. Check the Points in the Distributor are they gapped properly? are they getting a Spark when the Key is turned on and you move them back and forth by hand? if not its either a bad wire (broken, or loose) or the Coil. Ignition Coils are about $30. This method is called Static Timing it is imperative that spark is received at the Plugs at the proper time to start an engine.
The Technical section of tis Thread may explain it better than I did. Good Luck!
Tom
-
Librado65,
Since 1973 at the Chrysler Car Shows on Top of Eagle Rock Avenue West Orange New Jersey in the early 1970's where I went to Chrysler Cars Shows and Walter Percy Chrysler ran his first Cars up and down The Orange Mountains in the 1924 and 1925 test Drives from 112 Mechanic Street in Newark New Jersey and Elizabeth New Jersey, with the help of Fred Zeder, Carl Breer, and Qwen Skeleton, The Eagle Rock Avenue Mountain Climbs in West Orange New Jersey, there is nothing stopping you from doing a Ring Job on your Chrysler and fixing it yourself. YOU CAN DO THIS! Let no one or nothing tell you different.
You also need a set of feeler gauges I didn't mention earlier. As Sniper said this is simple stuff DO IT. Screw all the little Shi-t as-es that tell you different. It is simple mechanics. Take your time and do it right. The people you have been talking to are full of Sh-t. A Ring Job is a two day Cake Walk. I am 67 and could knock it out for you in one day.
These young mechanics are Nancy Boys. They couldn't tare the ass of a rag doll. Just pull up your Boot Straps and Knock it out.
Good Luck!
Tom Skinner
Huntersville,
North Carolina
-
Librado65,
I have done a ring job in one day. You can too. One must have a Head and Oil Pan Gasket, Ridge Reamer, and Torque Wrench, and you can take it apart in one half day. Then determine if there is no discernable Taper in the cylinders. (You can take a loan Tool a Taper Tool from Advance Auto) If your good to go order a Standard Sized Rings Set order from Andy Bernbaum or Vintage Power Wagon, then reassemble in your next available day. As was stated if these shops can't fix a Flathead they aren't worth a Tinkers Dang anyhow. They are quite simply simpletons. Or total B--- Sh----s. Or Both.
Tom Skinner
Huntersville NC
-
1
-
-
Mezz,
That is over the top! Excellent! Please share the door Trim and Rear Window garnishing as well! Looks better than new!
Tom
-
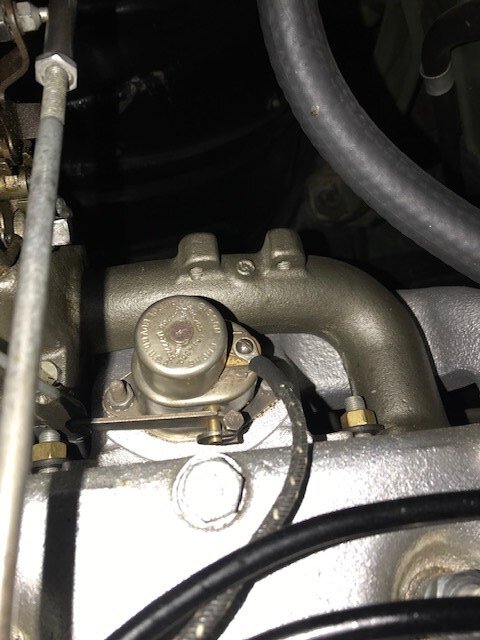
50CRoyal,
There are designations stamped into the ears of this relay (Where your fingers are in your picture).
H: goes to your actual Horns
IGN: goes to your Ignition Wire
B: Goes to to Battery
GRND: Gos to your actual Horn Button on your Steering Wheel
If you can access a full Electrical Diagram of your car that would be very Helpful, usually finding the H, and GRND wires are the easiest, you can almost guess your way from there. I am a crappy electrician and could do it. Good Luck!
Tom
-
Thanks Dodge4ya, and everyone else. I wrestled it in today. up and down under and over, and never moved the floor pan.
Not the kind of work for an older guy but I took plenty of before pictures. It was a frayed original greasy mess. I just need to test it and adjust it tomorrow
so it holds on a hill like it should I got it from Melisa at Mopar-Mall for $118 (I hope that doesn't break a Thread Rule mentioning a Supplier)
It fits perfect, It was kind of tough getting the sleeved ends into their bracketed fits near the ends. 5 hours in for it so far but I am proud I didn't need any help.
Thanks again everyone!
Tom
-
1
-
-
Gents,
Now that I am getting on in years, my 1948 Chrysler Royal Brake Cable was catching/binding some what so I ordered a new one. It goes through the firewall grommet and a bracket on the steering column and then proceeds to the actual brake mechanism at the Fluid Drive Drum (Down by the Emergency Brake Return Spring). Is there any tips as to changing this out without too much hassle? I got a bad back and don't want to wrestle with it, I want smooth sailing. I'm guessing jack it up with Tripods under the frame to give me plenty of room, wear gloves (the old one is frayed and oily) and then be sure to adjust that baby back to where it holds my bus still on a hill). Any other tips will be much appreciated. I have a 28 year old son that I had when my wife and I were 40 that is willing to help me (A former USMC Sargent) He helped me put a Clutch in her 14 years ago. Anyway any tips much appreciated. I searched the Thread first and didn't find any Tips on this before hand so as not to hassle anyone.
Thanks in advance!
I still love turning wrenches in NC!
Tom
-
Worden18,
Reconnect the A and F terminals backwards, rebuilt generators sometimes change those locations/designations. Then it charges.
always re-polarize your generator with a jumper wire at the VR. Don't ask me why just try it.
(When you believe in things you don't understand - you suffer - superstition is the way) Stevie Wonder
Tom
-
 1
1
-
-
It is fixed!!!!!!!!
I am not the sharpest marble in the box when it comes to electrical wiring. So I found where I had a wire or two out of place causing the downshifting to go into zugzwang.
But all is peaches and cream now (Gary Player - 1965). I just returned from a 20 mile ride and no issues what so ever. Whew I feel like Mr. Magoo another Steel Beam flew my way and caught my old car tires again. Oh Magoo you done it again! (In Jim Backus' Voice). Here's wishing you all a repair that goes like mine!
Thanks to all that tried to help!
Tom
-
3
-
-
This all came about when I rewired some wires under the hood in the engine area. (The Kickdown stalling). I might need to reclean the kickdown piston in the carb.
I found out how to do away with my second H;B;S Horn Relay by moving wires around. I got rid of the jumper wires that went to the regular 4 Post Horn Relay.
I had in avertedly put a wire or two in the wrong place. I have just moved the wires to their proper places yesterday during our 4 inch rain storm (near Tornado) so I was unable to test drive the car. Today I will go out and Test Drive it, and get back with the results. I am hoping it is fixed. Also the hydraulic (10wt) oil in the Tranny was a Cup (16OZ) low.
Maybe I have a cheap repair. I'll keep my fingers crossed.
-
I already installed a Rhode Island Trans Harness just 5 years ago. Electrical Tests seem to be pointing to either the Rear Carb Kickdown or the Kickdown Switch at the Transmission. But why would it suddenly go bad? These Fluid Drive Transmissions are pretty much Bullet Proof. I have na extra Kickdown Switch for the Tranny but it has two leads on it instead of one - like the one shown in my manual for my C-38. I believe one lead is going to ground? any Advice would be appreciated as I am electrically challenged.
-
Gents,
I ran all the electrical tests I could on my Hydraulic Transmission. Fluid in Tranny is full. Governor Points clean. All Electrical connections tight. Fuse at Tranny Relay good.
I serviced the Kickdown Piston at the rear of the Carb. Now for the problem .. The engine stalls at 15mph slowing down to stop. What could do this besides perhaps a bad ignition coil, or a bad Interrupter Switch at the Tranny? Any thoughts from someone with a similar situation. Oh yes and I cleaned the Carb Bowl Needle and Seat.
-
Grey is a nice contrast also
-
I have noticed over the last 50 years that some Fulton Sun Visors are specifically for GM or Ford products, and some for Mopar products.
Try moving the brackets forward as Andyd suggested, I hope you have the right Sun Visor. Kilgores Sun Visor above is the ones I have used on my Chryslers since 1973.
-
1
-
-
Merry Christmas Everyone!

-
2
-
-
As always - I agree with all the above repair suggestions, however, the easiest quickest check is: The Fuse check (30Amp) at the Transmission Solenoid.
If it isn't working well - and it only takes a minute to check it.
Good Luck!
-
Plymouthy Adams has it right above.
-
One must bear in mind that gas was 76 - 78 Octane (with Lead) when these Buses rolled off the assembly line.
Somewhere in the range of 10 - 11 cents a gallon. I haven't really heard the coveted ping upon heavy acceleration
after setting my timing since gas was still leaded. Of course that was with my first 1948 Chrysler back in the 1970's.
Back then I timed my 250.6 cu. in. Flat Head by ear. Today I use a Vacuum Gauge and a Timing Light.
-
1
-
Converting from 6v to 12v
in P15-D24 Forum
Posted
Whether 6 or 12 Volt - its the owners choice. One point to make is, if one chooses to remove their old wire harness and use it as a template/pattern to make a new one with new wire (using a good service manual or wiring diagram as well) then a lot of electrical problems will go away especially if the harness on your car is shedding its insulation around the wires. I opted for Rhode Island Wire, Because I could. but looking at the old harness taken apart afterwards I could see how easy making one could be.
Of course this presupposes one has some electrical sense - which my electrical abilities leave much to be desired. Either way nowadays both are expensive propositions if I have read this thread correctly. So here is a shout out to all that are changing over to 12V.
Good Luck.
Tom