

Tom Skinner
-
Posts
1,372 -
Joined
-
Last visited
-
Days Won
3
Content Type
Links Directory
Profiles
Articles
Forums
Downloads
Store
Gallery
Blogs
Events
Classifieds
Everything posted by Tom Skinner
-
 Marc, My 1948 Chrysler Royal - Fluid Drive didn't have one on it when I removed my Transmission and changed the Clutch out. I did not put one back in either. I have had no problems or leaks from that in 10 years. I would think you are good to go. Tom
 -
I got my 1948 Royal up to 68mph with a 251 cu. in. in it. It sounded good but I do not want to push it. It likes 50 -58 mph on a normal country road jaunt. Tom
-
47ply, On your other questions, please, please! go by the Service manual, it sounds like you may have other issues and need to know how to adjust brake shoes etc. etc. Good Luck! Tom
-
47ply, I always used a puller. Remember to leave the nut on a turn or two while using the puller so the drum doesn't shoot out at you. When they break loose it can sound like a gun shot some time. I bought a puller for $30 long ago, they are now allot pricier on ebay now. Rented pullers from say Advanced Auto don't seem to work as well. If you know an older mechanic he may have one you can borrow. Be safe! Tom
-
bleeding brakes,,,3 of 4 normal,,,, but the 4th??????
Tom Skinner replied to harmony's topic in P15-D24 Forum
Harmony, jfish is correct. Bleed bottom wheel cylinders at the front first or you will not achieve full brake fluid flow (without bubbles) at the tops, or a firm brake pedal. Other than that you may have blockage in an old flex line (at least that doesn't cost anything to disconnect and check). Don Coatney a few years back sent me an extra Master Cylinder Lid with a cut out for a Brake Fluid Bottle to attach to. I fill it with DOT 3 screw it into the top of my M.C. and commence to bleeding the brakes using a small bottle and magnet and hose. This is achieved with keeping the bottle above the wheel cylinder (basically gravity fed) while my wife, kid, or friend pumps the pedal slowly to the floor and holds it there numerous times until the fluid comes without bubbles and clear/new color - not dark or dirty). In this way a nice hard brake pedal is achieved. If minor adjustments are called for at the cams I then do that as well. Brakes are like new after this procedure. Tom -
Typically I will go around and Bleed 2-3 Times until everything is clear fluid - no bubbles - no troubles.
-
I used the stud part, Bolt or Stud you are good to go.

-
Maybe it was old to begin with. The guy at O'Reiley's showed me the new date on mine. I had to ask though. Mine was only $19.99 so I had to dive 15 miles to go get it. worth the ride with leaves changing colors. Tom

-
Marc, Just know that there is some holes to patch and some to cut. Go slow and measure twice and cut once. I cheated and took my carpeting out and used it as a pattern. I backed up the patches with left over material and Gorilla Glue, then carefully cut patches to fill the few holes that were not needed. All in all it was a very satisfying job. The car even smells like new rubber matting, a nice change from wool smell and horse hair. LOL Tom
-
I only posted this because I have seen over the years some asking about these Mats. The original guy in East Orange New Jersey hasn't made or sold them for decades. I believe it was told the mold was destroyed after he passed away or some such story. No one could justify a new mold to be made cost wise because demand just wasn't there. At least this is how I recollect the story behind why only rarely you see one on ebay for $400 - $500 range and they are dry rotted and cracked.
-
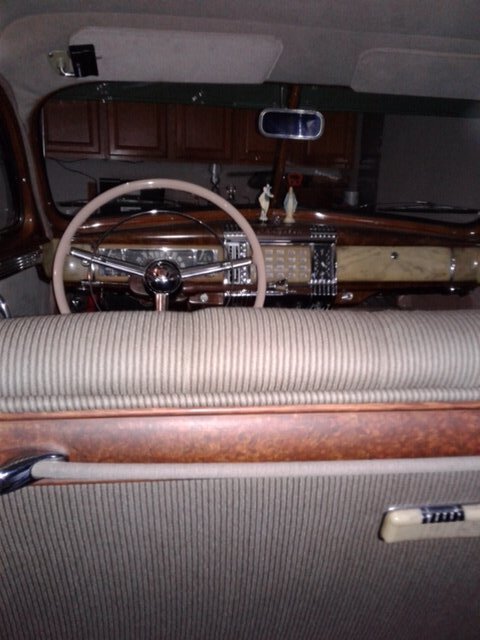
Trying again The Hump needs some padding other than that great fit
.jpeg.437af6499c8530821ea179b89923f5f8.jpeg)
-
It is right side up in my computer, This happens sometimes. I'll take another picture and try again
-
Gents, I have a 1948 Royal, I bought 15 years ago. It had carpeting throughout. A correct 1948 Royal has a Rubber Mat in the front, and Carpeting in the back. I went to Vintage Power Wagons recently and found in their new accessories on Page 12 a Rubber Mat for a D37. for $180. It looked close. I bought it. It fits with some extra holes cut and a few patched. here is my pictures. Ebay typically sells these at $300 - $500 . These are brand new. Caveat - one must fit these into their car. They are basically 40" by 58". I worked mine in, it took 2 Days with Gorilla Glue and patience. Well worth the results. Judge for yourselves
.jpeg.fe4ca0a811ac70a011d9a285da28ead5.jpeg)
.jpeg.37c3ce7014f57ae571eec52e33ed9d3a.jpeg)
.jpeg.0492364b1ce21abd2a6e56bd714c5ec3.jpeg)
-
Here we go. LOL
-
Just make sure you have plenty of Liquor in your cabin before dark. Then there is no reason to go out after dark. LOL Tom
-
Doug and Deb, Reset your dwell/Points Gap, then Timing, then Vacuum Gauge Set the Carb in that Order. See what you get then. seeking about 20" It may be there is dust gunk in the carb that is rebuilt, if so use carb cleaner as well. Take her for a run 50 - 55 mph. Fresh Gas - Non Ethanol if possible. Good Luck!!! Tom
-
Gents, I am getting about 1.5 which seems correct because my system is a 6 Volt, 6 Cylinder 1948 Chrysler Royal. Thank you for the help! If I didn't still have my Simpson Owners Manual, I would not have known which way to set the knobs to check this out. I might finally learn something about Lectricity LOL. Tom
-
Sniper, Thank you! I will try this first thing tomorrow. Tom
-
Gent, I do not pretend to know anything about Volts Amps or Ohms. My question is with a Simpson Tube Volt Meter 1960's Style exactly how do I test my Coil for Ohms? I zeroed out my Scale on my Meter it has a new battery 1.5 Volt I believe. So walk me through where to put the Black and Red Leads and whether I should have the ignition key on or off etc. I want to check my new 6 Volt Coil for 3-3.5 Ohms as instructed above. Basically I ask exactly how. Thanks! Tom
-
EV1 Carburators - need Cleaning sugestions
Tom Skinner replied to Tom Skinner's topic in P15-D24 Forum
Thank you Chrysler1941! -
Gents, I have over the years purchased several EV1 Carburators, soaked them, and re-built them. As time goes by the outsides have tarnished on 2 of them to a darker grayish color. I have Neat's Foot Oil on the Leather Cups inside and plenty of PB Blaster to keep them clean and supple inside for just sitting in a closed Cabinet. What if anything would I use to clean them up bright and shiny on the outside? I really do not care if its environmentally safe. I just want these babies silvery again on the outside. I bought one recently on ebay for $100 and it shines like new. Maybe it was new??? The other 2 extras need to "stand tall" like the one I just bought. Any suggestions beside green slime or any weak watery cleaners? Maybe Noxon, or a strong Silver Cleaning Creme like Happisch Semi Chrome with a tooth brush? Tom
-
Woodie, I wish I could be of more assistance, however, I always sent my tube (Philco 802) out for Service in PA. There is a section in your Service Manual that addresses what you are asking about. Pages 94 and 95 in The 1941-1948 Chrysler Shop Manual. I have very little experience with these Radios, however, I believe if you take the side cover off and use a graffite powder lube sparingly it may free that button up some. Just guessing though. Good Luck! Tom
-
I bought 3 on ebay before I hi=t a really good one. Do It!
-
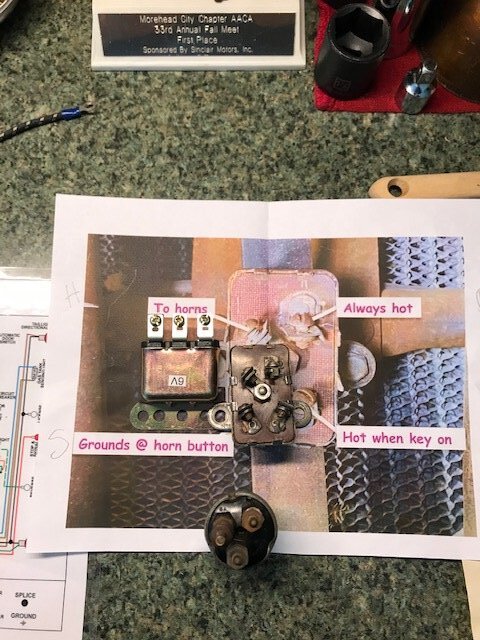
OK with more pictures: Question where does the Battery Wire go? From the B Post to the Ignition Switch? Top or Bottom Post on the Ignition Switch? Without anything Else the extra Relay read SBH. Original Switch reads: Top Left H Top Right B Bottom Left S Where does the B Wire Lead to the Ignition Switch? I give up, I am an Electrical Imbecile

-
Lazy K, You are right, however, I do not have the Electrical confidence to correct this arrangement. If I find someone here willing to help me sort this out I will re-post. Until then my only hope is my Electrical Engineer Nephew whom may be able to sort this out. I will repost if possible any developments. Tom

