


Dodgeb4ya
-
Posts
9,962 -
Joined
-
Last visited
-
Days Won
174
Content Type
Links Directory
Profiles
Articles
Forums
Downloads
Store
Gallery
Blogs
Events
Classifieds
Posts posted by Dodgeb4ya
-
-
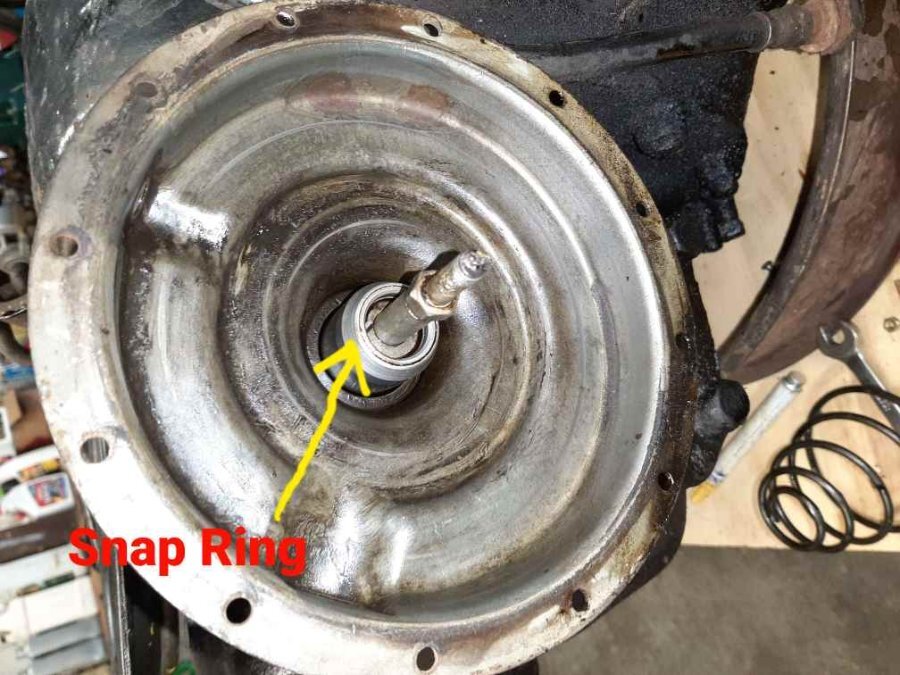
AFAIK the seal is inside that housing the shift rod operates in and out of.
There is a snap ring to get into it....but if you get into trouble guessing on trying to get at a seal you might end up pulling the 400lb diff out!😫
Clean it up and run it....had a lot of 80/140 gear oil in it!
-
There shouldn't be any oil on the axle vacuum side.
I have never taken apart the shifter shaft and sleeve assembly in one of these Timkin rear ends.
I'm sure there are one or more oil seals in there.
No service information anywhere that I could find.
The rear end pictured pictured above worked flawlessly with the oil in it.
Shifted great.
I was suprised to find the oil in it.
-
And with the upper line 131" WB New Yorker and Imperial power brakes were std.
Power steering and windows plus a real torque converter were optional starting in 1951.
I had a Fluid Torque Drive Saratoga.
It was easy to smoke the tires from a dead stop in that short WB Windsor.
I have also had a couple of the upper line 51-52 New Yorker and short WB Imperials. Luxurious cars.
-
On 3/22/2024 at 1:24 PM, E37Bruco said:
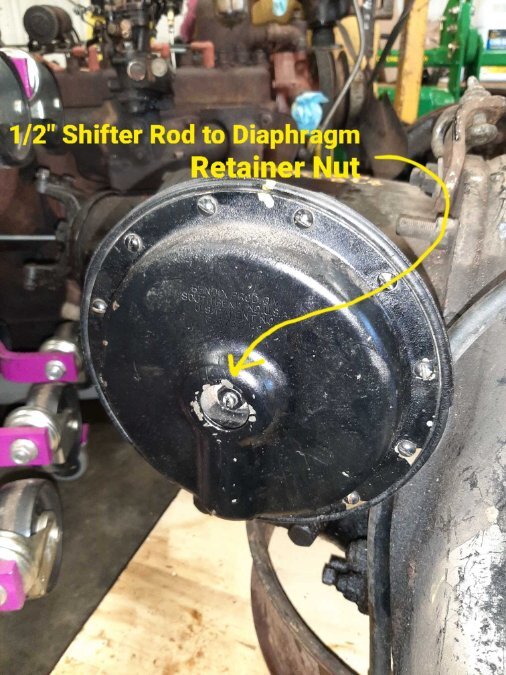
I doubt Whitepost could supply or replace the diaphragm.
The diaphragm's and base mount were sold as a complete assembly...no separate parts from MoPar.
This is what the leaky situation probably will be....there is a very strong spring in that vacumn chamber....
Once the 1/2" nut in the hole of the outer cover and the 12 screws holding the diaphram are removed....those parts are likely to go flying.
Use two 2" long safety screws to control the cover and diaphragm's gradual release off the shifter rod.

-
 1
1
-
-
There should be no oil getting into the rubber shift diaphram.
It will cause damage the hose and to diaphram.
There is no servicable seal in the shift rod. I have never had that rod apart or seen a seal in it.
If there is excessive oil and it has damaged that diaphram you have a bug priblem.
I definately would check the shifter rubber diaphram for oil contamination and possible swelling or splits.
A compromised rubber diaphram will cause axle shifting trouble...which you have had trouble with.
You might want to remove the 12 screws to be able to be sure that diaphram has no holes or cracks from oil damage.
It might be A-ok too.
-
$45.00 is cheap for a good quality MoPar to bearing.
Chinese bearings are garbage.
Buy the $45.00 bearing if it is the correct one.
-
MoPar started posting maximum drum oversize's around 1956...
I know most drums machining limit is at .060" OS. A maximum safe cut on the drum lathe bit is at .030" ....means the drum ends up at .060".
But I also know some late 50's model Chrysler 12" drums are spec'd at a max drum oversize of .090".
Shown is a MoPar pic of some center plane brakes maxed at .060" oversize cut.
Anything over .060" will require over size linings for proper shoe arc'ing and long lining life.
More meat on the drums is a good thing.?

-
Did your machist fab up a torque plate for honing the block?
Wonder how much distortion of the cylinder walls will be after the head is torqued.
Answer to question # 1....no.
It would be a $$$% custom fabrication.
I'd assemble and run it.
You are digging way to deep IMO.
Modern engines....be real careful.
-
I thought PB was gone....they need to be.
Screwd people of millions of pictures if not billions.
-
What adhesive did you use?
Is it used to just hold the cap centered or to help hold it tight to the cap itself?
-
Remove plug...carefully wedge the bulb out. Simple.
-
 1
1
-
-
Sadly last summer I scrapped out 2500 lbs of 1946-50 straight eights I've save for 35+ years. I saved the good parts.
Cranks and manifolds and couple pieces of tin.
Yep those things are heavy.
Messed with many.
-
Jesus...been thru this way too many times here.
Moparts is full of sh*t in regards to the use of brass in iron engine blocks and use of brass core plugs.
Period.
-
1
-
-
Lot of work that's not necessary for cable removal is all I'm stating.
Tight quarters removing a dirty floor pan possibly soiling a nice pretty seat.
Six cylinder and eight cylinder floor pans of course are different..
We all have our ways.
-
1
-
-
Study the old original e-brake cable and note routing.
Hopefully it is the original and routed as OE designed.
I myself have never removed the whole front floor pan which also requires removing all the carpet and front seat let alone another 20 plus bolts and throttle linkage. Anyway....
At the hand brake handle there are two bolts that position and clamp the end of the cable housing to the hand brake handle assembly.
There is aslo a clevis pin with a cotter pin to remove at the hand brake lever.
Next thing to remove is a double screwed aluminum clamp ring retaining the rubber grommet and cable located at the upper drivers side of the firewall.
Then remove the E- brake cable clamp bolt at the lower steering column.
The e-brake cable is routed between the engine rear cross member and bell housing cover...stays close to the drivers side lower rubber engine mount.
Just rear of this cross member there is a cable end retaining clamp located on the transmission side cover...remove the bolt and nut...pull cable end out of this retaining clamp.
Under the car at the rear of the transmission remove the e-brake return spring, cable yoke clevis pin, also remove two nuts retaining the cable end "U" yoke....remove said yoke.
Remove cable assembly from car noting proper original routing.
Install the new cable in reverse order.
Adjust cable down at transmission brake band for proper e-brake operation.
A fun little project..not too difficult...a little tight up by the handle brake.?
-
1
-
-
Merle showed a oxy/acetylene torch heating up the remnants of a spark plug being removed here a few years back.
Bamfords D24 Dodge.
Broken off plugs are common on flatheads as they rust thin in the sunken head wells.
-
I heat the broken off threaded and lower shell part red hot with a oxy/acet torch.... then melt a little candle wax on it.
I remove them with a shortened easy out. They will come right out.
Try to keep the valves down.
-
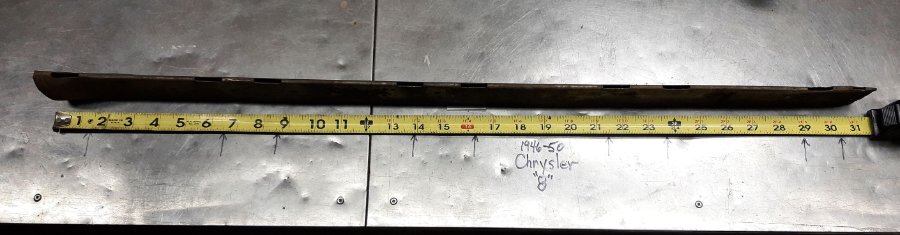
Here is a picture of a tube out of a 1946-50 eight with mrasurements to the center line of each cooling slot...the arrows point to each exact measurement center line.
-
I could go out and take a picture of mine...but I am positve the screws are right behind the arm rest flap door....possibly hidden under the folded/glued over upholstry trimmings.
-
On that spacer block...the wider portions of the oval face each end of the axle shafts that go through the axle shaft gears.
Reason being so it leaves room to shim the axles in/out for end play adjustments.
-
On my 1948 C39 T&C ...under the arm rest door there are two slotted round head screws attaching the arm rest to the door.
The two screws are there.
-
Colder parts of the country used two stapled together asbestos choke base gaskets to promote longer choke plate opening.
Standard moderate climate areas was one gasket.
-
1
-
-
Tomorrow I can post a picture of an original factory water tube if you like?
-
Your truck has a 1-1/2" M/cyl. bore.
It looks pretty ugly.
I doubt it you can safely hone the deep pitting in it.
I say sleeve it if new is not available...especially on a heavy truck.
-
1
-
'53 B-4TA-190 Fire Engine
in Mopar Flathead Truck Forum
Posted
The seal shown is the only seal...
There is only an extremly strong bottoming/over travel diaphram spring behind the snap ring and washer in the barrel part...