

Adam H P15 D30
-
Posts
1,298 -
Joined
-
Last visited
-
Days Won
14
Content Type
Links Directory
Profiles
Articles
Forums
Downloads
Store
Gallery
Blogs
Events
Classifieds
Posts posted by Adam H P15 D30
-
-
I use undercoating inside the fenders only to prevent rock damage visible on the shiny side, applied over paint. Floor pans get painted with enamel with no undercoating.
Sound deadener gets installed inside only after painting the metal.
-
 1
1
-
-
FYI, I've had 6v horns on 12v in 2 of my hotrods for years. No problem and nice and loud!
-
Pretty sure these are the same size a early HEMI blocks. Hot Heads and others sell screw in core plugs for the issues I mentioned early in this thread. Easily installed in the car.
-
A Runtz resistor for your fuel gauge.
Forget about the radio, you're also changing polarity. Disconnect it
Wiper motor is probably vacuum operated
Horns don't care
Replace horn and starter relays.
Starter doesn't care.
Clock (if you have one) doesn't care.
I used a mid 60s Dart heater blower motor (12v).
Change out headlamps and light bulbs to their 12v equivalent.
Swap your ammeter wires around since you're changing to negative ground. If you are running more than a 50a alternator, bypass the ammeter.
Make sure you're wiring is in good shape or replace it!!
-
Can't help you with the seat belts as I only have lap belts front and back but I wanted to say that is a nice, clean looking interior.
-
8 hours ago, D35 Torpedo said:
Has anyone ever tested or verified that ice will push the plug out when you jb weld them? Seems excessive. I use the smallest amount of the right stuff just for insurance, incase there is a flaw.
Ice will crack your block long before any core plug will pop out. They are there to remove casting sand, any other function is a myth.
-
2
-
-
I clean and JB weld my core plugs in, mostly on Hemi engines that have a history of blowing them out on hard use. They use the same plugs as our flatheads and still come out when replacing.
-
2
-
-
May be at an extreme angle when the body is put back on and the suspension compresses
-
Are the shock mounts welded upside down?
-
The specs will be different if you plan to run radials.
-
Cut that clip off and splice it on to an original frame if you must, it might also be too wide... Frame swaps almost always end up looking like frame swaps.
-
Jack the front wheel off the ground and rock it top to bottom, up and down and look for movement in the kingpin area. Might as well check your tie rod ends while you're at it.
Your smart phone should have an angle meter on it, check camber degrees with it before jacking the car up.
-
I would check your kingpin / bushings on the side that's wearing before anything else.
Could also be a bent spindle
Probably not toe because it's only 1 side.
EDIT: Check wheel bearings also
-
22 hours ago, harmony said:
I don't want to get to specific since my old girl is a 48 and there are probably differences in our cars as far as those seals back there. However this is a precautionary procedure you should keep in mind. I have a tendency to be a bit wordy, so please bear with me.
I got lucky and my eye caught something that prevented a "re-do" of the inner seal that is mounted in the differential.
The seal on my car is quite wide across and so I took extra precautions not to damage it as I was installing it. I went to the local hardware store and bought a PVC plumbing fitting that was very very close ( just under) to the outer diameter of the seal. This way, when I was tapping it in, all the pressure was put on the outer edge. I was patting myself on the back at how well I executed that process, when my eye caught something shinny inside the opening of the seal. That made no sense to me since when the old seal was removed it came out in one piece and the open is so big, due to the outer diameter of the seal it was easy to look in there and I was sure nothing was in there. My first thought was a broken piece of one of the splines on the end of the axle. Which was a bit of a stretch, but what else could it be???
Well, with a flashlight I soon discovered that it was the circular spring they put on the inner lip of the seal that had popped out. As the age old saying goes, they just don't make them like they used to. These seals are super expensive for us Canucks so rather than order another seal and wait 4 months for it, (covid times) I managed to get the spring back in place. No easy task with fat aging fingers. It did not want to go back in the groove on the inside of the seal. Plus you can't see it so it's all by feel and not enough room for a finger from both hands. I ended up using one finger on my left hand and a curved dental pick in my right hand and finally after about 30 minutes, I got it back in the groove. I used Red and Tacky grease to help keep it in place, until the axle was carefully slid back in.
On the other opposite seal, before installing, I used several strips of electrical tape to hold the spring in place while I was tapping it in. That worked great. Then after carefully removing the tape, I rubbed Red and Tacky grease around the spring to make sure it didn't pop out while once again carefully sliding in the axle. If you examine the seal you'll see that the lip on the groove that holds that spring in place is really small. "Chinese manufacturers code,,, lets cheap out as much as possible"
Btw, just as a handy tip. As an alternative to electrical tape, I have recently discovered "hockey sock tape" to be awesome tape. Not to be confused with hockey "stick" tape. The sock tape sticks to anything, as the word indicates even when it gets wet with snow and ice. Plus it's really pliable, much more pliable and stretchy than electrical tape. Almost feels a bit like rubber in a way. It's clear, and a bit wider that electrical tape.
I always pack the seals with grease to keep the springs from falling out.
-
1
-
-
Yes, just use less hardener when the outside temp goes up.
Did you finish weld that panel before adding Bondo?
-
20 hours ago, Sam Buchanan said:
I recently replaced the switch due to leakage. But I don't like the new one, erratic and requires too much pressure to activate. I'm going with a mechanical switch so I can set how much pedal travel turns on the brake lights. I want the lights to go on with very little pedal travel. This will require fabricating a bracket under the floor but should be worth the effort. I'll replace the present switch with a pipe plug so leaks won't reoccur.
To address the original question, I didn't need to bleed the brakes after replacing the switch. I had the switch ready to go and quickly swapped out the switches with very little loss of fluid.
There's a low pressure switch available for this exact reason.
-
Oh and I used the 5 pin on one of my old builds with a boost switch. Worked great at retarding the timing over 10lbs of boost.
Also works well when connected to Nitrous. Great little module!
-
Make sure to read carefully, the HEI module will fire when the points close instead of opening. This will cause to rotor to be out of phase with the cap. I tried this once and built a little inverter inside my (now unused) voltage regulator.
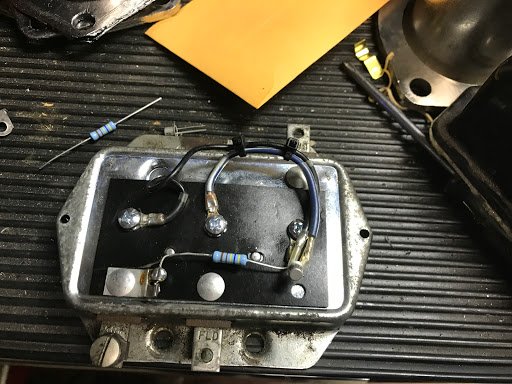
It worked but in the end it was easier to convert a slant 6 distributor and much less complicated.
-
Vintage door knob... Why not?

-
1
-
-
5 hours ago, Bob Ritter said:
Wouldn't it be a lot easier to use electronix ignition in your own distributor, that way you can stay with the six volt system. I understand that when you make these changes you need a hotter coil. I would guess that you need to up grade the plugs to a hotter burning spark plug. I think the cost for the
electronix package which includes the coil runs about $130.00.
If you mean Pertronix, definitely not nearly as reliable as a \6 conversion. Combine the \6 conversion with a GM HEI module and you're pretty much bullet proof. Can't say the same about Pertronix.
-
-
One question: Why risk it? Manual transmission lube is readily available and I too saw a shifting improvement with the MTL fluid. If GL-5 was the ONLY oil available then I understand but that's not the case.
Put the right stuff in and forget about it for 5 years...
Modern transmissions don't have yellow metal in them and most don't use gear oil anyway.
-
Here is one link for a GM 6. http://devestechnet.com/Home/HEIInstall
Here is another link on the slant 6 forums https://www.slantsix.org/forum/viewtopic.php?f=28&t=15779
the slant 6 forum link is the most in depth
-
1
-
-
Just ask for a 1975 GM full size car module. It will be a 4 pin, you can see it on my firewall under the hood hinge here
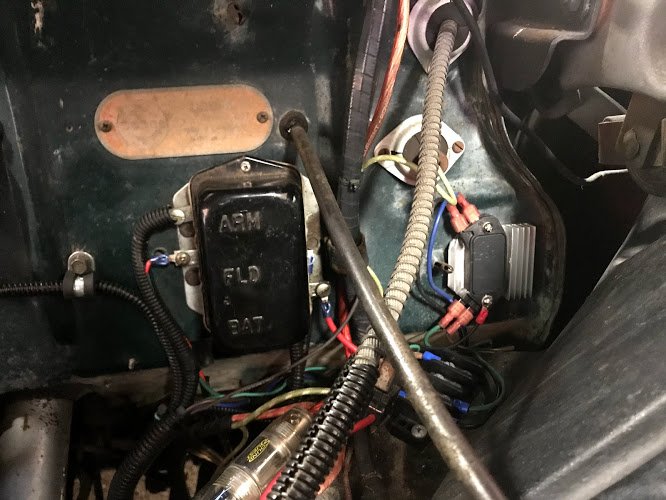
You need a heatsink, I used a spare I had from a 97 LT-1 swap. The module can require 10+ amps so a small battery wouldn't last long. 12v conversion is a must.
-OR- convert a slant 6 POINT distributor and keep the points with 6v.
I don't like the MOPAR units as they still need that troublesome ballast resistor
I use my supply of Pertronix coils I save from the failed units I throw away. Or use an early 80's Mopar Lean Burn coil. Some canister coils don't like 12v running to them all the time. You can also change to an e-coil and increase your plug gap to .055 or so if you wish, I don't see the need and I don't like the look.
You MUST change to resistor plugs and wires
Been running it for several thousand miles now with zero issues.
-
1
-
Rear Differential Oil?
in P15-D24 Forum
Posted
Save the gl1 for the transmission and just use a modern gl5 90wt oil for the rear.