


jmooner3
-
Posts
272 -
Joined
-
Last visited
-
Days Won
4
Content Type
Links Directory
Profiles
Articles
Forums
Downloads
Store
Gallery
Blogs
Events
Classifieds
Everything posted by jmooner3
-
Awesome story! I love that your boy is into it too! My Jake is the funny looking gear shift in the 49! He's 17 now and I'm looking forward not only to my first drive in old blue but his too...Perhaps I've planted the seed of tinkering in him as well... Thanks for sharing the story. Cheers, Jayson

-
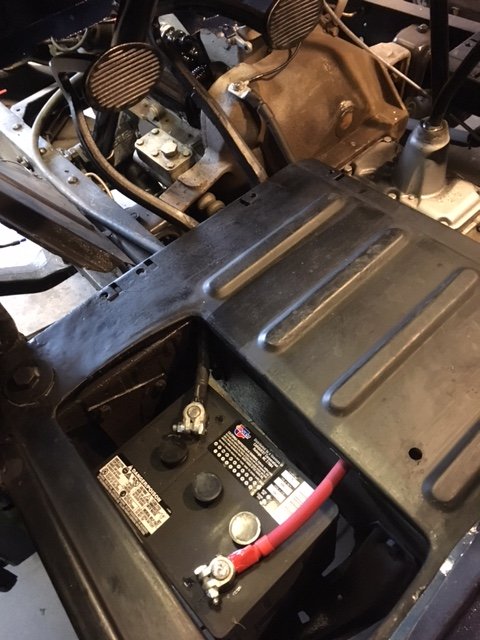
Battery Disconnect installed: Hey folks, I had searched the forum and found some good info prior to wiring mine - Wanted to provide some info in case anyone is looking to do a battery disconnect install. I renewed my battery cables with 2-0 wire because I'm still running 6v +ground and with big current better conductor is...well just better. To add the battery disconnect you can use your original cables if you want or swap both as I did. You will also need a third cable. I used 2-0 welding type cable for all cables had quality battery connects and 3/8 eyelets crimped on to all. I used a Cole Hersee 2484 switch (bought it off amazon with free shipping for ~$20). Also got the switch plate (was extra) certainly don't need it...it's your truck and you'll know what on and off is ;-). One unexpected benefit has been as I make different connections under the dash post rewire, I can flip the switch and take a wrench or screwdriver under dash without risk of arcs and sparks! There's a bunch of ways to do this and plenty of locations for batt switch to reside, I chose side of seat as it's easily accessible when in the truck and out. Anyway what you need to complete the install like this... Cole Hersee 2484 switch, 43" cable with 3/8 eyes at both ends to rout the way I did, use your cables or make new ones. Punch a 3/4 hole in the side of seat base and two down through the floor. I used two 1/2'ID grommets for where the wires go through floor and 1/2" adelle retainers to secure cables to frame(added after the pictures). Good luck! J


-
For sure a great milestone! Thanks guys. And Mark it sure is a great feeling!!!! Tomorrow I've blocked off some time to get floors back in Ol Blue...
-
Another 1949 Dodge B1B breathes again! Been a long road to this point and plenty still to do but this truck got a complete frame off going over. Nothing perfect and never going to be a show truck but I've learned a ton from the guys here and a little knuckle busting of my own. So together we should celebrate this milestone - Thank you! I had some health issues this year and this project is where I poured my time to keep my mind off it. I went all-in in January. Put the cab back on, put an engine from my 50 parts truck in the 49, used the tranny that came with the 49 (was hooked to a desoto that was seized). Rigged up a radiator and hooked up a gas tank from an old lawnmower. I painted the dash and put gauges and switches back, rebuilt a new wire loom, and metered out all connections - so far so good. Wiper motor was shorting, pulled it and found it full of rust too. Pulled coils and brushes out, cleaned it all up, re soldered coils and that now works. I dropped marvel mystery oil in each cyl and worked it over a bit and found the starter stuck. .....Yesterday I pulled the starter apart cleaned out a pound of rust wire brushed it, cleaned up brushes and it worked ....so - judgement day. A little fiddling with distributor and a good dose of gas down the throat she sneezed that marvel right out, ther'll be no mosquitoes in my shop for a while. Still too much snow to even get out of my shop, so I put rear end up on jack stands to run it through the gears... ha no first gear due to an "obstruction".... Had to torch and bend the shift lever because it hit the dash and couldn't get to first gear ;-), Need to finish sandblasting floor so I can POR it and get it back in - need me a gas pedal again! Sitting atop my milk crate seat at the helm of my "pilothouse" was a pretty good day! Progress my friends! Just like I'm 8 again counting the minutes til I can get back in the sandbox....Can't wait to get another day playing with my truck. Cheers, J 49 Dodge first start.mp4
-
Freeze Plugs / Welch Plug Questions
jmooner3 replied to Jocko_51_B3B's topic in Mopar Flathead Truck Forum
Mine looked like mud and what looked like a rusted washer came out too. Makes sense that the sediment lands low and back. It's gotta be an improvement in flow and now question #6 was hotter if it was not getting the same flow. Good luck with it! keep us posted on progress... -
Freeze Plugs / Welch Plug Questions
jmooner3 replied to Jocko_51_B3B's topic in Mopar Flathead Truck Forum
Happy to help! I've had so many folks help me on this forum, I'm happy to pay it forward. When I pulled the freeze plugs outta mine I had sludge too. I did not dip the engine, I just gave it an in frame clean up - I wheeled the truck out into the yard, pulled the water pump and distribution tube, pulled the head and shoved my pressure washer in every orifice of that poor engine. There was a ton of junk pouring out. I'm certain that I did not get it anywhere near as clean as the caustic clean you are talking about but the pile of slime after I was done leads me to believe it's a hek of a lot better flowing than before I pulled the freeze plugs. I put a new water distribution tube in as mine was nearly rusted away. I think I got it from VPW. If anyone is thinking of doing the pressure washer dance - it/s not for the faint of heart and not a good thing to do inside your garage - there was stuff flying everywhere! Good luck. -
Thanks Merle! Makes sense now. I'm still chasing what appears to be a bad wiper motor. Thanks Gdad - Perhaps I have something shorted in the lead to the switch. It all worked on the bench and now when energized the breaker opens like an over current or short. Perhaps I pulled the strain relief and shorted something inside where the connection from switch to motor is. Going to have to pull it out to have a look.
-
Electric wiper question. I just rewired my truck, got gauges and spedo back in the dash - I had taken out the wiper motor, cleaned up the motor and all connections, rewired the leads and hooked up the switch. hooked up a negative lead to the switch at the "breaker" and hooked positive to a screw on the motor housing. The motor worked great on the bench, two position switch moves motor at low and high speed as expected. I installed in the truck and when I energize no movement, I hear the breaker click too... I'm scrutinizing my wiring now but am thinking I need to pull the wiper motor out and revisit it. I'm wondering if I crossed something up. When I stomped the starter it fired right up turned the engine over once or twice and then let the smoke out...starter seized up just buzzed and didn't move. I pulled it took it all apart and cleaned up everything inside, found no real shorts or bad brushes. I cleaned and put it back together and it works great on jumper cables, need to re-install and test in the truck. Incidentally, I saw some other posts where people we struggling with starter remove/replace. I ground slots in both bolt heads to start them in with a screwdriver and then used crows foot wrench made short work of it. There's no doghouse on yet, so probing leads- the headlight, tail light, and dimmer switch light leads seem to function properly key on/off & light switch cycles lights right. I'm having new battery cables made up in 2-0 because I found a local shop that would. So I've got jumpers powering the dash at the moment. . Just for gut check. When I bug light the back of the gauge cluster, I get power at both Amp connections and at both fuel gauge connections. should there be? I'll bring my DVM out there and see what I have for voltage. Was surprised to see power at both studs on the fuel gauge, with nothing hooked up to the blue wire that currently is swinging in the engine compartment waiting for me to finish the tank and get a sending unit.... If anyone has thoughts on the wiper motor please let me know... if you have a wiper switch you want to sell please PM me. I need the lever that goes on the switch for electric and the nut that holds the switch in the dash, I'm not yet convinced I don't need the whole switch. Any insight welcome!
-
Freeze Plugs / Welch Plug Questions
jmooner3 replied to Jocko_51_B3B's topic in Mopar Flathead Truck Forum
Hey all, had done all the freeze plugs on the block a while back when I freshened up this engine. But it wasn't til I moved this engine from my 50 parts truck to my 49 B1B that I had to pull the heat bulb outta the head. As y'all know sometimes you have to pop the welch plug above it an work it out from the inside as these suckers are fragile. I struggled to find a replacement plug in local shops here in Vermont. The 1-3/16 didn't show up anywhere in the Dodge listings the only one I found was outta stock... Just need to know what you're looking for! Turns out a 65 jeep uses this very size. So for very little money I bought a kit of 10. If any of our members needs a plug shoot me a note I'll send one to ya. Part number for the kit was 550-016. Cheers! -
Freeze Plugs / Welch Plug Questions
jmooner3 replied to Jocko_51_B3B's topic in Mopar Flathead Truck Forum
Yup and there is one in the head right above the temp gauge bulb. It's 1.18". -
Re-upholster your sun visor without sewing.
jmooner3 replied to B1B Keven's topic in Mopar Flathead Truck Forum
Awesome - Thanks Keven, good solution. -
Any chance that crock-a-doodle knows of a source for the visor material...? or has anyone found a way to refurb these things themselves? I'm a ways off from that even mattering. JB thanks for the great wire diag. That's the next to-do on my list just ordered the connectors, refurbed the two switches, the spedo and collected a bunch of wire. At some point in this build, I'll get back to the visors, it would be nice to get them looking sharp too. I found an old radio in my parts heap, gotta see if that works too, never had a tube radio before... Was ahead of its time, now they call it YOUTube and it's got moving pictures! Would you connect radio to the "GA" on key switch?
-
Good to know, I have both with my 49. The frames are both functional but visors are in pretty crispy shape, is there a source of replacement for the vinyl covering of the visor itself?
-
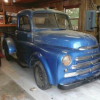
The originals were black with white lettering, there are some posts on here if you search where others have painted with black and laid in white paint into the embossed lettering. Their's looked better than original. Mine were all corroded and chalky, I was going to do the same, so I wire brushed and liked the brass look - so I hit them with clear. I may have a spare knob in my bin, I'll look when I'm back at the truck. PM me. Jay
-
Door Window Channel Retaining Clip
jmooner3 replied to WarriorDog's topic in Mopar Flathead Truck Forum
Awesome! Thanks for taking the time to provide the links. Jay -
Resurrecting this battery disconnect thread. Just looking to verify wiring plan. Did you put the switch in the ground path even if it's positive ground like our trucks? ie. take the positive lead from the battery to the switch and then from the switch to the trans mount that the battery went to originally.... And did our trucks originally have ground straps that connected frame to cab etc. I just painted my dash and am going to start wiring, I'm figuring there is little hope of a solid ground to gauges now that there is a new coat of paint between them. I made up new buckets for the three bulbs (gauges and speedo), does it make sense to run additional ground wires to the gauge bodies to complete a good circuit? Anyone find a good source of LED bulbs to refit our 6v rigs? I think the bulbs are GE 55. I will use the cole hersee switch too, I like the idea of having a way to kill the battery. Thanks for any insight! Jay
-
Door Window Channel Retaining Clip
jmooner3 replied to WarriorDog's topic in Mopar Flathead Truck Forum
Thanks Warrior, this picture is helpful. I don't have my doors painted yet but looks like I'll need runs and weatherstriping at least. I'll have to see when I'm back at the truck. The window is on the regulator and goes up and down but rattles around as there is no channel or track for the window to ride in. Could you post a picture of what the weather strip and track is supposed to look like? I have the vent windows in mine too but they are not in the door yet either. I'll have to dig through the box and compare to your post and see what parts I need... -
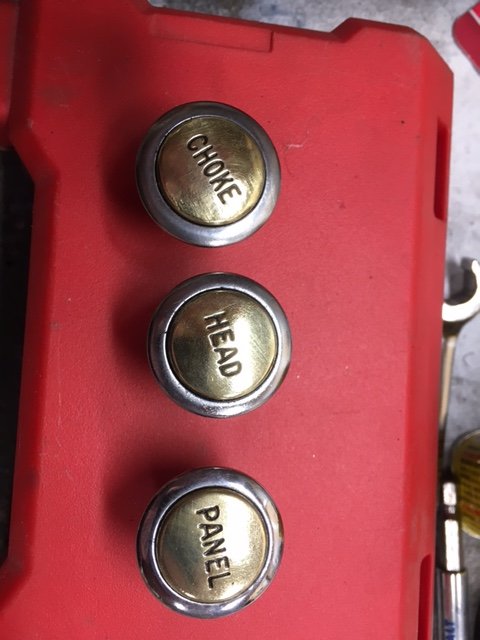
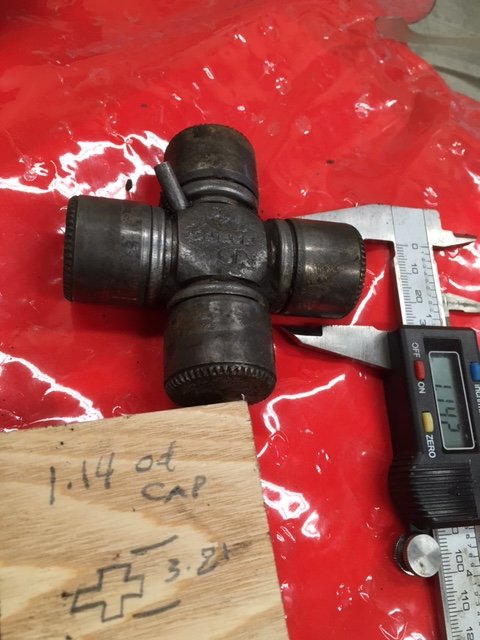
The keepers don't fit down over the cap like the originals and they push the caps tight on the cross. I flipped them and bolted 1. so the cap doesnt fall out and 2. so I don't lose those keepers if I do end up needing to go with the original. They fit pretty good, seems like it will work.. Merle, I did pop a couple of the Cclips in but not sure they really do anything as the end cap keepers will keep the caps in.
-
A local shop matched up the attached for <$20. It fits the drive shaft, but doesn't have the knurled ends on the caps so the locking plates for the clevelands don't recess like original. I just flipped them and everything appears to fit. Will mock it up in the truck tomorrow. We'll see if this is a viable option for our community of B1B owners... This Ujoint has a grease fitting on the cap so I just drilled out one of the retainers to fit over the zerk.

-
Thank you Merle for the info and Austin for helping me decipher, when I looked closer I did figure out Merle's chart. My local parts shop matched up another Ujoiint the caps are a little shorter but the overall dimensions are supposed to be same. Will try it when I can get back to the truck and let ya'll know the PN if it fits. Cheers, Jay
-
Thanks guys! Seems a pricey part no matter where it comes from (all > $80). I've got a couple parts places around here to check with too. Merle, do you have the OEM part number for the B1B in your book?
-
I found threads for larger trucks but can't find anything the 1/2 tonners. Anyone have part number fof source for or the Ujoint for the 1949 B1B? I have two that appear to be new in box that came with my parts truck stash, but there too big.
-
Thanks! Good to know. I may skip the boot and just search out some rubber matting. Would be simple to lay out and cut to fit before I put tranny back in. I'm guessing, the rubber mat basically becomes the boot to keep the dirt and stuff on the road side. Do ya'll have your floor mat fastened down or is it free wheeling. Pictures? Sources of rubber? Also I'm going to touch up the dash before I put gauges back in, I'm probably going to paint the outside blue again someday, but thinking I'd just hit the inside with black. I was thinking POR15 for the floors but I've heard there's issues with getting paint to stick to it. This is NOT a show truck, just thinking I should get everything inside one color before I move on... Looking for insight on paint for dash, doors, floors. Should I shoot it with a quality base clear or just a rattle can prime and paint? Will something like rustolium be durable enough? Jay..
-
Bummer! He was a wealth of knowledge and seemed like a real nice guy! Cheers to Dave! Does anyone have a picture of what the boots are supposed to look like? How about a source for the two boots for the B1B floor shift and ebrake through floor? Thanks, J
-
Resurrecting this old link, I found a few discussions about boots for floor shift and brake in a 49. But have never seen a pic to know what it should look like AND Dave, I'd love to know the source that you found for the boots. I too have a 49 B1B floor shift and ebrake. I got the truck with a desoto engine, Just got a 1950 Dodge 230 flattie in it's rightful place and I plan to put the little 3 speed trans that came with the truck in. It looks like it'll mate up but the stick is straight and it is a little farther back than the hole originally in the floor tin was. maybe a car trans with that desoto?...The previous owner elongated the hole for the ebrake (moving it back) and hogged out the hole for the trans. Is there a floor tin that should fit what I got or should I get to fabing some steel back iinto the tin I have then pop some boots on?. 1. Source for floor boots please 2. pics or thoughts on trans and floor tin.If there is a trans tin piece that fits what I got I'd be interested in buying it along with the boots. Thanks, Jay

