


jmooner3
-
Posts
272 -
Joined
-
Last visited
-
Days Won
4
Content Type
Links Directory
Profiles
Articles
Forums
Downloads
Store
Gallery
Blogs
Events
Classifieds
Everything posted by jmooner3
-
Lots of good options here thx. My tank is pretty solid, I spent a day wire brushing every inch and then painted POR over the whole thing. I don't have any swiss cheese holes on this one, the leak on mine is just at the seam where the two halves come together. With the options listed of refurbing the one I have 300-600 or a brand new repop for under $300 having a hard time not pulling that trigger. I was considering one of the systems where you slosh around a cleaner, etch, then slosh some material that creates a membrane inside the tank. I thought I had read a post on that where someone tried that and was very unhappy with it, I can't seem to find it again though. I know folks that have used this type of system on motorcycle tanks with success... One of the posts I found talked about "Tanks Inc." I'm headed there to research next. all input welcome.
-
Update The Runaway heat issue appears to be behind us. JB's theory of head gasket failure leading to gasses jumping cylinders leading to runaway - seems accurate judging by the poor condition of the head gasket. So its got a new head gasket and head torqued and re torqued a few times after heat cycle. My son helped me to put the hood back on yesterday and I took OlBlue out for a cruise, Tstat opened right on queue, engine ran cool and all is good. Truck has beautiful new radiator keeping it cool. I'm pulling in a radiator thread to keep my chronology together. I did grab the manifold heat control with vice grips and turn it about a half turn clockwize as well. If not going to repair back to stock, I think I understand this to be the position we want to run them in(Full clockwise) -right? Next is the bed wood and Gotta drop the fuel tank and seal that up, it's leaking at the aft section by the seam, I was thinking I'd use one of those products that you prep the tank and pour in to create a membrane inside...anyone have a favorite tank restoration product? IT's that or run a half tank=full ? Thanks, Jayson
-
Sure is... Thanks
-
JB that info is great, nice to see greybeard's words continuing to educate! Net I got was this feature was innovative to resolve an icing issue and is generally not needed. If I can turn clockwise and leave it I will. I believe my overheat issue is a result of headgasket failure. as yall suggested exhaust jumping between cylinders and leading to a runaway issue. I've replaced head gasket, torqued and retorqued and it appears to be controlling heat. Like I said I am running the engine with rad cap off and I do see steam (or exhaust) exiting the fill neck of the rad, no bubbles noted. I need to get one of the exhaust test kits to put my mind at ease and theory to rest. I just posted a radiator solution on the forum. I found SUPERIOR RADIATORS from Mt. Clemens Michigan. www.superiorradiator.com, 586-463-8722. Charlie was great to deal with.
-
My truck had a period correct radiator but was from a desoto car I think, welded a bracket to fit but overall it was wrong for our trucks. It sprung a leak and I started looking for a replacement. That is where I found SUPERIOR RADIATORS from Mt. Clemens Michigan. http://www.wwwsuperiorradiator.com , 586-463-8722. I spoke to Charlie about our trucks he had a drop in radiator $380. he tweaked a couple designs and came up with a nice fit for my truck. These are tig welded aluminum radiators, thing looks beautiful in the truck. Charlie was great to work with and I've got the radiator in the truck. I don't yet have the shroud on or hood back on to verify final fit, but it mounted right up to our rad support. If you're looking for a radiator for a b series truck, I suggest you give Charlie a shot...


-
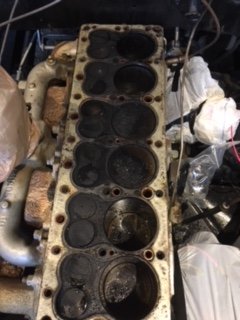
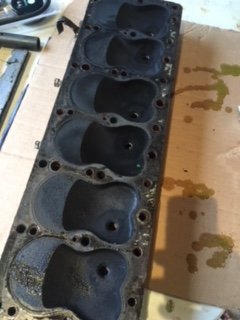
Great info! Thanks! This engine is clean as a whistle internaly I flushed it all and got a fresh water dist tube in behind waterpump. What are you guys using to reinstall freeze plugs? I had used permetex red previously and it held up fine, a mechanic friend told me to use Indian head, which I did this time and I now have two leaking post reassemble...least of my worries now, they are just seeping a bit so I'll continue to chase the overheat and fix those when I drain block next. Manifold: JB thanks for the info - I need to look into the manifold heat control when I get back to the truck, this engine has no external signs of having that control. There is a stud there where It's supposed to be (2 actually)? see pic. Does that mean that it's there and I'm missing some parts? I see the slotted post where spring is supposed to be, but there are no other parts in any the bins/buckets that I got with this one, anyone have extra parts to sell? Is there a safe way to orientate this valve and run the engine? Head Gasket - So I had the head machined flat but the block stayed put. I mated up a new felpro gasket (Dry as recommended by manufacturer) put my newly flatened head on and torqued, reassembled engine, started and it overheated pretty quickly. I re-torqued with hot engine and restarted heard the Tstat open and it's rock steady at 160. It was pretty cold out that day, and I ran it with no rad cap on. I noticed steam or what could be exhaust (if head gasket was compromised) coming out of rad top. IF the runaway condition was happening again -exh between cylinders could there be exhaust actually showing out rad top? Engine/Valves: Valve seats look OK and engine compression - all six were between 90-110psi. I cleaned up the top of block (pic). Top of valves were a little discolored but not terribly pitted. Piston tops cleaned up ok too. Figured I'd run it torque head after a couple heat cycles and then check compression again.


-
Thanks for the quick responses! Couple votes for exhaust migrating in the head... The gasket was discolored between each cyl, so exhaust could have been migrating as you suggest. The machine shop said the head was warped pretty bad, so the leaks probably got worse as it overheated and made the problem worse. The coolant was brand new a month ago it's still pretty green and does not stink. The engine ran ok when I first got the truck back on the road and then over time progressively got worse overheating after 1/2 hour then after 10 min then after 5... so it's plausible that the exhaust leaks in the head gasket were the major downfall. A couple mentions of pitting on cyl 1 and valves, what shows in that pic is a lot of carbon, it was loaded with it -pistons, valves and the head was full. Plugs were filthy as well. I plan to clean up the top of engine and reinstall head, I will pop in a current pic of the top of engine when clean for you to weigh in on, if you still think pitting. There are many schools of thought on installing gasket. The felpro head gasket that I got says to install dry as it's intended to seal itself. I have copper spray and was considering hitting the block side of the gasket as I did not machine the block just the head. so gasket side against the newly milled head I was going to leave dry.... I'm curious what the manifold heat control is? as for the draft tube, I had it off a while back, painted it and reinstalled it was clean then, I'll check it though, the mice around here seem to find all the most inconvenient places to winter. And is did see flow in the top of radiator when running ode to the water pump but no latent bubbles noted. Once I have it all back together I'll check timing and dwell where should those be set? Thank you all! J
-
Nice looking truck, welcome to the forum! I sent you a PM with my number if you find yourself over in Essex. Forum friend - I have not yet figured out my overheat, have researched a bunch on the forum and several members have mentioned timing and dwell as possible culprits. That's where I think I have to go next. I have ruled out water pump(new) - still hot, ruled out Tstat (ran without out and put a new one in) still hot, new radiator still hot, and I pulled the head, water dist tube, and all freeze plugs again as well as pressure washed every orifice I could gt into (motor still in truck) so didn't get back freeze plug. I also pressure washed in the head passage ways and then took the head to the machine shop for a clean and decking...it was warped and had a ding between cyl 5 and 6. they took it down .015 .. so I've got to get it all put back together again, get it running and set up timing. where to set the timing? For those that have found timing to be cause of overheating any tips welcome. The engine ran like a sewing machine but the plugs, head and cylinder tops were covered with carbon. For you engine whisperers, I imagine that's telling me something - opinions welcome. Thanks, Jayson
-
Thanks JB! And thanks to the Moose for the initial partnumber and relief cut idea. I too searched the forum, scoured the web and came up empty. Hopefully the next folks lookig for the dust caps can find this helpful repost. I love this forum! " NAPA P/N 730-2409 & put a couple of relief cuts in them "
-
Does anyone have a part number or source for the bearing covers (dust caps) for the front wheel bearings on a B1B. I thought I had seen something on the forum about trailer caps that fit but I cannot find. thx.
-
I'm working on the over heating issue at the moment. It's either Radiator or Block (water dist tube) Will know next Friday when new radiator arrives...
-
Just wanted to put this thread in here as it really should have been at the beginning.... To keep the story straight ?
-
Latest update - I posted in an overhat thread but thought I should post here the milestone of achieving taking my truck the the destination I targeted a couple years ago. I headed out to the NSRA show Saturday and Ol blue boiled over half way there..... I'm not finished but I got it running on time to get it to this show at the local fairgrounds where there were a ton of really cool old cars and trucks. So, half way meant decision - home to work on it or short stints with a wait....I drove a little, boiled a bit and waited a couple times but limped it into the show. It was on my bucket list and is a milestone in the life of ol Blue. My son Jake and I started the project when he was around 10....he's 19 now and we still had a ball limping to and from the show... So we made it to the show, met some nice folks, and from our multiple tours around the fairgrounds...appeared that ol Blue was the only Pilot house - representing our rigs ? ... Proud moment to have so many people looking at my truck and commenting on how cool it was that it was all original +ground and flathead mostly still getting it done. Once I get the overheat figured out I'll certainly get back on the road.

-
I'm not certain that it's waterpump or tstat but they look original, the waterpump did flow water but I'm not sure what amount it should flow and the Tstat appears to be stuck open when I pulled it, I left it in as my thinking was open is good... Tod I did flush the block when I first got it, removed , poked and replaced all freeze plugs etc. however I don't remember pulling the water dist tube on this one. Honestly I just got the fresh painted sheet metal all back on, and the wiring finished across the headlights. The waterpump and Tstat are the easy first try (<$50 from rock auto) without having to dismantle much. If no go then I will pull the doghouse again, pull the pump, dist tube and all plugs again and flush it good.
-
Who knows where these brackets go ? someone knows...
jmooner3 replied to thrashfit's topic in Mopar Flathead Truck Forum
It might have been bolted to the frame, I don't remember, I can check when home. -
Who knows where these brackets go ? someone knows...
jmooner3 replied to thrashfit's topic in Mopar Flathead Truck Forum
The flat stock bent like a z looks like the brackets from the frame to the bottom back hole of the fender - bolt goes through fender, lower box metal, and this bracket. the end with two holes rivets to frame at rear on each side. Not sure about the others. J -
Thanks guys, so the update is that it's really overheating now, I headed out to the car NSRA show Saturday and boiled over half way there..... I'm not finished but I got it running on time to get it to this show at the local fairgrounds where there were a ton of really cool old cars and trucks. So, half way meant decision - home to work on it or short stints with a wait....I drove a little, boiled a bit and waited a couple times but limped it into the show. It was on my bucket list and is a milestone in the life of ol Blue. My son Jake and I started the project when he was around 10....he's 19 now and we still had a ball limping to and from the show... I've got a waterpump on order from Rock auto... So we made it to the show, met some nice folks, and from our multiple tours around the fairgrounds...appeared that ol Blue was the only Pilot house - representing our rigs ? ... Proud moment to have so many people looking at my truck and commenting on how cool it was that it was all original +ground and flathead mostly still getting it done. Once I get the overheat figured out I'll certainly get back on the road.
-
Thanks for the votes of confidence guys!. I'll get some inside pics, Seat and dash are refurbed, still need to do the roof insert and door cards. Merle thanks for the info, the trans shifts well just not a lot of top end, so the rear end might be the right way to go for me. What is the ratio of the original rear axle? I have the stainless strips from DCM and bought the hardware from ACE hardware here in VT, I had some red oak trees cut in my yard and had a portable sawmill come here and cut into boards. I just need to make the time to plane them and mill to size. But in keeping with this project theme - do all I can myself.... to me it's kinda cool that the wood grew on my land and now I'll make it part of this project.
-
Thanks for the Trans pick, mine is same housing with different lever. I also have a trans that was 3 on the tree, I wonder if that has any taller gears? I can swap the shift lever on that and make it a floor shift as I don't have the 50 firewall or Ebrake setup for the column shift. But the trans works, it'd just need to be a floor shift. As for the paint, I used 2 stage base /clear. Painted it outside and it came out pretty good. I had a couple bugs land in the clear, butI had laid it on pretty thick so plenty to wet sand and then buff.... not hard at all and to be honest that was what this truck was all about to me. I had never welded before, I welded the frame, many panels, fenders etc. I got better as I went. and my truck is all steel all original. I had never taken a head off or done much more than change the oil but I got the engine running and pulled it from one truck to install in this one then got it running again, I certainly had never painted anything, I bought the lower end starting line spray guns from speedway and gave it a rip.... I did everything on the truck sometimes more than once:-) including upholstery, Using Utube or our shop manuals, figured out a bunch of stuff - my rig is FAR from perfect but I like it and that gave me a pretty cool sense of accomplishment. My point I guess is this truck gave me the opportunity to explore some things that I've found really interest me. I think one of the biggest things I try and teach my kids and have lived is ya just can't be afraid to try or to fail, but be sure and try again. My vote is for you to do the two stage paint and have a ball with it!
-
Hey Guys, I'm chasing an overheating symptom. It's a 1950 230ci with external bypass. I've just started driving the truck, first couple of trips temp gauge hung around 180 degrees, was 90 outside but truck ran good. Now it's cooler out but dash gauge reads hot ~200 and up to 212 when I shut it down. Could junk have moved around and partially plugged thermostat...? ( I had pulled all freeze plugs, and water dist tube on this motor and purged tons of junk. I dumped the rad and ran water but never really flushed it as I was afraid to cause a leak. Radiator seems to burp a bit of anti freeze each time, down overflow tube - indication of something? I filled Rad to top and ran truck to see if I could see flow from the water pump, cannot see if there is flow at top fill port. Top hose is hot to the touch bottom hose is cooler. Does that indicate the the thermostat is working properly, rad is not plugged, and the water pump is working correctly? How does system work though Tstat> Does water flow into top of rad from block and out bottom of rad back into block? I used my laser temp gauge to hit all parts of the motor a couple of different times. Net is exhaust side of block is 300+ head just above is 170deg, fitting where bulb end of temp gauge is 160, all areas on head 160, block 165, top of rad 156, bottom of rad 70 antifreeze in top of rad 155. Seems the engine is actually controlling as it should? The dash gauge climbing through the roof just has me nervous. I'm trying to convince myself that the engine is running at 160 but feel like I'm missing something...anyone have a gauge run away like this? Are these gauges adjustable or able to calibrate? Any thoughts or suggestions? Best way to determine if water pump is working to verify rad has proper flow to verify thermostat working and enough flow The rad seems period correct, but it didn't bolt right in, I had to weld up a bracket - I think it's from a desoto car. the lip where the cap attaches has an overflow tube above the sealing surface, seems it should have a pressurized cap...should our engines run pressurized or not? and if so what psi? Idea why rad burps each time, maybe I have rad too full? All info welcome! thanks, J
-
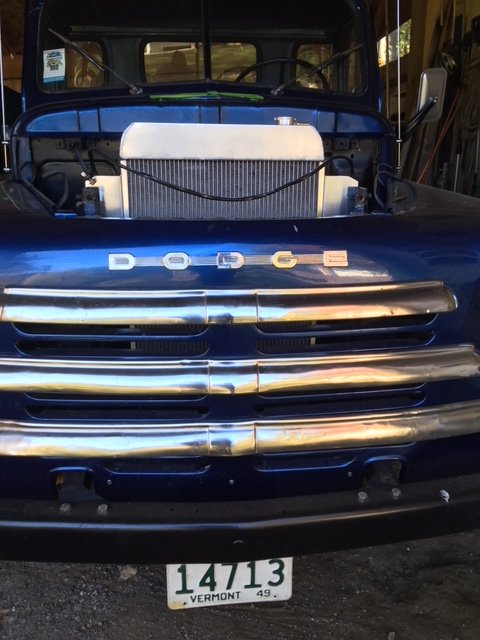
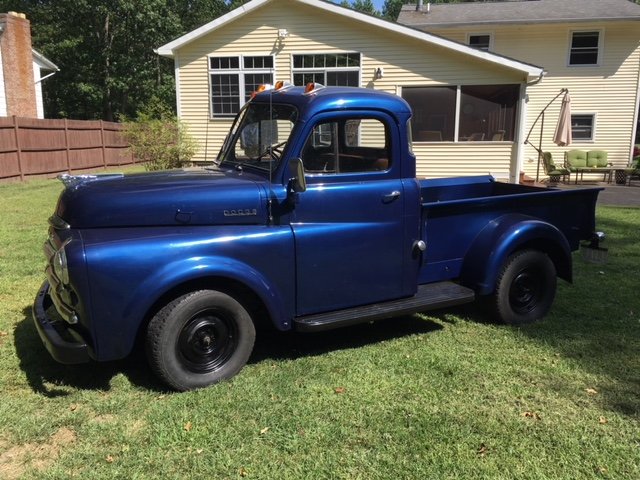
Nearly 70 years after coming off the production line she's running the roads of a little new England town again. I am at another key point in this journey, I got the truck registered, insured, and inspected because that's all the rules to extract $ from me and legally put a vehicle on the road here in Vermont..... Ol Blue has all the parts to make it a real truck, assembled mostly where they go, painted up to match, and all the lights work as they did from the factory. Still some work to do (headliner, bed slats, right running boards) but it's a running driving B1B and I'm having a ball driving it around town. I have to go back and check the forum, I remember someone talking about transmissions and taller gears. I have a 230 flathead from a 1950 B1D mated to the 3 speed on the floor (reverse is where normal 1st gear would be), top speed is about 40. The trans I believe is from a Desoto car as the engine I got with this truck was a desoto. The trans I have does not have the long bent shift lever that I see in some of your trucks. Anyone have an idea of a trans I should mate up to this powerplant to give me a little more drive ability? Anyway wanted to update yall and share a pic. Hey by the way there is a National Street Rod Association (NSRA) car show here in Essex Vermont next weekend, ther'll be a lot of our vintage rigs mostly chevy and ford but an occasional Dodge and Ol Blue will ramble in and make her first appearance....any chance any of you are bringing your trucks? PM me if you do! Cheers Jay


-
Glad you made it home safe! Thanks for looking. Has anyone taken the longer running boards and cut them down to the 64" size? J
-
Safe travels to all! I saw pics of the BBQ, looked like a beautiful day! Sleet sideways here in VT and everything is coated in an inch of ice...I'm ready for summer!
-
I came up with some interesting info referencing running boards. I had bought a set of what I thought was the right stuff for my 108 wheelbase as I made a rookie mistake and bought the shorter of the two that I found thinking my 108 would be the short ones compared to my 126 B2D parts truck... I was wrong. I got a set of 60" boards straightened and cleaned up, extracted 4 busted bolts and chased all the threads, POR and then POR top coat, installed on the truck and then started fitting the bed.... As many of you already saw the punch line comming - ... the space between the front fender and the back fender is about 64 inches! If I can find a god set of 64" boards I will be posting the 60's on our classifieds . If not I'll be building a 4 inch spacer ;-) Anyone know of a source for the 64" boards? I added this link as it may help someone else sort out what they need before they head down the path I did. Just another subtle differences between the 50s and 40s trucks... Cheers. J
-
MoparNuts - I have a B1D 1950 full rolling chasis with just cab on it. All four wheels are good, brakes redone not too long ago. Was a driver just a couple years ago. It's my parts truck and I'm working on a 1/2 ton B1B so the 1 ton drums and 126 wheel base is not going to be used by me. I was planning to put the whole enchilada up for sale on our classifieds section when I'm done picking what I needed off it. PM me if you are interested in it. I'm not planning to part it out at this point I'd rather send the whole frame and running gear to a good home in tact. I'm in Vermont - 05452.

