

Bobacuda
-
Posts
651 -
Joined
-
Last visited
-
Days Won
16
Content Type
Links Directory
Profiles
Articles
Forums
Downloads
Store
Gallery
Blogs
Events
Classifieds
Everything posted by Bobacuda
-

Made another tool for my '67 Barracuda rebuild
Bobacuda replied to Bobacuda's topic in Off Topic (OT)
My brother is the wood worker...I am the wood butcher. He uses fine cut saws...I use chain saws. . The last time we worked together we built a pole barn. He cut each rafter on his side individually. I strapped all of mine together and made one cut with the chain saw - I thought he was going to kill me. Like I told him, "The hay and the cows will never know the difference." And that is why rolling cart is made of metal - less chance of it falling apart and landing on me. I am lucky enough to have a tractor with a front end loader, which is how I pick up heavy stuff now. -
ARGH! Tooljunkie - My most humble apologies, I meant to say '69 Sweptline, NOT '79 Sweptline… I also apologize to anyone and everyone that felt I was wasting their time and efforts. I make typos, but that was ridiculous. OK, I am sufficiently red-faced. Bob
-
The Sweptline trucks use I-beam with king pins, same as the Pilothouse trucks. I think I first read about this swap on a Sweptline forum. Anyhow, it was just a matter of disconnecting the brake line, the steering ends and then removing the king pin. This removed the spindle and the hub. I did this to both trucks, then I installed the Sweptline spindles with new king pins on my truck. Make sure you get spindles with the same diameter king pin - the first set I got were from a Sweptline model that was supposed to be a "gas miser," and the pins were smaller. The set that worked for me came off a full size, 1/2 ton '79 with a slant 6. After the spindles were installed, I put the brake backing plates back on and replaced the brake components. I ran all new brake lines, and I regret not using the original diameter lines. I used the size that the '79 and the '90 Dakota used. I have always wondered if this affects the amount of pressure I have to apply to stop the truck. Anyhow, I put new bearings and seals in the hubs and had the drums turned when putting it all back together. If the set you get has left hand lugs, this is a great time to change them out. Since I have a Dakota diff in my truck, I have eliminated the LH lugs. Its all hidden behind the hub cap, so no one ever sees it. Fixed my bad hub problem, I now have brakes that are easy to get parts for and are easy to adjust.
-
The body is at the body shop, I have the drivetrain at my place. Trying to move the diff around reminded me that I did not want to work on it on the floor, so I got to looking at the tubing I had left over from the k-frame/engine/trans dolly and I thought, "Why not make one for the diff?" I tried to make it adjustable enough to use with other diffs, but it would require some additional "fabrication" to use on a diff that mounts under the springs. The bottom of the brake drum is 15" above the floor. The support under the input collar is a bit redundant on this diff, but I thought it might be necessary on others...and I had the scraps to build it with.
.thumb.JPG.47d6bbc52b7be301848e830160bbedcc.JPG)
-
Before I show the project, I should make it clear that the last time I welded anything was with a stick, "Lincoln tombstone" welder about 50 yrs ago (where does the time go...?). I have removed the B'cuda k-member (and the rear suspension) and I wanted some way to get the front suspension off the ground for rebuilding. The concept evolved into something strong enough to hold the engine and trans so it can be rolled underneath and the k-member (along with the engine and trans) mounted to the car, rather than lowering it into the car. So, I found some other people's projects online and came up with mine. Contrary to the other designs, mine has 4 wheels (rather than 3) since I tend to dump anything with 3 wheels on its side (specifically my 53 truck's engine first time I pulled it). I got a Hobart 140 as a retirement gift, so I added another $300 and upgraded to a Hobart 190 at the time. This is the first time I have used it in almost 2 years. And, I proved I can still make some welds look like cat poop on a flat rock, some that just look like poop, and some good ones. By the time I finished, they were all looking good. Time to order suspension parts and get busy.

-
I put a 1990 Dakota full diff (8.25) under my 1953 B4B. I had to cut off the old spring hangers and weld new ones (from Northern Tool) on the top in the appropriate places. The u-joint was the same. I tried to use the Dakota e-brake, but my 53's factory lever could not get enough "mechanical advantage" to make it work. I removed all of the e-brake hardware and fine-tuned my original e-brake. Modern brakes, easy to find parts for, no LH lugs. I also put the front spindles (I had a bad spindle and hub) and brakes from a 1979 Sweptline. Nice, new brakes with easily available parts and I eliminated the LH lugs as part of the process. My only complaint is I ran the smaller diameter brake lines from the MC to the wheels - I think I should have used the large size line and downsized at the wheels. However, it all works fine. No complaints, so far.
-
Almost as much fun as replacing the water distribution tube. I had to put lots of PB Blaster on mine, but one refused to move. Following another person's advice, I used a hydraulic jack and a long block of wood with a plate of metal under the pin. Then I jacked it up to put lots of the truck's weight on the bottom of the pin and left it overnight. Applied heat the next day (while under pressure) and finally was able to tap it out. There are different length pins. Measure your old ones before destruction. I got mine from https://dcmclassics.com/15-Door-parts-and-accessories
-
Water in oil (condensation) in my 251 engine
Bobacuda replied to Fernando Mendes's topic in Mopar Flathead Truck Forum
When our '51 Plymouth and our '50 Dodge engines had that, it was a bad head gasket. Dipstick looked like it had been stuck in an off-white milk shake. Is the radiator losing water? -
JB- Finding that B4B script is amazing. Getting that piece of Unobtanium off the dash without breaking it will be damn near magical.
-
I don't know about the older than 1953 Dodge straight axles, but when one of my front wheels spun a bearing and wiped out the hub and spindle, I was told I could use one from any of the Dodge I-Beams from the '50's up. I got a set from a '69 1/2 ton short-wide that was a "miser," lightweight 6 cyl - the kingpins were the wrong size. I went back and got a set from a '69, full size Sweptline with a slant 6 - fit great. I am using the spindles, hubs and drum brakes. It goes without saying to use the wheel bearings and seals that fit the replacement spindles and hubs. So, from my experience, spindles (get the hubs and all the brake stuff, too) from the newer Dodge I-beams will work, just make sure that you have the correct King Pin size or a parts yard that will work with you if you get a set that won't fit..
-
Fritz Von Erich, aka "The Iron Claw"
-
1953 Dodge - What have I got into
Bobacuda replied to peteandvanessa's topic in Mopar Flathead Truck Forum
Wiring! Either make your own harnesses based on the old ones (about $250) or buy them from Rhode Island Wire (about $1000). Mine were crumbling apart and I built my own harnesses with color coded wires made for 6v. Every truck I've seen near the age of my '53 either had unsafe, crumbling original wiring, scabbed together patches of wire of various - or monochrome - colors run all over the place, or it was properly rewired. -
Interior looking nice. Did you sneak off and get your truck all back together and not tell us or show photos?
BTW, after losing about a year to back injuries (long, stupid stories), the 67 Barracuda is finally at the body shop. When I get photos of it blasted, I'll share.
Bob-

Hey Bob, what truck you looking at? ?
haven't worked on “George” for sometime now.... I Am working on the worlds longest build with that truck. (35 years and counting, lol)
Looking forward to the cuda photos. Just might be what I need to get back on track with George.
-
-
I ran my truck's 6V starter on 8V for about 15 years - no problems and it sure helped with starting.
-
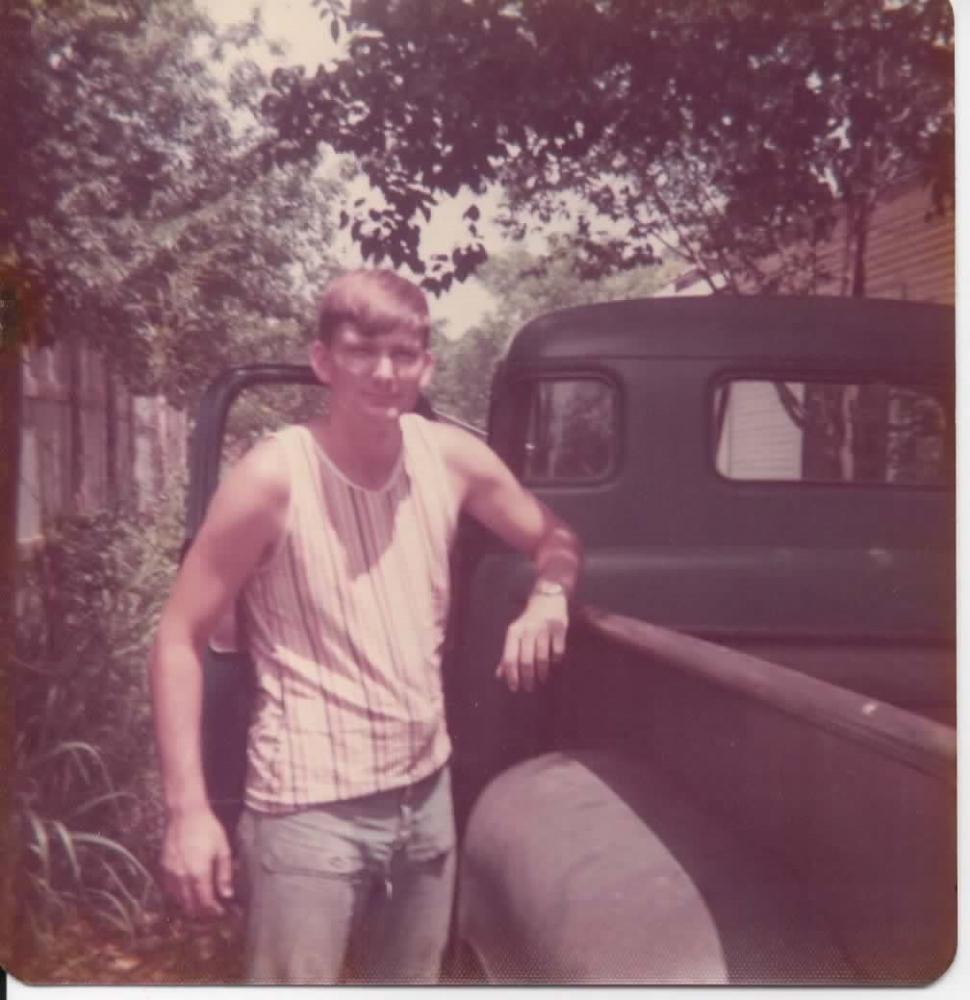
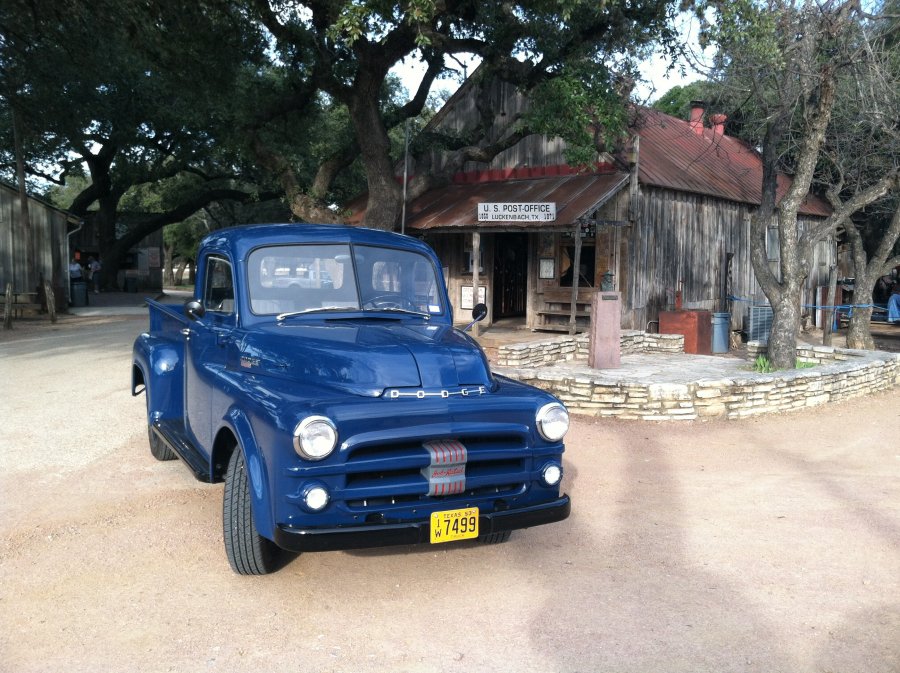
Michael - I have restored a B4B, long wheel base with Fluid Drive. Take LOTS of photos and expect frustration on a regular basis. When you rewire it, make the wires behind the dash longer than original - it will make your life MUCH easier when you put it back together or have to change a light bulb (I wish someone had warned me to do that). If you get stuck on something, I might have a photo that will help. Oh, and if you have the one year only plastic Dodge emblem from the dash (Brent's photo), be darn careful with it and not club-fisted like me. The little metal clips on the mounting prongs work great for breaking off the prongs, and clumsy fingers are great for breaking the script. On top of that, it isn't really made of plastic, its made from pure Unobtanium. Brent's photo is the one from my truck that I kinda broke twice, glued back together, painted the back white and got mounted in my truck. Photo is my truck at Luckenbach, TX. Good luck working on your "Time Machine." Bob
-
Great car man. Saved Ford and Chrysler. Too bad he wasn't young enough to save Chrysler from Daimler and the politicians that gave it to Fiat.
-
Tex Smith's book has an excellent section on relocating the front shocks. Lots of other stuff and a great read as well. https://www.amazon.com/Build-Chrysler-Plymouth-Dodge-Rods/dp/1878772171
-
I insulated my cab much like you did, except that I now have the "fatigue mat" foam over the top of the "bubble insulation" you have in your photo. I think that is more than enough. It is insulated, quieter and it is "dark" behind the seat. When I put the rear covers in my truck. I had to custom fit the product on the sides and on around the gas tank tube. Since I am tall, the seat was jammed against them. Tough to move the seat where I was comfortable and the seat rubbing/hitting the back covers made lots of squeaking noises. On top of all of that, you could not see them anyway. I wound up taking them out and wishing I had saved the money. They are now sitting somewhere in my garage.
-
Ever get tired on a 90 degree day and you don't want to go to a motel? This is not an "internet photo," I spotted this guy at a truck stop in my hometown today. The generator and the AC were running and people were having a good time taking photos of this urban camper.
-
'53 has different rear fenders. Does the dash have a chrome metal plate in the middle or plastic script that says "Dodge" ('53 model).
-
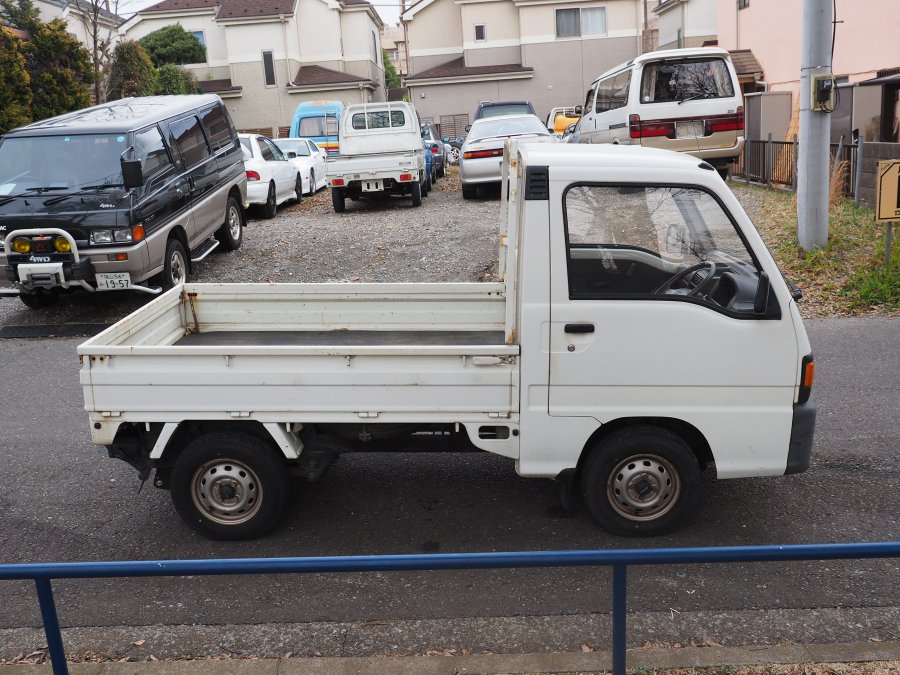
I am 6'1" and weigh about 325. Body shape is "old guy." The distance from the "face" of the back of the front seat to the steering wheel is about 17". The distance from the bottom of the steering wheel to the "face" of the seat bottom is about 7.5". That's more room than my '53 Dodge has. I fit in the Sambar fine, although it is a bit narrow at the shoulders (compared to what I am used to), and getting my feet in at the bottom of that door (foot has to clear front wheel well and the door jamb - see the photo I posted) are the greatest challenges - much like some of the UTV's I have been in. A 5'8" average size guy would have no problem. Unmodified engines of the Kei vehicles (Subaru, Honda, Daihatsu, Suzuki, Mazda & Mitsubishi) have been ruled compliant by EPA. All of these little trucks look pretty much the same and by law have the same dimensional sizes, engine size, hauling capacity, etc. regulated by the Japanese government.
-
I don't know about other states, but a 25 yr old one is considered a "classic" by the EPA so the engine clears that hurdle. Since the Fed accepts them on the road, Texas will as well. I have to get the local sheriff's department to look at the serial # on the frame and compare it to all of my paperwork to show that it is not a stolen vehicle, next the Japanese title will have to be converted to a Texas title in my name (the paperwork to do so was part of the deal), then I have to get insurance, a safety inspection and plates. I start that process on Thursday. I see that a lot of folks in Canada opt for the Suzuki or the Daihatsu versions and attach snow plows to them (those two are more suited for lifting, oversize tires and the snow plow).
-
So, for several years I have wanted a Polaris type vehicle. However, the price tag ran me off. Just over a year ago, at a swap meet I met a guy using a Japanese mini-truck to set up his wares. His was a Mitsubishi, and he was very informative and allowed me to sit in it (too small for me) and he told me that a Subaru Sambar or a Daihatsu Hijet Jumbo cab would probably work. So, I started researching them. I took the plunge and imported a 1990 Subaru Sambar from Japan. It is a rear-engine, 660 cc 4-cyl, 5 spd, with a low-crawling gear, 4 wheel drive, fully independent suspension, and it has a heater and AC. It will carry 750 lbs. And yes, it is smaller than a US truck - it is the size of a Polaris. Vehicle price was minimal, compared to the exporter's fee, shipping, US import taxes, etc. Roughly $3.5K total from Japan to off the boat in Freeport, TX. That price is much less than even a used Polaris UTV's that needs work around here. I'll post some other photos and my overall impression with it when I get it licensed (bureaucracy takes time). Here it is in Japan. Either I made a good deal, or I have given my family another thing to laugh at.
-
Another week of 80 degree weather forecast. I like getting my ice from the freezer... Snow is for Snow Cones
-
When the Harrah's Auto Museum in Reno was still intact and on display, my wife and I drove to Reno just to see it....spent a great day there - it took a full day to see it all. After the Harrah heirs sold out to a hotel chain, quite a few of the cars were sold off or shipped elsewhere. I often feel like I was lucky enough to see a "Wonder of the World" before it fell apart and became a shell of itself. Please report back and tell us how big the place is, how long it took to tour and what were your impressions of it.

.JPG.dfdfd60a98fb78349c1ec391979218f2.JPG)

