rekbender
-
Posts
115 -
Joined
-
Last visited
-
Days Won
2
Content Type
Links Directory
Profiles
Articles
Forums
Downloads
Store
Gallery
Blogs
Events
Classifieds
Everything posted by rekbender
-
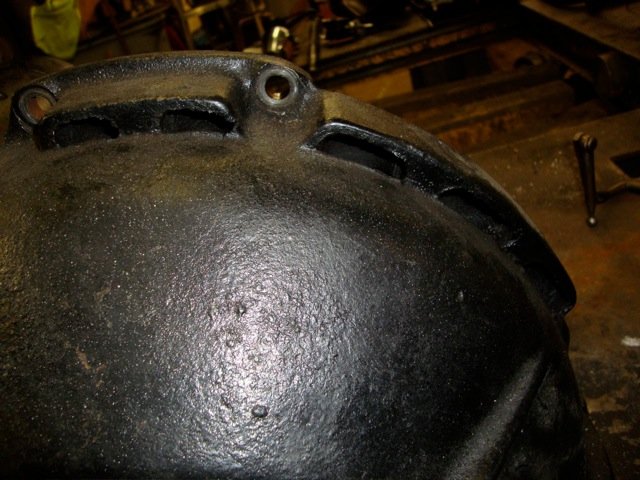
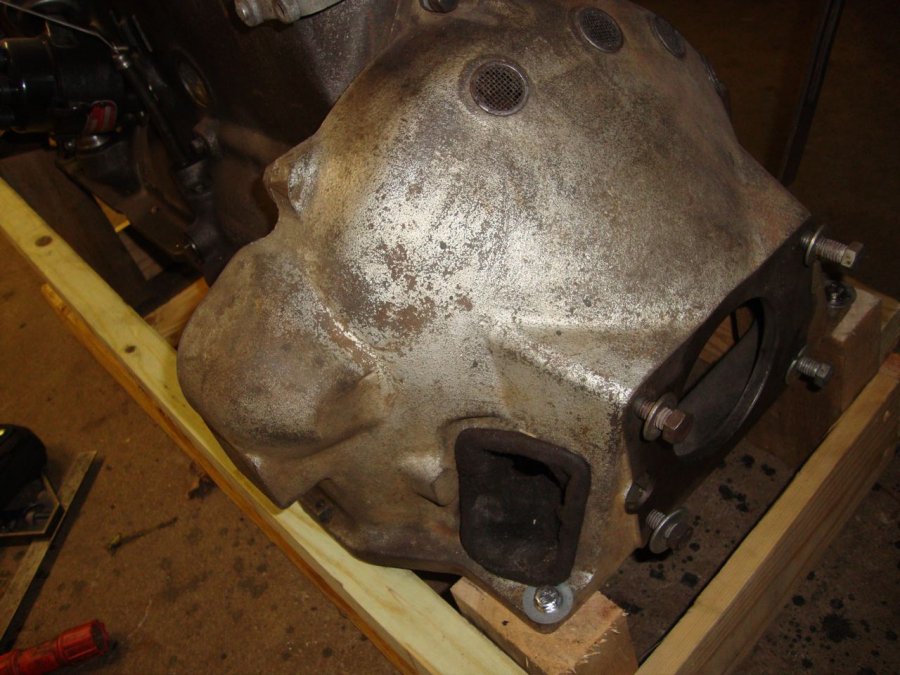
I bought a truck load of '35 Plymouth parts, so I thought I'd bring this thread back and add this 1935 Plymouth PJ bell housing. Very similar to the '36, but the '35 has an additional boss at the top to accommodate the starter pedal linkage, no screen riveted over the cooling vents at the top as was added for '36, and two tapped bolt holes in the right trans mount bracket for an exhaust pipe hanger. CASTING # 636140-5 1935 PLYMOUTH PJ ANGLED BRACKETS FOR MOUNTS 7 3/4" DEPTH 4 1/8" HOLE

-
Give Annamarie a call. She has shipped two cars for me in 2017 and both went with no problems. She knows her guys, gets it done promptly, and and is very professional. Annamarie Wilcox My Car Transport Office: 847-426-3104 Cell: 813-484-6070 Email: mycar@yourcartransport.com Web: www.yourcartransport.com Member of The Better Business Bureau
-
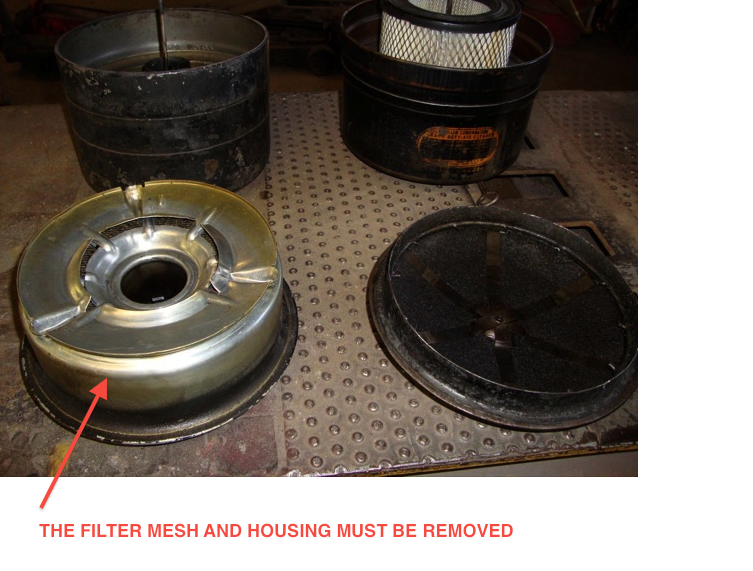
Here are some different versions of the oil bath air cleaners. I think the one on the left is the best looking, most compact of the four. To answer your questions, the housing for the filter mesh must be removed from the lid, and then as Jerry Roberts said, take your aid cleaner top and bottom to a parts store and try different paper elements until you find one that will fit. I don't know the year of my modified air cleaner - probably late '40's or early '50's. The element in that one is a Purolator A14380. It looks like an air compressor filter.

-
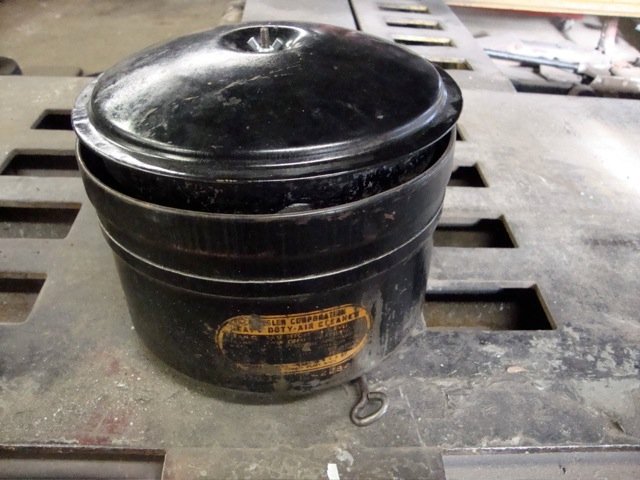
bluefoxamazone, I really like the the way your convertible looks, it appears to be so stock and untouched - just my kind of car. The factory oil bath air cleaner isn't particularly beautiful, but form does follow function. I personally would keep the factory unit, or at least the factory look if I were running a single carburetor. Here are some pictures of a modified factory oil bath from my collection of stuff. Yes, the filter mesh was gutted, but when assembled it looks stock. Maybe the best of both worlds, maybe not. At least, it's easy to service.

-
The notches fit around the ridges (red arrows) on the rear main bearing cap and the aluminum oil pan plate in front of the front main bearing cap. Adhere the gasket to the block and the cork strips to the pan front and rear retainers. Be sure to leave about 1/8" of the cork strips extending past to bottom pan to insure a tight fit at these corners. Put a dab of silicone on each of the notches before you install the pan.

-
Does anyone else run a Pines winter front when it's cold?


-
I've owned both a '35 and '36 plymouth coupe. They looked quite similar, but there were many differences between the bodies in the cowl, roof, windshield, windows, doors, etc. , even the steering column supports were different- the '36 was referred to as a new body. The '36 convertible used the '35 convertible cowl, but the convertible dashes were different from the closed cars. The swap could probably be done, but I'd stay with a '36 dash. 1st pic is '35, 2nd is '36.

-
Starting my truck in cold weather
rekbender replied to Bobacuda's topic in Mopar Flathead Truck Forum
In addition to following P15-D24's excellent advice, both my P2 and P18 are kept on battery tenders. The P2 has a fuel pump with a priming lever, while the P18 has an electric priming pump. With the battery always fully charged and a float chamber full of today's fuel, both cars start almost immediately. -
The oil pan has to come off to remove the engine mount plate as there is a bolt that goes in from behind. This bolt goes through the aluminum oil pan plate that bolts to the bottom of the block in front of the front main bearing cap and actually threads into the motor mount plate. Before you remove this plate, mark the bolts still holding the plate after the timing chain cover is removed. The cam timing gear has to come off too. Don't forget to remove the flat head screw next to the locating dowel pin. While the motor mount plate is off, replace the core plug behind it in the block. To re-assemble, I would glue the plate gasket to the plate first with Copper Coat, or gasket sealer so it's firmly attached, then apply sealer to the block side of the gasket. I'd put some extra silicone around the bottom where the motor mount plate bolts to the oil pan gasket plate. As I remember, there a three bolts that enter the water jacket so teflon tape these threads. I'd would take pictures at each step of the dis-assemblly and keep notes just to avoid aggravation. It's not really bad at all.


-
This gasket is included in the Fel-Pro overhaul gasket set. It's a heavy composite material, thickness measures .030". If you can't find something that will work, I'll put one in an envelope and mail it to you.
-
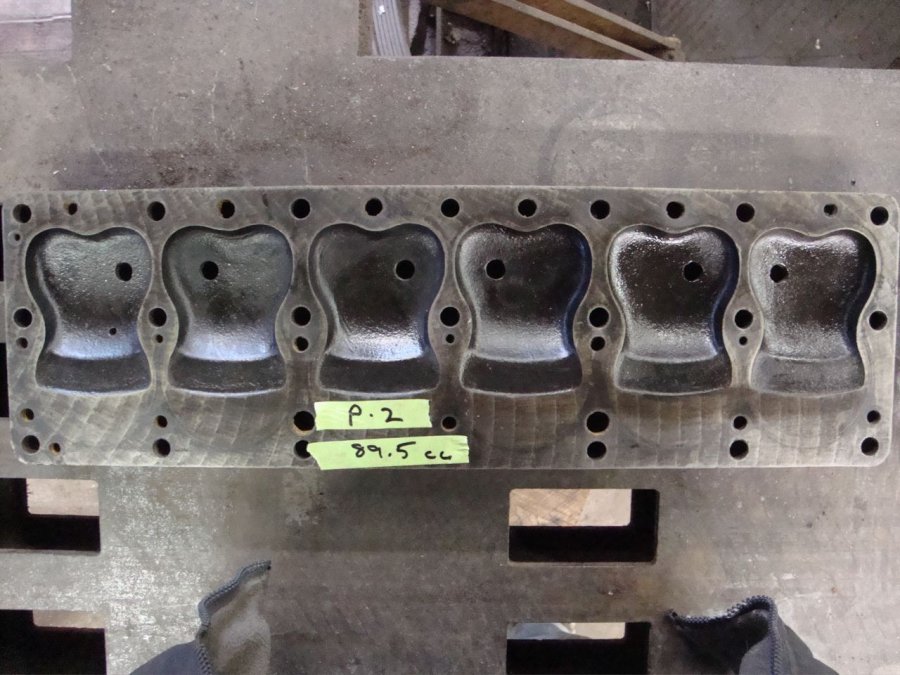
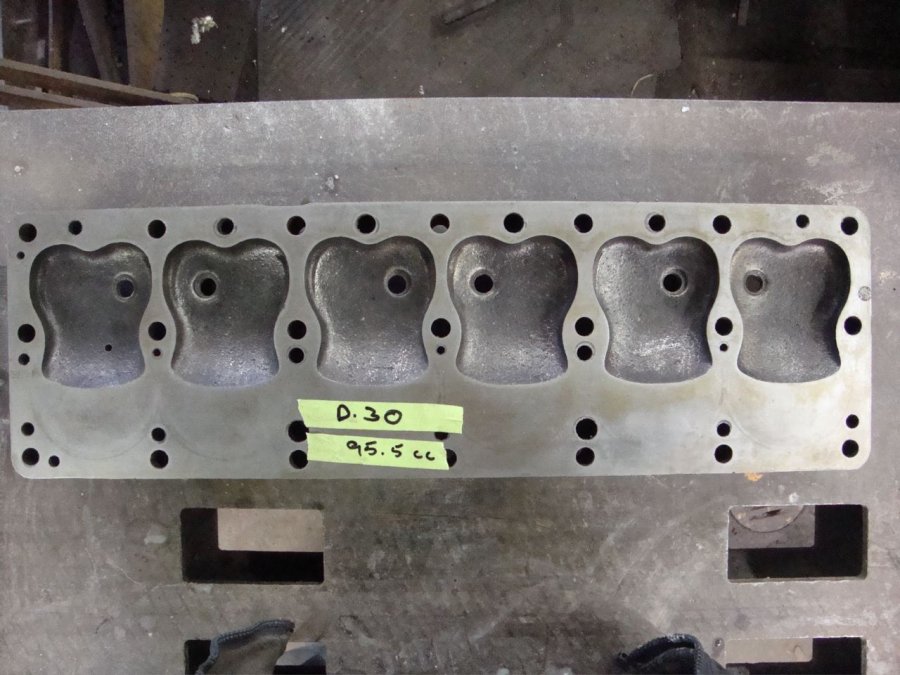
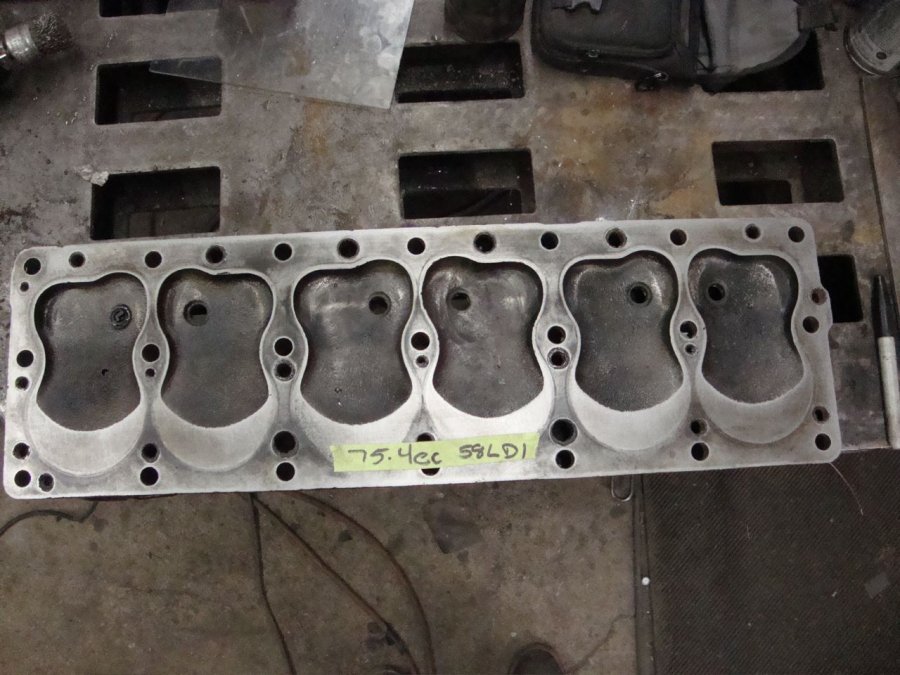
gregg g, the first five pictures below are of the heads in the same order as the list below. The D42 head is not labeled - it appears at the top with the P2 head below, and is the one that has just been cut. As a note, the D42 head was cut .090" - this resulted in an average chamber volume of 75.4, just a coincidence it's same as the late 50's LD1 chamber volume. As I remember, there was still over .100" clearance above the valves to the head so a .100" cut shouldn't be a problem. With this much of a cut, I don't know what happens volumetric efficiency or how thin the head becomes. This was an experiment to find out if a shaved 230 head would raise the compression on a 218. Not enough of an advantage to justify the cost, especially if the universal copper gasket were used. Might be worthwhile on a 230 if the chamber doesn't become too restrictive - the computed compression ratio on a .030 over 230 with this head and the correct gasket was 7.8:1 P2 head no. 632955-2 89.5 cc P19 head no. 1311810-5 89.2 cc D30 head no. 1120804-2 95.5 cc D42 head no. 1326386-1 96.7 cc LD1 head no. 1676337-2 75.4 cc The last four are the difference in the way the gaskets conform to the chamber around the exhaust valve and between the combustion chambers. Here are the part numbers I've seen for the tighter chamber head gaskets: Felpro no. 7547 steel Fitzgerald no. 0587 steel wizard no. R6057 steel - actually a Felpro 7547 Victor no. V1066 copper Fitzgerald no. 0492 steel - for early non-internal bypass head


-
Early last spring, I compared the chamber volumes on three heads I had. The head numbers are listed by the blocks they were removed from and may not be correct for the blocks. Average chamber volumes were: P2 head no. 632955-2 89.5 cc P19 head no. 1311810-5 89.2 cc D30 head no. 1120804-2 95.5 cc D42 head no. 1326386-1 96.7 cc The P19 and D32 heads had a different chamber shape - the chamber fit much closer to the exhaust valve and required a head gasket that fit accordingly. I just checked a late 50's head no. 1676337-2 that I found two weeks ago. This is the 230 head with a nominal 8 to1 compression ratio. It's chamber volume averaged 75.4 cc. From this limited information, it does appear that the 230 heads have a greater chamber volume than the 218's, although the late 50's head seems to provide a small increase in compression if used on a 218. I also cc'd a used (compressed) universal copper head gasket and a used Fitzgerald 0587 head gasket that properly conformed to the P19 and D42 chambers. The copper gasket gave away an additional 4cc to the Fitzgerald so this seems to be critical when computing compression ratios. If anyone is interested, I can post pictures of the different chamber shapes and gaskets.
-
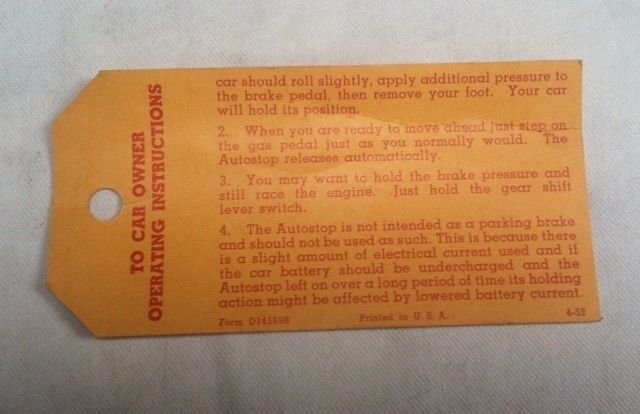
I finally found pictures of the owner/operator card on ebay. Neil, from The Old Plymouth Cafe, was nice enough to send me a picture of the back of the card, as well as the front that he'd already posted. This fellow couldn't have been more helpful. Thanks, Neil.
-
Made this to ship a P18 engine. The carb is level and you can run the engine on it. I can get measurements tomorrow if you're interested.


-
Freeze or core plug extractor? Drill a hole in the plug, insert the split collet, expand the collet and slide hammer the plug out.
-
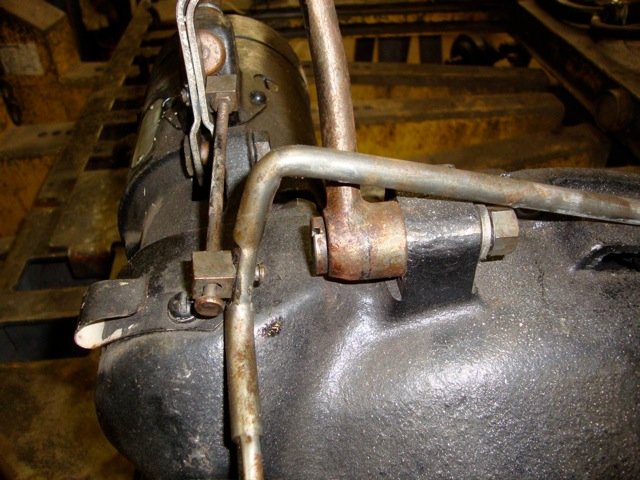
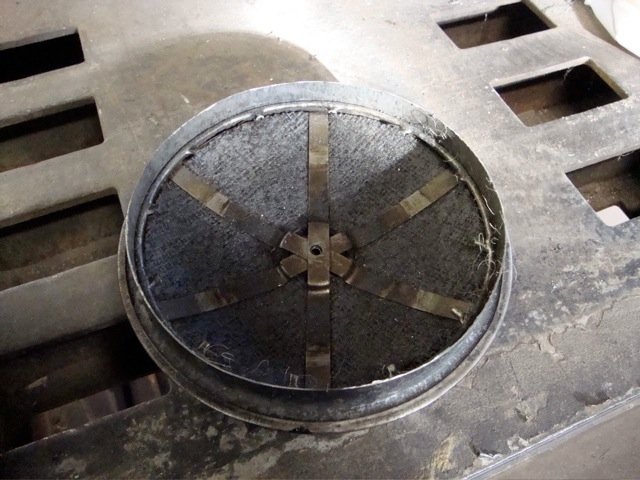
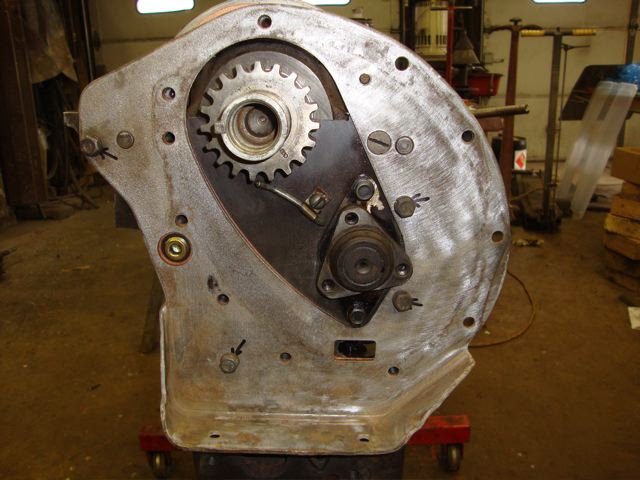
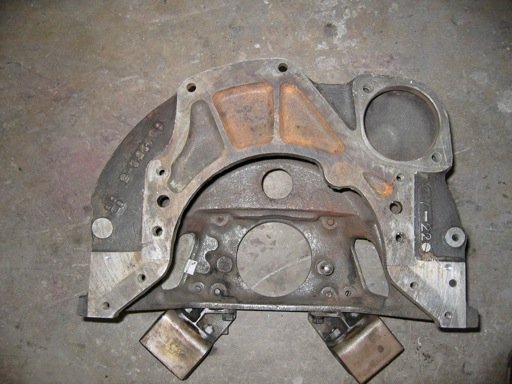
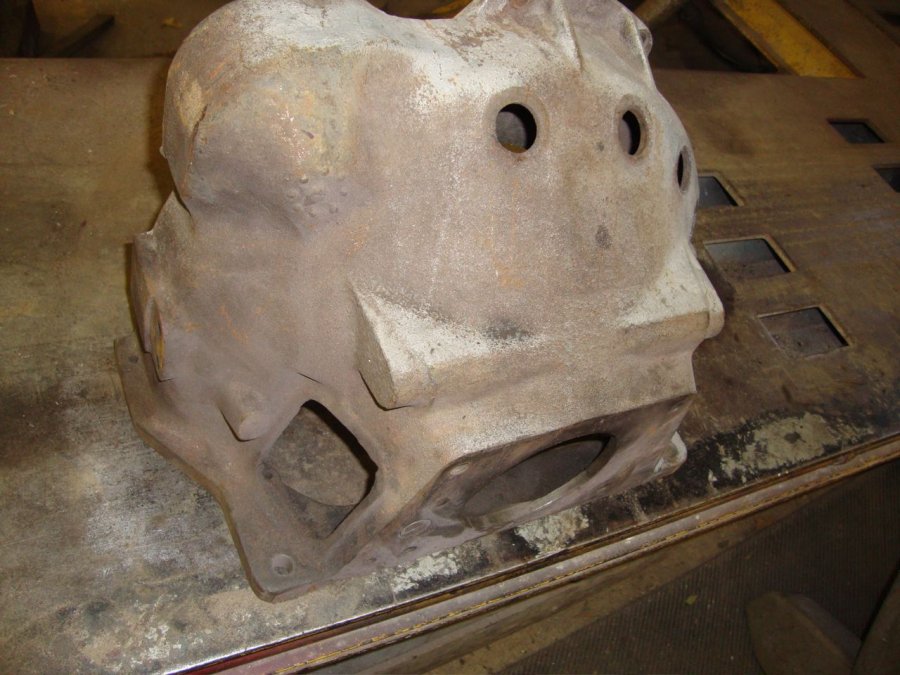
These are 9 year old pictures of my 1936 P2 bellhousing. I didn't take measurements, but maybe the pics will help someone identify another like it in the future. Casting # 651252-5 Motor mounts are attached by brackets at the bottom
-
I don't know if there is any real advantage in trying another set of caps, but I have a set from a 218 parts engine I'll be glad to send you for the postage. The center caps are stamped 2 and 3.
-
Casting # 871357-6 Early 50's Plymouth? Rear horizontal mounts 4 1/8" ID Hole 7 3/4" Depth Casting # 864588-3 1948 Plymouth? Rear horizontal mounts 4 1/8" ID Hole 7 3/4" Depth Casting # 579298-6 1952 Truck? Side vertical mounts 4 3/4" ID Hole 7 1/4 Depth

-
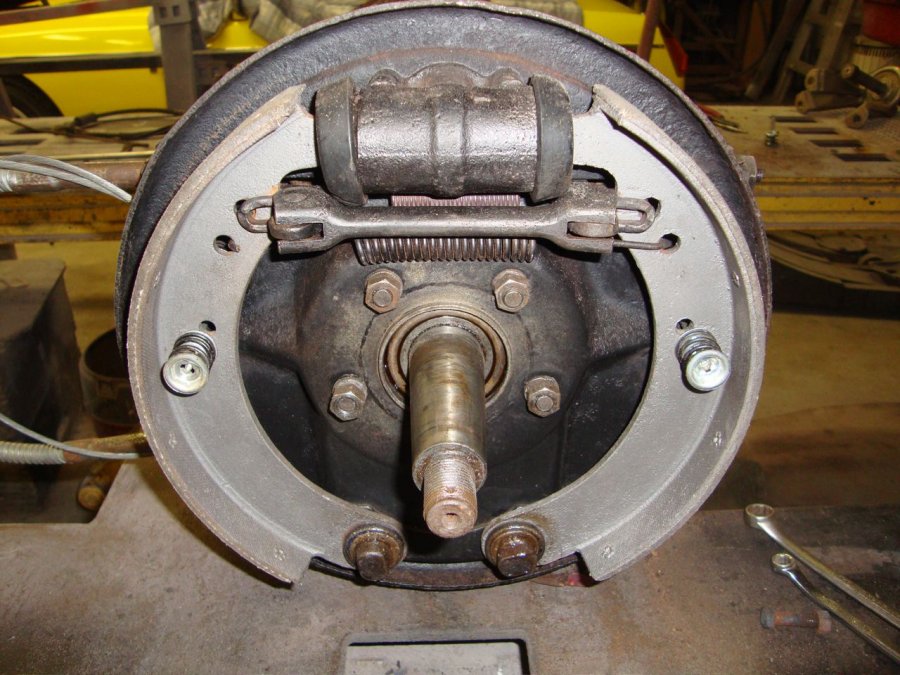
What are these 'things' in my driver's side front coil spring?
rekbender replied to medium_jon's topic in P15-D24 Forum
We did exactly the same thing in1966 with my buddy's mother's '65 Mustang 6 cylinder coupe before we'd cruise Frisch's drive in, only we used the twist in metal type. I found the rubber ones in the front springs of my P18 while replacing the coils this Wednesday. They may have led to the broken right side spring as they have to overload the adjacent coils. Eaton Spring shipped me new springs overnight.
-
I was 18 and offered to work one Sunday at a gas station to fill in for a friend who was married and needed a day off sometimes. They had a dummy display battery - an empty battery case with a removable top. We had a none OSHA approved air gun with about a foot of steel brake line screwed into the nozzle. I show up early on Sunday morning, and there's a car in front of one of the bays with a "dead battery". They had drilled a hole in the dummy battery case, stuck the brake line from the air gun with the button taped down into in the hole in the battery, filled the case with water, put the top back on the battery, and set it in a car. The hood is up, one of the guys is leaning over the engine doing something, and he tells me to get the old IH service truck and bring it over for a jump. He then hooks the cables up to the truck and tells me to connect them to the dead battery. When I touch the jumper cable to the dummy battery, they connect the air hose to the shop air. It blew the top of the battery loose and soaked me with water. The "explosion" scared the piss out of me - I thought I was going to die! I never even noticed the air hose going under the car. Every new guy received this initiation so they told me.
-
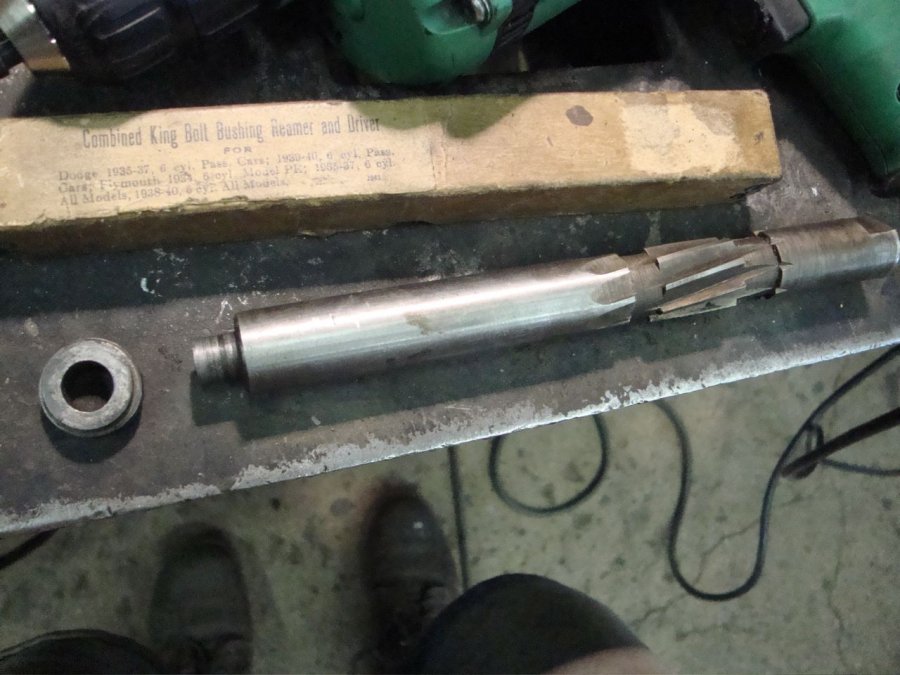
I just put new king pins (.795") and bushings in my P18 on Wednesday. I used an old Sears .797" king pin reamer that I bought on Ebay for $20.00' to ream the bushings. It worked perfectly for removing, installing, and sizing the bushings. The pin was a firm push fit in the bushings. My new king pins wouldn't quite start into the uprights either. The old pins measured .795" and had to be driven out with a drift. I didn't know what fit the pins are supposed to have in the uprights so I briefly ran a 1" ball hone through the upright just to clean things up, but it didn't help. After much consideration, I carefully started the reamer in the upright bore. It's slightly tapered so it starts easily. It barley met any resistance as it passed through the bore with no pressure, just turning gently back and forth. This leads me to believe the upright bore is also 797"or really close to that. I did feel it clean up the area around lock pin hole as it went by. I was then able to gently tap the pin through the bushings and upright with a little brass tack hammer. I'm putting new coil springs in today before I check the camber and toe. Can't wait to test drive it!
-
Here's the phone number of the warehouse: 800 768 3646
-
Rob the machinist just called and said one of the bearing suppliers came up with a 201 block bore of 2.407" but no plus or minus. Bearings are available in std, .010, .020, .030, .040, and .060.
-
I checked with the machinist who did some work for me last winter. He found the rod bore to be 2.0420" to 2.0430", but only the 218 block bore. Hope this helps.
-
The U-joint flange, not the seal, retains the bearing. Chrysler faced the same problem in 1936 when the Warner T86-1A overdrive transmission proved too long to mount a parking brake. They moved the parking brake to the rear backing plates. The 1936 rear end used with O.D. was hypoid so these might work on a '37. They're out there but hard to find - Desoto and Chrysler had them in '36.