stellarrestorations
-
Posts
16 -
Joined
-
Last visited
-
Anybody available with the parts books that could tell me if engine oil dipsticks were unique amongst all the late 40s flathead engines, or if they are the same? Wondering how wide of a search we can make. Or.........., I know someone with a '49 Dodge that needs a dipstick. Thanks,
-
Modern Paint Equivalents
stellarrestorations replied to stellarrestorations's topic in P15-D24 Forum
Thanks, I've been to that site numerous times on other projects and either have no idea on how it works, or it simply confirms the information I already know..... the PPG number for Tamiami Green is 41636. I occasionally will see a color name that is used numerous times, but it doesn't necessarily mean that the actual colors are the same, only that they have the same name... Have you been able to glean more information from that site? Thanks for your help.... Tim -
I'm wondering if somebody out there has already done the legwork to determine an accurate color cross reference for the color Tamiami Green on the 1955 Plymouth color chart. I've checked with DuPont and PPG and they did not provide a modern equivalent, even after checking with their respective color libraries. I'm aware of TCP Global and their site autocolorlibrary.com Not certain that they have any better reference than my local PPG which usually does a pretty good job. I'm surprised that this color stumped my local jobbers. Thanks in advance, Tim
-
Question For DeSoto Wise Men . . .
stellarrestorations replied to grey beard's topic in P15-D24 Forum
Also information, forum, and club membership with the National DeSoto Club www.desoto.org -
another freshmen ? I'm at a loss with this.
stellarrestorations replied to 1949dodge's topic in P15-D24 Forum
I've used dry ice on a stuck piston to shrink it and also help loosen the bond between the piston and the cylinder walls. -
You can make a nice effect with minimal cost by using artist oil paint, with a kitchen sponge, or shop rag, etc. as your application tool. I can get artist oil at stores like Hobby Lobby. Oil based paints dry slowly and give you time to "play" with the grain until you're happy. Our grain plates make the job perfect; but before we invested in the GIT system, we made quite a few attractive dashes with artist oil.
-
We have had skinned hubcaps re-chromed. The chrome shop I used charged $150 per cap (several years ago). That price was if I let them do the whole thing. I decided to do the repair myself, so I carefully worked the folded edge up on about 2/3 or so of the diameter of the skin, and was able to slip the rest of the skin off from there. Removing the skin allowed me to sandblast the steel center, as the chrome shop wants absolutely NO rust in their plating tanks, or it will contaminate them. Afterwards, I used a DA sander with 80 grit paper to sand off the chrome down to the brass. This was on the recommendation of the plater. He didn't like stripping the chrome because it would cause the brass skin to pit. After repairing the skins, I sanded them up to 220 grit with the DA, and then slipped them back onto the steel cores. I found it difficult to get them as tight as original, so I used a little silver solder in several places to permanently fasten them. These were non MOPAR hubcaps, and didn't have any of the adhesive that others are mentioning. After all the time I spent doing the repairs, the chrome shop still charged me $75 ea. to plate them. It would have been more cost effective just to let the plater do the whole thing.
-
Has anybody tried heat shrinking?
stellarrestorations replied to Joe Flanagan's topic in P15-D24 Forum
Can't swim! -
Has anybody tried heat shrinking?
stellarrestorations replied to Joe Flanagan's topic in P15-D24 Forum
Oh, it occurs to me that I like to shrink stretched metal while it is "up", rather than down like a dent. If you can bump it up and get it to stay there, that's where I would begin to work it. -
Has anybody tried heat shrinking?
stellarrestorations replied to Joe Flanagan's topic in P15-D24 Forum
I actually don't have any experience with Mapp Gas, so I should defer. What I know of Mapp Gas is that it comes in a bottle like propane, and fires a large flame similar to the hardware store propane bottle. I understand it to be hotter than propane. I would assume "yes", you can use that kind of flame, you'll likely have more "periferal" heat generated in the area because the blue heat will generate slower than it would with the oxy-acetylene torch. I would say "go easy"; it's easier to do it again, or "do more", than it is to wish you hadn't quite done that much..... -
Has anybody tried heat shrinking?
stellarrestorations replied to Joe Flanagan's topic in P15-D24 Forum
As for "where do I start with the heat", locate the center of the stretched area by flexing the oil can back and forth and looking for the perimeter of the area that is moving. You can mark the perimeter with a sharpie to get a visual idea of where the extra metal is. If it is a light oil can and in a relatively low crown area, a very small amount of heat may be all you need. Take your oxy-acetylene torch set at a neutral flame and make a small heated area about the size of a dime that is just blue; not red; exactly in the center of the oil can. You can quench it with a damp rag afterwards if you want. Depending on the amount of stretch and the amount of crown, you might not even have to strike the metal with a hammer and dolly, it may tighten up on its own. Mild steel should never be quenched while it is cherry red. If that isn't enough, you can spiral out from the center with more heat spots. Mild steel, when heated and allowed to cool shrinks as a natural result of the heating/cooling process, so take it easy. The less crown, the easier it is to spread the damage if too much heat is applied. The shrinking disc works extremely well on low crown areas; it is much more controlled heat, but requires a grinder that turns 5-6000 rpm to work efficiently. -
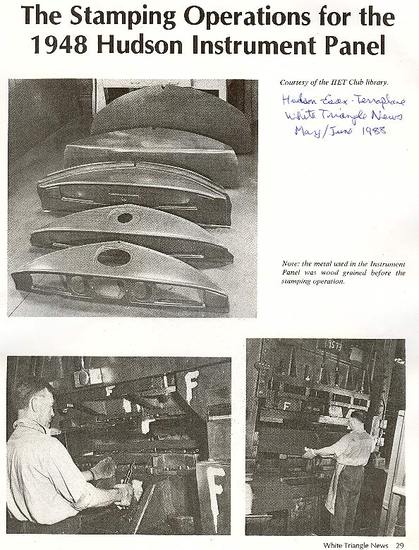
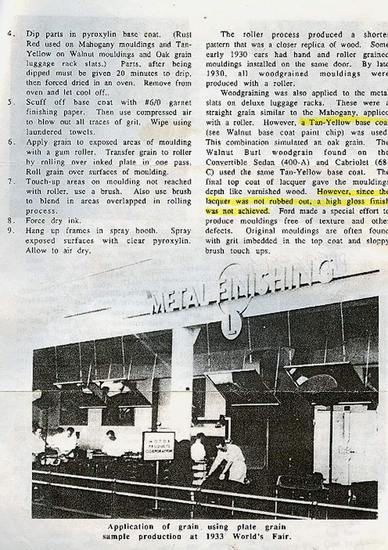
I've attached the images I mentioned in my previous post from the website for Grain-It Technologies. The text related to the '33 Worlds Fair Picture demonstrates the method of transferring a grain from an etched plate with ink and a roller, with touchups done by hand. The 2nd image shows information about Hudson dashes that were woodgrained prior to stamping. I had hoped that the images would show better than they do.
-
Ford is 1-2-3-4 on the right bank, and 5-6-7-8 on the left bank.
-
Thanks for the welcome, everybody. And Jim; likewise, if you're ever back up here in the McPherson area, the coffee is my treat! That goes for anybody else for that matter, too.....
-
I wanted to make a quick "hello" and introduce myself. My name is Tim Bowers, and have been a MOPAR fan for many, many years, as my Dad accumulated a small collection of DeSotos as I was growing up. I can clearly remember sleeping on the package tray of the '56 Fireflite Sportsman that was the family car back when I was small enough to fit there. Besides my interest in DeSotos, I'm also a restorer, and have been self-employed for a number of years now. We recently finished (but are still working out a bug or two...) a '38 Plymouth P6. I was recently encouraged to join here and post some questions about this car after I asked them to the DeSoto crowd. Finally, I'm also privileged to be on the faculty of McPherson College's Antique Auto Restoration here in KS. If you don't know, McPherson College has the only degree conferring program in the country in auto restoration. Anyway, I look forward to participating when I can be helpful. Please feel free to check out my website, and the college's. Thanks, Tim Bowers Stellar Antique Auto Restorations Windom, KS www.stellarrestorations.com McPherson College www.mcpherson.edu/technology