


Cpt.Fred
-
Posts
1,739 -
Joined
-
Last visited
-
Days Won
9
Content Type
Links Directory
Profiles
Articles
Forums
Downloads
Store
Gallery
Blogs
Events
Classifieds
Posts posted by Cpt.Fred
-
-
the pictures of the different chambers are very interesting, thanks for sharing.
also, thanks for that milling chart, great info!
i have a 1947 dodge 230 on the engine stand right now and the pistons on TDC are between 0,029" and 0,016" below the deck.
also i never saw any of these engines having the pistons level to the deck from the factoy, yet.
(but i admit i haven't seen more than 10 different ones)
-
i'm with you on this, Dartgame.
the Aerostar springs are working great and they're a steal, even if you have to ship them overseas, like me.
i got stock riding height when i put them in, little higher, but as you heard, they settle a little (about 1" max) and then you should have factory height.
that happens no matter you ride it or not, from my experience.
i cut mine a little afterwards, but that's a decision everyone should make for himself
(my car's lowered nearly 8" in the back and drags tail, surly not everyone's cup of tea).
relocating the shock mounts and buying the Moogs were the best things i could do to my front end, it's amazing how it changed the car.
it's much more streetable now and a lot safer in traffic, but without loosing that classic feeling (especially on 16x6.00 bias plys
 )
) -
with the manual from the imperial website it's actually pretty straight forward,
wish i had known about it BEFORE i started the whole operation...

the most annoying part is changing the sector shaft bushing and, most of all, reaming them.
i was lucky to have the possiblity to borrow an adjustable reaming tool of the right size,
plus having a friend machine the new bushing for me. i'd only buy NOS parts the next time,
the aftermarket pieces i've bought and seen were all something i'm not allowed to write here.
-
I got to work on the steering since the last post and i thought i'd post a little update.
First i went to the imperial owners club website and printed the manual.
Second i checked the orientation of the steering column in it's mounting boss unter the dash,
and found that i had not put a rubber cushion in there yet. i made one from an old tire tube
and put it in between the column and the mount.
since that changed the angle of the column a little bit
i loosened the steering box on the frame to release the tension,
tightened the column mount and then tightened the realigned box back to the frame.
Then i drained the oil out of the steering and started with checking the end play and bearing preload of the worm and steering tube assembly.
i found the new bearing race to be 1/10th of a mm taller than the old one, so i inspected the old bearing and race, diagnosed "mint condition" and put it back in.
Afterwards the steering already turned a little easier, and i think it doesn't have any end play in the stering tube, so i guess this is done now.
@jdluxuryliner: apparently that's what the #37 shims are all about, to set the correct bearing preload.
they do not seem to change the position of the worm in the housing,
so the "middle" is strictly defined by the position of the cross shaft head, it seems.
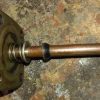
Next was to pull the cross (or sector) shaft and roller assembly out of the housing to check the gear mesh again,
since the steering was still "binding" a little in the middle. I pulled off the pitman arm and pushed the shaft out to the top.
Last time i had taken 2 shims out, so i put one back in and reassembled.
From what i can see in the manual, it should be correct now. It's not 100% the exact same steering box in there like i have here,
but the functioning principals should be identical.
Here's what the manual says about it:

this is my steering gears, turned hard to the left. that's where the play is:

this is center position. no play and not binding, now that i adjusted the depth of gear mesh correctly:

and, finally, hard to the right. there's the play again.

from what i see in the manual, it's actually seems to be a good sign that the difference is so noticable,
it seems to mean my roller and worm gear are in pretty decent shape.
i will fiddle and double check some more, then fill it up again and close it.
as soon as the car is back together (hopefully in 2-3 weeks) i can take it for a test spin and see how it works.
hope i finally got it to work right now

-
 1
1
-
-
Thanks for the input!
I did not change the #37 shims, just put them back in the same way they were before...
there weren't new ones in the "kit" i ordered (not to mention most other parts didn't fit so we had to machine them ourselves).
i'll drain the oil and take it apart again,
and then follow the steps from the imperial site manual.
great link, James!
Thank you, everyone.
Fred
-
1
-
-
interesting information there.
do you have a picture that shows one of these encircled logos?
-
when i completed the box i tried to follow the manual and had a lot of back and forth with the shims
adjusting the sector shaft end play (#30 in the picture below)

i ended up taking two of them out and thought all the play was gone.
now everything is back in the car and feels pretty nice, maybe even a little stiff, i'm not sure.
BUT!
if i turn the steering wheel all the way to the left i have a lot of play when i take the drum in both hands and move it around.
only there, if i steer hard to the left. i noticed the sector shaft move up and down a little, but i tightend down the set screw #25
and it stopped moving.
i'm pretty confused, since in the center the wheel is almost a little too hard to move, how can there be play outside when the steering is turned?
so, i need advice once again. who has done this before and can give me info on what i did wrong?

Fred
oh, and i made sure to have the steering in center when i put it together, so it couldn't be just wear, i guess.
plus the worm and sector looked pretty healthy to me.
a little bit of pitting here and there, ok, but i don't think it's that bad?


-
while working on the front of the car i decided to fully rebuild the steering box.here are some pics of what i have done to the box so far.
 new seals:
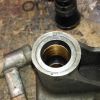
 new sector shaft bushings:
-
hey Andy, good to hear from you!
glad you like it, even with the lack of chromity-chrome, lol...
i have pretty high hopes on the setup, unfortunately i do not move along as fast as i would like...
but the patience will finally pay off, i guess!
i will stay with the vacuum unit for now (cause that double pump is so cool in my eyes) but if it
doesn't work properly i will try to go electric.
this is how it is now:
 the copper line sucks air in, i will put a hose and some kind of filter on it later.
DJ: i already followed Todd's advice and oiled the motor yseterday...
during the next text runs of the engine i will try to make those wipers move!
-
casper50:
is it a 6V postive ground setup? do you have pictures of it? sounds interesting.
DJ:
i will try that. i hooked up both ports to a T connector yesterday and it seems to pull,
but if you are running yours like you said with no issues i will switch to your system.
what "wiper oil" do you mean, do have oil in your motor?
i put a NOS wiper "motor" in the car, but all it would do was pull the wiper blades up (very slowly and painfully)
and stay there. so i had rain-ex on the glass all the time and when it got bad i let the motor pull the blades up
and switched it off, so they fell back down. that way i had at least one wiper stroke and could go on until the window
had filled with drops again... gruesome, eh?
-
knuckleharley:
engine, headers, tranny etc were built by George Asche.
full story here: http://p15-d24.com/blog/17/entry-107-das-boot-going-the-long-block-route-with-a-1940-plymouth-sedan/
thin oil sounds like a good plan, thanks!
i rode around with standard manifold vacuum on my previous triple intake with little to no wiper action, so i thought it would be nice to improve that.
Cpt.Neon:
E10 is normal here, though i think normal fuel with 95+ octane has 5% in it as well.
greg g:
i will spin the crank without plugs and see if both ports are pulling. if so, i put a T in the line and hook the wipers on there.
i don't have a vac gauge, it think, but one of my motorcycle guys might have one.
-
yeah, i thought, when it says 39-50, there should be a lot of them out there...
not so, apparently. if the pump is connected to the manifold it would seem it is only used as a booster
for manifold vacuum. that would mean it's not very strong. i guess i just hav to try it.
we have ethanol fuel here, but it's low percentage.
i am using an electric pump to feed the engine, but still it would be nice to have this one intact.
if the diaphragm gives in i will replace it with a new one, if i can find any.
-
thanks! kinda sad though...
that would mean i still need a connection to the manifold... which i do not want to drill a hole in.
i wonder why it has to be connected to the manifold. doesn't it create a vacuum by itself?
guess i will take the plugs out, spin the starter and just try out what it does then...
-
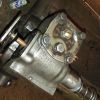
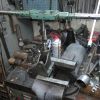
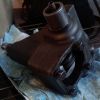
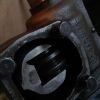
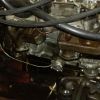
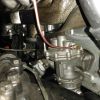
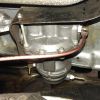
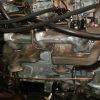
Hi everybody,
i intend using a Carter M750SA combinated fueal and vacuum pump on the new engine in my Plymouth P10.
bought this NOS quite a while back since i do not want to drill and tap the intake and thought i'd get much better wiper action
when stepping on the throttle.
as you can see it's all pretty tight down there with the split manifold.
the fuel part of the pump will just be filled with fuel to keep the diaphragm moist and intact and then i'll just connect a hose from
the OUT back to the IN port to circulate it.
i thought the vacuum side of the pump would be similar, IN on the front and OUT on the back, so i hooked it up that way,
but i looked closer yesterday i saw lettering on the front port saying MAN and the rear port says WIPER...
does anyone have one of these in the car and can tell me what is originally connected to the MAN port and what it means?
can i hook the wipers up to the MAN port and just block the other one, or is it needed to suck in fresh air?
it's pretty close to the front exhaust dump, and despite the modified heat shield it will get pretty warm down there.
i heard rumours these pumps were used on ragtops to move the folding top, but i cannot really believe that.
any info would be greatly appreciated!
here's some pics of the pump:

 thanks,Fred
 -
oops, missed that somehow...
 thank you.
 -
nice, Brian!

engine looks great, and so does the side view with the nose on!
that is one funky interiour upholstery... do you plan to change the door covers as well?
and where is that steering wheel from? it's different from mine, it seems.
-
Beautiful, we have a winner!
That's close enough, all i need to be sure.
Thanks a lot!
Problem solved.
-
The worst is over, i hope. Working the details now...
It's over on the AoK-Blog this time since George Asche built the engine and OD trans for this one.
-
Thanks, Don!
That's way better than everything i have found so far.
Looks like i'm not completely off with mine, but still looks a little different, angles and all...
anyone else?
-
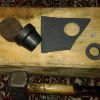
Hi all,
i am looking for closeup pictures of the original carb linkage setup on a 1940 P10 US model.
the things i am looking for are happening under the wire loom, so if someone here has
relevant pictures or, even better, owns one and would be willing to help me out it would be
greatly appreciated!
here you can see what i am looking for exactly:


i am swapping one of these linkages over to a long block and need to know how exactly the 90°
direction change was assembled originally... i don't find any drawings in my books here and all the
pics i have or found online have the wire loom in the way, hiding the important parts.
thanks a lot!
Fred
-
nice coupe! father and son adventure sounds awesome

und willkommen im forum!
-
indeed
-
that second one seems to be the one i have here. only nicely painted.
-
that looks like the one depicted in Roadkingcoupe's partsbook in post #12.
Exciting 1933 Dodge project!
in P15-D24 Forum
Posted
fantastic project! you guys do great work... very cool! thanks for sharing.