55 Fargo
-
Posts
10,373 -
Joined
-
Last visited
-
Days Won
21
Content Type
Links Directory
Profiles
Articles
Forums
Downloads
Store
Gallery
Blogs
Events
Classifieds
Everything posted by 55 Fargo
-
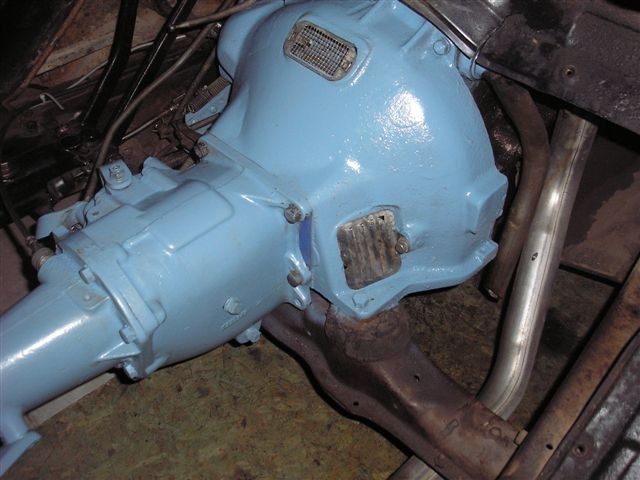
Here is a pic of the trans back in, the driveshaft is connected now, drove the car down the driveway tonight, sounds and works okay, starter is still spinning and not engaging properly............Fred
-
The bug deal feel through, at the last minute. Good thing as I would have no time for it now, barely any time for the Chrysler. So what are you saying, did you want me to call Bill about the grill, did you want it if available, at the right price. Let me know via PM or Email.............Fred
-
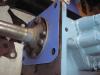
Hi all, fixed the anchor bolt on the ebrake, used the one from my parts car, cleaned up the bolt, intsalled new safety wire and adjusted it to .005 on the brake band, used a gasket for the trans to bell housing, smeared permatex around the oil hole. Use 2 guide bolts on the bell housing, installed trans myself, with my hands only, was real fun trying to line up splines. Did not think I could get the trans in, but eventually she slid in to about a 1/2 " from it's final position. Used the bolts to ever so carefully pull the trans into position, it slid along no problem. Clutch appears to be working good, but looks like it will need more adjusting, both overcenter spring and throw out rod. Hooked up the shifter linkage, this is not working too great all of a sudden, and nothing was messed with, will investigate further tonight. The only other things to be done are, install bell housing pan,hook up ebrake cable and spring,install driveshaft, correct shifter linkage, add gear oil to trans, go for a test drive. Thanx everyone fo your help throughout this repair..........Fred
-
Brendan, It is Bill Harrison's yard in Altamont, it's called Vavoom Auto Parts, by appt only. Not sure of the Minnedosa yard, but there are 2 near me, one has more model Ts, even a 1912 Model T Cabriolet, in complete shape, but needs to be restored, he want's $5000 for it,and oddball stuff than I have ever seen before. What are you looking for, I have a godd supllier locally for NOS Mopar parts. I also know where a 1948 D25 is for sale, it's in decnt shape, sftied, new interior, Coker WW tires, real nice driver, owner is asking $5000.00, its a 4 door.............Fred
-
Thanx again Don, will do as you did...........Fred
-
Robert, keep in mid this bolt is not tightened right down, as in most bolts are used to fasten an item down. Because it adjust and is not torqued right down,over time vibration would most likely back it out. The e-brake band, is supposed to have.005 clearance from the drum...........Fred
-
With a long thin artists brush I can apply grease in to the pilot hole, how much do I need to have there?
-
Any idea, where the brake pedal retrun spring attaches to. know the obvious point on the brake pedal shaft near the MC, but where does it attach after that..........Fred
-
As mine is a dry clutch,won't be near as deep as the fluid drive I will try and use an artists paint brush and apply some grease into the pilot bearing, should be fairly simple, had a look in there..Thanx Fred
-
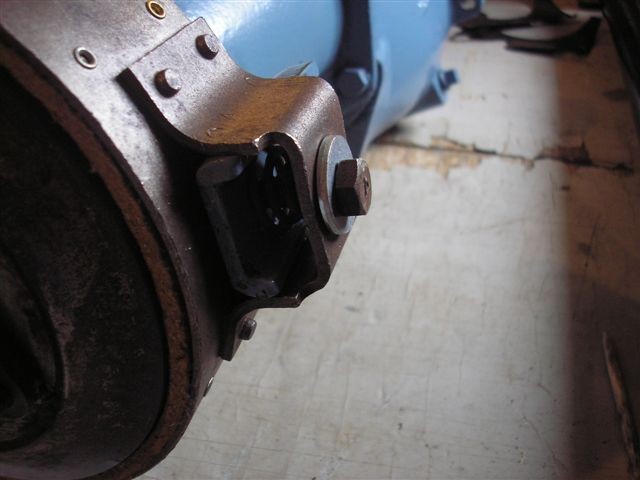
Found this retaining bolt on the parts car, just need to pull it off now, clean it and use it. The wire, does it just run through the bolt and wrap around the little bracket on the ebrake, don't want to break it while taking it off, done enough a that sorta thing.thanx Gents Fred
-
Hi all, when installing the transmission back into the clutch, do you grease the end of the pilot shaft, or do you try and place the grease into the pilot bearing. I would not be keen on putting grease at the end of the pilot shaft, then trying to fit through the clutch disc could get grease in that area and get onto the clutch disc lining.I have some high heat/high speed grease on had, is the right type to use. Not sure how I would get this into the pilot bearing with the clutch already installed. The pilot bearing was not changed. Do you need to put any lubricant on the pilot shaft itself, where the release bearing sleeve goes onto it, probably not correct....Thanx Fred
-
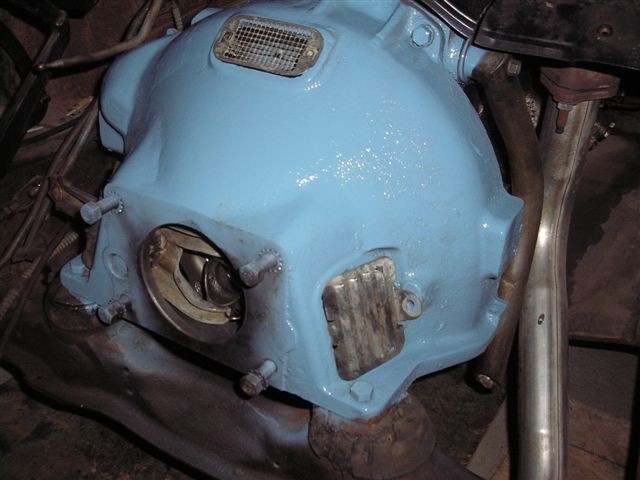
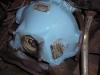
This gasket is made from some type of coated cardboard,that I found at work, not real gasket material, still think I should put a little sealant, at least around the vent hole perhaps......Fred
-
Don't suppose i could drill a small hole in the bolt, I have now, fish a wire through it.
-
Here is th pic of the area and homemade bracket. Hard tosee, will post a better pic later.
-
Here is the pic of the anchor bolt.

-
The side hole at the front of the trans in this pic Shel, this is the gasket I made..........Fred ps, what sealant should I use on this gasket
-
Hi, on our e-brakes, on the opposite side of the adjustment levers is an anchor bolt. Mine was missing, so I have used a bolt that fits, the band has the recommended .005 clearance. But in the manual pics, it shows a wire or something with the bolt, what is this for, I don't have one, do I need this, or will something else work. It looks like a keeper of sorts to possibly keep the anchor bolt from backing off............Thanx Fred
-
Hi Bob, your right, the 2 holes are missing from the bell housing for the plate, that attaches to the clutch torque shaft. But I did mod this, with a bracket that attaches to the bottom of the bell housing and it works fine, the clutch torque shaft is in a correct position.The throw out fork position,or it's opening may be different, have nothing to compare it with. I will take a pic today and post it to show you or anyone else that may be interested........Fred
-
One question, I have the gasket made, I do have this vent hole covered, but what about the side hole, that runs from the same spot, what keeps the oil from exiting that spot. Is this side hole to the other hole, meant to have a welch plug or something, what stops the trans oil from running out of there......Fred
-
Hi all,got the clutch rods and over center spring, a new used turnbuckle rod, a new used torque tube. All is well, the trans is not in yet, so I will need to install it before the final adjsutments are made. Because the over center spring was off, the turnbuckle rod was replaced, how and by what spec do i adjust the overcenter spring. Now I don't have the special Miller tool to use as a gauge, I have seen the pics of the spring being adjusted, have a Chrysler shop manual showing it. Unfortunately, When I re-cut my throw out fork rod to spec, it is now about 1 inch to short, so I will be using a rod from a 1950, which is okay, but not exactly the same. I did cut the rod to 6 and 1/16 of an inch as per DonC. pic, but the location of the throw out fork, in relation to position, must still be a little further back, than a stock 46 to 48 Plymouth, not sure why. The belll housing, engine and trans are from a 1951 dodge, could be a little different in size I suppose, but not convinced. So I will use the other rod for now. I am going to make guide pins to install the trans, what gasket sealant is best used on the trans to bellhousing gasket, I was going to use a thin layer of Permatex, on the trans side of the gasket, right or wrong. Thanx everyone who have helped answer the questions on this big job, from beginning to end..........Fred
-
Shel, another rod was being used, although it's not the exact type it worked okay, it is much shorter than a fluid drive rod. I also have had seates in my car close to a year. Tonight,I installed all the clutch hardware, man what difference with the overcenter spring installed properly, hardly no effort to push clutch pedal, everything still needs adjusting, the trans and driveshaft can go back in next, also have the ebrake relined, will be nice to use it also. Hopefully over the enxt 3 days, it will be finnsihed and ready for a road test......Thanx everyone for your help
-
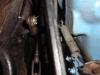
Here is a pic the bell housing with fresh paint, the other pic shows the clutch torque tube, the turnbuckle rod, the throw out fork rod. Still need to wire wheel evrything and paint before re-installing. Hope to have evrything back together this week:cool: ..........Fred

-
Thank you very much sir, I did cut it today, but only to 7.5 inches, will recut to 6 inches tomorrow and cut more thread on it. The hole is still fairly round.The turnbuckle rod was seized, but heat and penetraitng oil broke it free, cleaned up the threads and they are good to go..........Thanx again Don, for such a detailed response........Fred
-
If i am not able to get a measurement of this rod, I will have to size it up, cut and thread,just be a little easier to have a factory spec on it's length, just in case I mess up, in cutting to length. Both rods for fluid drive and non fluid drive, appear the same, except the length.........Thanx anyway Fred
-
The fluid drive rod is 11 and 3/4 inches long, without the adjustable tip on, the non fluid drive rod, as what the plymouths have should be 4 to 5 inches shorter as the dry clutch is that much shorter. But as you say, measure 3to 4 times and cut once. If anyone has a rod off there car now, could you please give me a measurement...Thanx Fred will post pics tomorrow evening