Tom
-
Posts
47 -
Joined
-
Last visited
Recent Profile Visitors
2,037 profile views
.thumb.jpg.78d6c0802c54e2d4382e1ae232fa93e6.jpg)


-
Sorry for slow response...Dartgames post is exactly right....any of the franchise parts stores are a good source..
-
Try Newport Engineering Washington,MO
-
Hi...You might try this....put your outside handle back in...have a helper hold the handle in the open position....sit on the seat and push on the door with both feet..sometimes you have to kick it....be sure to wear you tennies!! Then after your door is open check the latch mechanism as Mr Adams pointed out ....
-
Hi...Welcome to the forum....here you can look forward to a ton of great information from knowledgeable people about doing exactly what you have planned...do some topic searching and you will find the information and answers from the guys who like all stock to the "anything goes " guys and everything in between...Good luck and keep us posted! Tom
-
Hi.. Great idea...my buddy called me today wanting to know what to do with his 2009 Honda Element with no compression on 1 cylinder...we all know the story... So let's ride in a little style... This topic has been visited many many times..can you make a nice dependable driver out of an 80 year old car... Of course!! We want it to steer, stop and run and let's add some heat/ac as well... Those cars steered amazingly well with 1936 technology..some adjustments to accommodate modern radial tires are easily done...Rustyhope will make it stop like you want it to...you said it runs well so stick with what works.. Bolt in a rear end of your choice...we put a 3:07 Ford Ranger rear end...relocate the spring pads....stock ebrake...have a driveshaft made... 1940 D-14 cruises 65-70 at 2400...steers and stops fine... You want heat/ac...mount your Sanden compressor on engine... aftermarket condenser ....heat/ac combo under dash and you're set.. Oh...that ac is going to tax the old flat 6 too much!! Of course it will! AC taxes ANY engine too much...so you do what the sign says in my area."turn off ac next 10 miles to avoid overheating" OR you could buy a Honda Element and ride in that sort of style ...l like the Airflow Tom
-
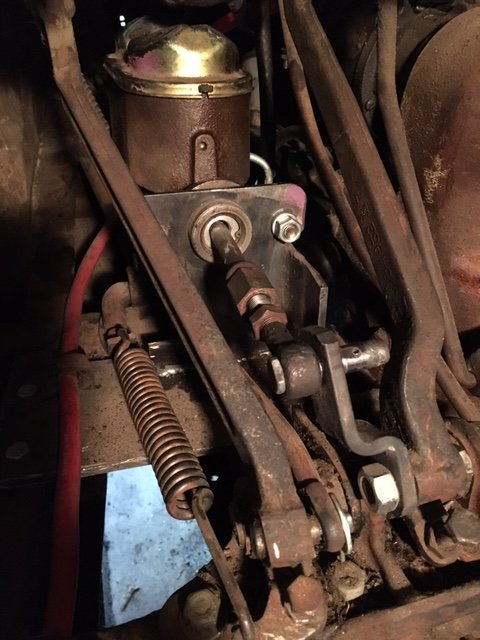
Hi In regards to your dual chamber master cylinder...we made a bracket and used the stock pedal with a GM mater cylinder from an early 70's manual disc brake car..there is also an aftermarket set up available from Butch's Cool stuff...

-
I know this ground has been covered thoroughly ..Let me just offer this...l still have my first car, a 34 Plymouth all original brakes, steering and drivetrain. Like he said, you can drive the car as is in today's traffic but it takes a specific mindset to do it safely...it is fun but not for very long as it is both a physical and mental challenge. l recently purchased a 1940 Dodge, basically the same car, with the goal of making it a safe and dependable driver. So we did...steering is original but in good condition, rebuilt front suspension with manual disc brakes and dual chamber master cylinder, Ford Ranger 3:07 rear, 12 volt. Original engine and column shift 3 speed the car steers and stops just fine and cruises at 65-70 at about 2300. With relatively simple and inexpensive changes it really transforms the driving experience to a different level...it's cool to drive and doesn't beat you to death. Regards Tom ps don't fool with your used tank...new ones are available ..
-
Hi...my experience chasing electrical problems by trial and error has been less than successful to say the least...the map light wire is probably disconnected from the main light switch...l could take some guesses on the bullet wire but it would be just that, a guess...follow the wire to see where it terminates...better yet, get a manual or at least a wiring diagram...life is easier with some instructions ... And as Andy said...welcome
-
Hi..l had mentioned our 34 Plymouth in a previous thread but recently uncovered some buried information...l will share it with you after a brief forward... l acquired the car in 1964 from my grandfather...he had been using it as a storage container...l almost allowed the car to suffer a similar fate but some high school kids and the Great Race intervened in 2002...now here we are in 2018 and l see the same scenario slowly developing again...what follows is a transcription of what l wrote for the Great Race in 2002.. The woman who owned the car was Mabel Payne. She lived in Glendale on Louise St across the driveway from my mother and Grandmother. In 1936 my grandmother relocated to Armstrong Ave in Los Angeles and Ms Payne and the Plymouth accompanied her. Ms Payne passed away in 1942 and my grandmother "inherited" the Plymouth. I remember riding in the car with Grandma...l couldn't see out of the windshield but l can clearly remember the beautiful oval instrument panel and her wrinkled arthritic hand on floor gearshift. Grandma passed away in 1958...l was 10 years old. The car sat in the garage...we would go to visit Grandpa and l would go out and sit in the Plymouth. I pestered my father incessantly about the Plymouth... he finally relented and one day he and l made the trip from Whitter to West LA to maybe see if we could talk Grandpa out of the Plymouth. Negotiations were successful and we towed the car with Dads homemade tow bar out to Whittier. The winter of 64-65 was spent in the garage.. I knew next to nothing about what we were doing but l had read and re read an old copy of Automotive Essentials by Ray F. Kuns for hours and hours in anticipation of the big day when we would be putting the Plymouth on the road. One day Dad said Ok we're going to rewire the whole car from headlight to taillight. I said "What for, the wires look ok to me" He said "Take out all the wiring and don't cut or break anything" Ok fine. He then presented me with a wiring diagram which l had no idea where he got it and said "Look at the picture and follow it, it's not that hard.. No new harness, no schooling, just do it.. I began by going to the auto parts store and buying 5 or 6 spools of different color wire. I bought the braided although the plastic insulated was available l thought the braided looked more like what l had taken out. I learned to solder the terminals..Crimp ons were available l think but we didn't have a crimping tool and the solder terminals were much cheaper. Then came the brakes and l have never struggled with a mechanical job before or since like l did with those brakes. Dad said we'd start with the wheel cylinders.. He sent me to the store for wheel cylinder kits and paint thinner and emery cloth. The fronts were easy..just take off the big nut in the center and the drum pulls right off... But the backs...l quickly found out they're not the same.after hours and hours of sweating, prying.. dad said" ok loosen the big nut but only a turn or two"..he then got out his BIG sledge and hit the end of the axle so hard l thought it would come out the other side..."ok try it now" I cleaned and cleaned and ran that emery cloth through the cylinders, installed the new seals and filled the master with fluid and was feeling pretty good about my developing auto skills until l got in the car and pushed the brake pedal to the floor. I must have pushed that pedal a thousand times...to the floor. When Dad got home that evening he informed me about a process called "bleeding the brakes" He said to get in the car and listen for his instruction. "Down...up...down...up..." As if by magic, after a few minutes of this we had brakes.. There is a lot more stuff to tell but you know what it is...the same stories you could tell too.. Now to prevent the old Plymouth from returning to its roots as a storage container ,through a truly interesting chain of events.. we may have the opportunity to have it accepted in an automotive museum.. Just wanted to share.. Tom

-
Hi again...l just reread "50 Dodge fuel gauge operation" by Gregarious...check it out...l also recall a similar problem l had and l wanted to ask if you are doing your checks with the sender installed in the tank or out...observe your gauge with the sender out of the tank ...again making sure grounds are good...see if needle moves when you move float arm..if the needle moves as it should determine if the float arm is up or down according to needle movement., then make necessary adjustments.
-
Hi..Ok...remember electricity is really not magic although l have thought so once or twice...let's look at the various checks before we go any further...first...make absolutely certain that both the sender and the gauge are perfectly grounded. I can't tell you how much time and brain cells l have burned chasing similar problems only to find insufficient ground.. a visual inspection is not adequate...got to check with voltmeter or test light. Ok? All grounds good! Next check your wire that runs from sender to gauge...make sure it is satisfactory and not touching ground somewhere between sender and gauge. Then check your power source to make sure there is sufficient voltage at gauge. All good? You mentioned you checked your new sender with ohmmeter to make sure it is operating correctly..l have had new in the box senders and gauges that were defective...Maybe not likely but certainly possible...your ohmmeter should increase or decrease when you move the float arm. The next check is the electromagnets in the gauge itself...find the fuel gauge thread with explanation by Plymouthy Adams ...he does an excellent job explaining the entire troubleshooting process and particularly the gauge. Hope this helps! Tom
-
Hi... You might try Rowland's Antique Auto Parts 521 Schooley Rd Zilah WA 509 829 5026
-
Hi again...the fuel gauge has 2 terminals ...one goes to ign the other to fuel sending unit ....the ign side has constant voltage, the sender side has variable voltage to ground, the variable part meaning the level of the float...the variable voltage is what makes the needle move...the gauge is grounded through the mounting screws...
-
Hi...you can use a universal sender available from Summit for about $20..since fuel senders are not voltage sensitive they work on variable ohms resistance the 6 volt positive ground will not affect it..other than it might read backwards in which case you have to turn the float and resistor upside down. The float has an adjustable arm to accommodate different tank depths.. hope this helps... Tom
-
Yes me too!!! I was a high school coach for 35 years and every year l get to go with some of my former players to a regional. We were scheduled for San Diego this year but we were on our Florida trip... Watched our Wolfpack lose to Loyola...Looking forward to Final four... Tom