keithb7
-
Posts
3,347 -
Joined
-
Last visited
-
Days Won
188


.thumb.jpeg.28cb36506a6b17cd30e7d4a22504384d.jpeg)


-
In Canada I think Marine marked gas is still ethanol free. That’s what I run in my old cars. Illegal, yes. Lock me up! Hide behind pump so cashier cannot see. Show up with a legal gas can. Cashier will check that you have a gas can. All good. Fill gas can. Stuff fuel nozzle in your car. Proceed to slam all you can in there. Cashier is too distracted with other customers. Pay for your gas and leave. All good! Or go directly to jail. Lol.
-
Another vote for making your own. It’s like a puzzle to solve. You screw a few up. You learn. You get better. Building and shaping your first ever 3 ft line across the left rear axle housing? Order two 25 ft rolls of 3/16” brake line tube. 😄
-
Have you measured the stroke? very likely a 3 7/16 bore.
-
I think I’m a year with the electric 6V boost pump in Chrysler. No complaints. It will push through vapor lock. I have done so with it. I do like it spliced into ignition switch (wire to fuel gage). Then I cannot leave it on when I park the car. I have left the heater blower and AM radio on by accident. They were wired to direct non-switched power sourced. Dead battery the next morning. A sure way to ensure premature death of an otherwise good 6V battery.
-
It measures down to .0001, one 10,000th of an inch. Its accuracy is 2 10,000ths of an inch. It comes with a 2” calibration spacer. That one would be fine for me. If someone ground more than .0625 off, you’ll need a 1-2” mic. I doubt it is that even an option? Measure several times at the same spot. You’ll need to practice your technique. You’ll flub up. I know I sure did. Many times. Get the pen and paper out and a calculator. Scratch your head a few times. I did!
-
Not all bearings have the size stamped on them. If I were doing this I’d first of all get a paint pen. Draw an arrow on each rod cap pointing towards the front of the engine. You can number them as well just incase they were not stamped at the factory. Its so vitally important the caps go back on properly. If an oil hole is covered up by improper cap placement, you’ll be mad at yourself when the bearing starts knocking. The micrometer, if needed can be used to measure each shiny rod bearing journal on the crank. Measure each journal 3x. At each outer and, and in the center. As mentioned write down your measurements. You’ll get fumbled up a few times and think holy! That one is way out of spec. It’s likely your mistake when reading the mic. You are not doing the actual machining here. So a machinist grade micrometer is not required. You are measuring to ensure you get the right size replacement bearings. I looked it up. A new 218 rod bearing journal is 2.0615 to 2.0625 “. If they have been ground down you’ll come up with a smaller number than this. Max allowable taper or out of round of the journal is .001”. Rod journals are often ground .010, .020, .030 down or more. When I rebuilt my engine the surfaces were stock size still. True and even wear. I found a set .001” bearings on ebay. Designed for when just a polish is needed. I bought them and that’s what I told the machinist to do. He kinda a tweaked a little saying “it might be hard to get just .001 off the journals”. He did. The clearances turned out great. Great oil pressure! When installing new bearings make very, very sure they go in place properly. No oil holes are blocked. Re-install caps exactly as they came out. Be sure the lock washers are re-installed. Torque nut to 80-85 ft lbs. A Fowler brand mic on Amazon is not the cheapest junk. Not too expensive either. It’ll do fine. The principle here is they mill down the crank journal so its diameter becomes smaller. Then they make the bearings thicker by the same amount. So the crank is undersized, the bearings are oversized. This job is considered a major intervention. You are basically performing open heart surgery on your cars major component. Think it through. Pay extra attention. When in doubt, stop. Re-evaluate. If you make a mistake the engine may have to come out. At the minimum the wallet comes out. Sounds like an idea for a future video. Measuring your crank! I might do that. Keith
-
I bought some asian made micrometers. (not Mitutoyo).A 0-6” set. A dial bore gauge too. I really didn’t want to spend a lot. Possibly using them just for one engine overhaul. So I didn’t buy the best. Nor did I buy the cheapest. Sort of in the middle price range. I considered them to be part of my education costs. There’s no local course to take for rebuilding Mopar flatheads. I invested in myself and learned a ton. The tools allowed me to really dig in and find, and understand internal engine wear. Thrust and combustion forces. Uneven wear patterns. Etc. I measured everything I could, many times and gained a ton of experience. I researched why parts were wearing as they did. The tools really knocked it home in my pea brain. Proving the wear patterns. High quality tools are nice to have but not necessary. If you have time, scour garage sales and auto swap meets. You can find quality tools for great prices. That’s a bonus. I have found that I reach for my micrometers for other work quite regularly. They get used in my shop. The dial bore gauge? Awesome tool to own but it might, maybe, see one more use in my lifetime. I do like rebuilding engines. Who knows? Another opportunity may come along. If I recall (double check to ensure) your rank rod surface is in the 2 ⅛” range? Buying 1 single 2-3” micrometer would get you what need today. It won’t cost much. Then you get to learn how to read a micrometer! Fun times ahead. 😊
-
Plasti-gauge and a micrometer are your best friends here. Measure the crank throw bearing surface 5x at the same spot. Write down all measurements. Divide total by 5. This will get you a good number. Note the differences in surface wear near outer edges at crank counterweights. Expect more wear on the outer surface area due to thrust forces of the spinning crank. I believe the crank naturally wants to walk backwards toward the tranny.
-
Hi folks this topic is in regards to my daily driver, a 2006 Mazda 3: Last spring my A/C was not working. I found a rock had punctured a hole in my condenser. I purchased a new condenser. It came with a new receiver dryer as well. I installed both. New seals were used. I tested the system for leaks. None. Pulled a vacuum on the system for about an hour. I added 2 oz of PAG oil. The system calls for 6 oz of PAG oil, but 4 oz sits in the compressor they say. I added the proper amount of R132a and the system blew cold air. It worked for a little while then no more cold air. I left it alone over the winter. I just did some more trouble shooting today. The system still has a charge. No leak down. I have a gage set. When the A/C is turned on I am getting no increased pressure reading on the hi-low gauges. I measure 12V at the compressor, at the clutch wire connection. The compressor is not working. See some excessive wear on the compressor belt. Signs of a possible compressor seizure. I suspect I may have not added enough PAG oil when I installed the new condenser, then the compressor locked up. This is an original 2006 compressor. 18 years old. Vane style that are known to be problematic. Just the compressor clutch coil could be bad, yet for its age I figure it's lived a good life. I'll replace it. I was thinking I'd order a new compressor and belt. Install it with new seals. Then take the car to a proper A/C mechanic to flush the system out, pull a vacuum, add the correct amount of PAG oil, then add the proper R134a. I'll explain to the tech that I changed the compressor, belt, reciever dryer and condenser. Does this sound like a reasonable plan? I won't charge or run the system after the new compressor is installed. I'll drive it straight to the garage. Why am installing my own compressor? The cost savings are considerable. $300 for me to buy one and install it. $1000 at the garage, plus install labor. Or maybe I can do all this myself at home. I'm just unsure if I can flush out the A/C system properly and add the correct amount of PAG oil. How do I ensure I get all the old PAG oil out of the system? I've not done A/C work before and have limited knowledge. Thx. Keith
-
I’m sitting on the sidelines, watching. Minding my own business. I get dragged in to one of two discussions that will never be solved: 1. What oil to run? Zinc additive? 2. 6V or 12V? I’ll respond based on my experience and what makes me tick. 6V? Cool. I wonder how that system works? Let’s rebuild it and see if we can make my car perform like it did when it was new. I’ll learn a ton along the way plus it’ll feel good to fix something I know little about. Hmm. The wiring is old and crusty. A bit of a volatile mess. Do I order a new replacement wiring harness? Pretty pricey. Plus how am I going to improve my soldering and harness building skill-set? I’ve got plenty of time that I don’t seem to mind wasting. I sure don’t like paying someone else to do what I can learn to do myself. I sure don’t like letting money out of my wallet very quickly. Off we go. 6V it is. I’ll read and study all about it. I’ll make my own harnesses and upgrade wire gauge too. I’ll add relays & fuses. A 6V-12V converter too for my iphone. I’ll rebuild switches. Sockets. Salvage and re-use rare wire connections. Voila. My car starts up immediately and runs like a dream on 6V. I feel good. I like it. It’s different than everyone else on the road. It works well. People I meet like to talk about my 6V system. These experiences feed my brain good things about the vintage car hobby. I’d rather spend $1200 on books, tools and parts. Then another 40 hours of my time perfecting my skills, versus spending $1200 on a new harness assembly. So now I’ve appeased myself and quelled my curiosity. I like 6V and I’ll stick with it. Both of my cars are 6V and I’ll keep them that way. You can do whatever makes you feel good and secure. 12V if you like. The other 5 vehicles around my house are all 12V. They work fine too. No complaints except they are way harder to work on! Lol. Not sure I helped settle anything here. Now you just know me a bit better.
-
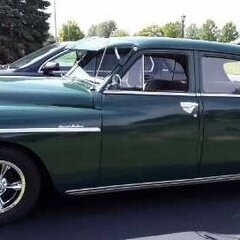
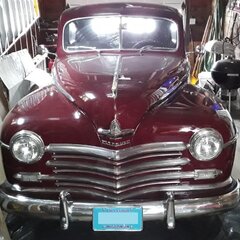
I’m not well versed in the early Mopar V8. I saw this local ad for sale recently. I wondered, did they offer a hemi V8 in 1951? I thought they were still straight 8 in 51? I honestly don’t know. What year did the Chryslers get the V8 option? Thanks for educating me!

-
12V if you prefer. That’s fine. I like 6V for old school cool factor. I like it when young drivers want to check out my old car. I point out the positive ground 6V system with a generator. Vacuum wipers. Suicide doors. Tube radio. Split hood. Flathead engine. Bias tires and more. They are often stunned and awed. I like being a custodian and teacher for these old systems. That’s just me.
-
Next time I’m in the area we’ll stop at the Denny’s again. Try and order the exact same meal!
-
With My 18 year old girlfriend at the time, it was July 1990. We were driving through California. We stopped for dinner at Denny’s. Just north of Sacramento. 34 years later, tonite we stumbled into an old box of receipts. I didn’t realize my love of Meatloaf went back that far. Lol.

-
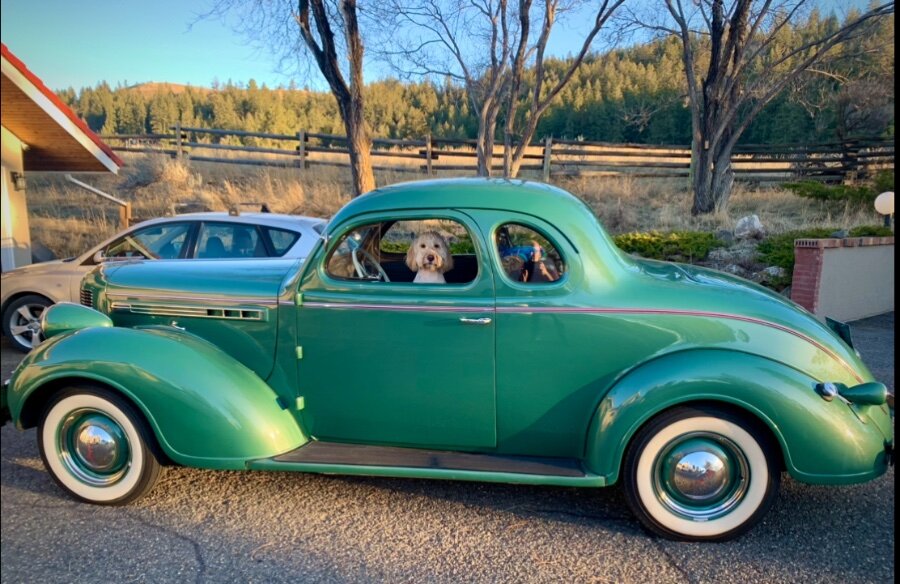
Spring arrived this week. I saw enough vintage cars and motorcycles on the road to stir-up some nostalgia. I removed the car cover and rolled out my ‘38 Chrysler today. It flashed up and ran like a hot engine that was just tuned-up yesterday. I didn’t do a thing other than check the oil and hit the electric fuel priming pump. I love a well maintained flathead engine. While warming it up the pup wanted in on the action. We went around the neighbourhood a couple times. I will drain the oil now and put in a fresh jug of 10W40. How’s 2024 shaping up in your Mopar neighbourhood? -59,331 miles.