


Mikefaster
-
Posts
22 -
Joined
-
Last visited
-
If you look at some of my earlier pictures I pretty much just made it from basic steel from Steel supplier and used the existing master cylinder as a pass-through...
-
The Corvette style master cylinder is pretty much around 1974-1979... It has become the standard for brake kits because if the even sized reservoirs and versatility. The aftermarket ones on eBay come with ports on both sides and come with a 1 inch bore or 1 1/8 inch bore...
-
I don't doubt anybody's theories, but I DO doubt the quality in which roads are made out of nowadays... Or it's affects on tires in general...
-
Well one problem is that they're probably 20 or 30 years old, LOL... Like I said I don't know when's the last time that Sears made those tires... I haven't heard of Sears making bias-ply tires but just the fact that they're bias-ply are probably not great for the roads now a days...
-
Body mounts? What to use and what size, length bolts?
Mikefaster replied to Mikefaster's topic in P15-D24 Forum
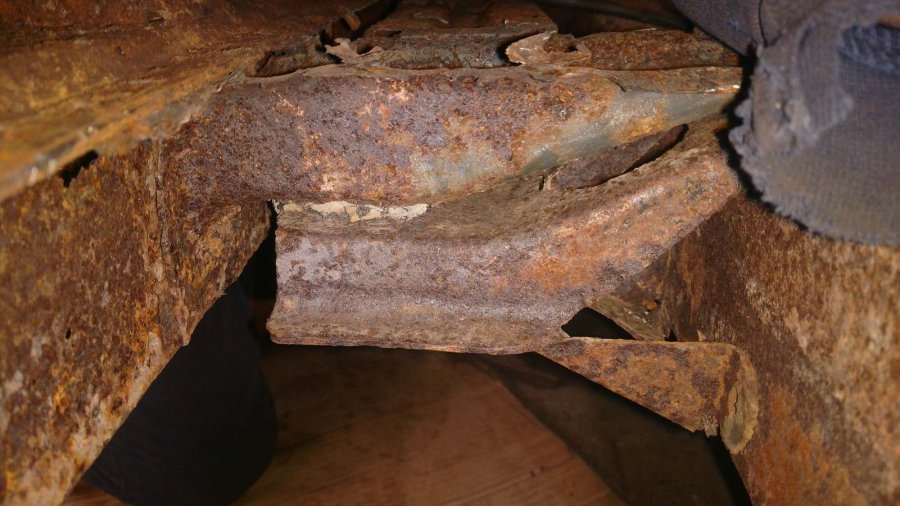
But other than the floor and affected areas, the rust is just heavy scale that I'll need a good pressure washer to remove... -
Body mounts? What to use and what size, length bolts?
Mikefaster replied to Mikefaster's topic in P15-D24 Forum
Sorry all... I never got email notification that anyone responded... I found these which seem to be a fair price... I'll see about using a sleeve when I see these in person... I'll need 2 sets undoubtedly... I'll just buy new bolts and washers at Ace. I don't care about originality, so whatever works for as cheap as possible... I'm not taking off the frame but I see what you're saying but it's really in better shape than it seems. I'll be replacing probably most or all of the inner rockers and the supports... Do you mind telling me what gauge metal you used to weld up that body mount Support you had made jhm1mc13? And I have another support that's totally disconnected... All in all, at least 6 of 7 should be replaced... Tomorrow I'm cutting out the floor under the rear seat as well because that's where I need to "get" at the rear body mount supports. The metal is pretty thin anyway but not exactly sure how to go about fabricating it... Look at this on eBay http://www.ebay.com/itm/261204851743


-
Just wondering if anyone has a "comparable" body mount bushing that I could use and the exact size, (length and thread) of the bolts for my 1951 DeSoto... One body mount setup on one website is $9.00 for the pair (top and bottom)... How many should I have? Seems to be at least 14... Not thrilled at that price. Figured that there has to be an alternative... I don't care about originality... Thanks in advance... As you can see, I have some issues with metal work and if I got to take off at least 8 of these, then I might as well change them...


-
That's a little bit expensive, but definitely pretty cool... This is more down my alley Look at this on eBay http://www.ebay.com/itm/191631884986
-
My master is cast; I don't get exactly what you meant... I pretty much only install the new style brake lines on every car I work on because it's so easy to work with. I'm also not taking off the body to accomplish this. It's not reengineering to put different lines in there. The replacement master cylinder is definitely reengineering, but to a lesser degree...
-
Thanks, I hear ya... I'll one day use mine for movie sets so I want to make sure all my brake components are new because I simply cannot get stuck. I'm also replacing all the lines with the easy to bend, never rust, alloy type... Being that it is totally cast iron, I'm honestly contemplating drilling 2 holes in the master, pipe thread tapping it, screwing in brass barbed fittings and extend 2 clear hoses to some kind of reservoir under the hood...
-
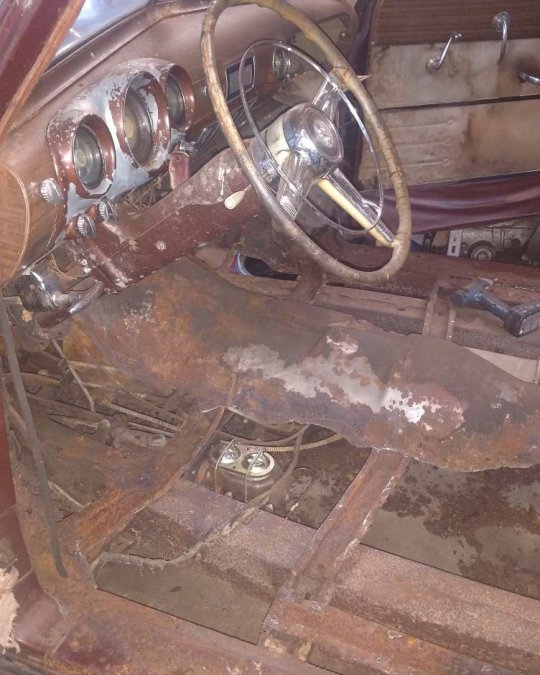
That's why I used the Corvette style master cylinder... It's just slightly over the floor. I'm sure if I changed the body mounts, it would be flush...

-
That works... I was thinking about a plastic Reservoir but I'm just afraid something will go wrong...
-
Hopefully I'll be able to test the brakes in 2-3 weeks... I assume they will work very well without much effort. I'm sure a power booster option could work. I started making the holes but it would need to be set back over 3 inches IF you can get something to attach a GM eyeloop style power booster AND manage to get it through the center hole of the original master. I assume you can completely hack off most of the master (area where the hole is), mostly the lower rear bolted area and leave the other 2 bolts to support the pedal assembly. It's going to space everything back under the seat... I was seriously also looking at a 2006 Dodge Ram 2500 master cylinder and/or a 2007 Dodge Grand Caravan master cylinder as well... You'd need metric conversion fittings, but they have reservoirs that have one opening, towards the front. If you put a unit like I just described under the seat, there's a chance you can access it from the rear part of the front seat, if you have a 4 door, or a front seat that folds forward on a 2 door... The whole mechanical aspect of what I did works VERY WELL and I expect it to be very reliable. It literally cost me $20 in steel and around $40 in hardware and a tap...
-
Okay I'll post a link for a video I made cuz it probably will be a little bit better because I'm terrible photographer, LOL... But basically I was showing here a few different angles... It looks like I'm going to stick with the Corvette style master cylinder and if I ever need to I can always find one that it has an inch and an eighth piston. I think I'll be fine... It turns out that the Corvette style master cylinder is one of those hot rod style ones with 4 different ports so you can put it in difference places. It also has in lodgings mounting holes. In order for me to use the Dodge Ram style of master cylinder it would need to also have the holes in large end and that may take away the structural Integrity of the unit. It's also considerably Higher by at least three quarters of an inch. I was also saying in the video that the benefit of the the Corvette style master cylinder is that you can basically stand on it and it won't go anywhere. So if the hole is not so big in the floorboards, you can always not worried about breaking the master cylinder or anything hitting it from underneath and breaking the plastic. Or stepping on it and breaking it for that matter. The other drawback to the Dodge plastic Reservoir master cylinder is that the Piston Rod barely protrudes inside and I just think for what I'm doing with the extra long Rod that I made, I feel better knowing that it's going deeper into the master cylinder. The Corvette master cylinder is definitely not level with the floor however my body mounts are pretty shot and I could probably gain at least a half an inch if I had changed them all. The other thing is, there is one part of the floor that has a gusset and that's the one that looks like it goes down below the master particularly. This is not really a big deal but you're going to have to modify your floor in order to make this work and I don't suggest not cutting a hole in the floor and not being able to get to the master cylinder. The only other thing I was thinking about is drilling a hole between the two reservoirs so it accepts fluid from either Reservoir and then comma drill a hole on the outside on either Reservoir section and Plumb in an external Reservoir somewhere. If you can Plum it in up through the floor through a smaller hole and have a reservoir under the seat that is easy to get to that might be ideal as well. I think I'm going to use the original rubber boot and put it back on the master cylinder to prevent too much from getting in with the rod that I made. I guess it also will help prevent anything getting caught in the hole with the rod period since the rubber boot already broke, I just figured I'd use it as it is cuz it's close to the size of the rod that I made... when I'm getting my free data I will download the YouTube video and put a link here. So far today I have only plumbed in the real lines because I was doing other things and getting the gas tank out as well... I'm kind of multitasking on this car and now my personal car, a Volkswagen diesel decided to have the oil pump crap out on it so that's another thing I have to do now...
