Leaderboard


Popular Content
Showing content with the highest reputation on 01/08/2018 in all areas
-
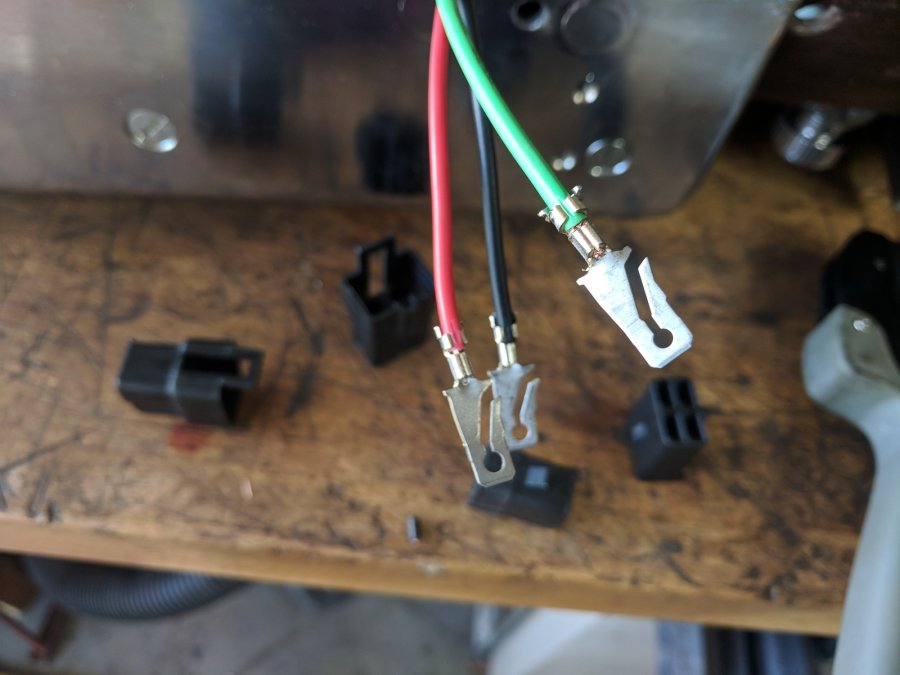
The 12v-6v DC-DC converter showed up and I got that installed. I fabricated a simple aluminum plate that bolts on using the radio grill screws. I used a little foam tape on the rear in case it vibrates against the dash and for wire rub through protection. The converter is mounted with rivet nuts. I left the extra aluminum for future addition of the stereo components. In the past I have used a small amplifier chip that will power two speakers and has a headphone jack input. You can also have a Bluetooth input too. The chips use various input voltages so watch out for that when choosing one. All that will show on the dash will be a small 3.5mm headphone jack. Click here for an example. All the Packard connectors are installed for the dash and under dash wiring. I have one for the ignition switch, one for the wipers and one for the lighting switch. i also took apart the turn signal switch and cleaned the contacts and replaced all the wires. I used a 6 gang Packard connector for that too.


 2 points
 -
I'm gathering up my floorboards and heading to your place. We're going to get along great!2 points
-
Honestly comparing this to a fluid drive is like comparing apples to bananas it really is. The fast 2nd your referring to is a 1940 tranny were 2nd is 1.55 instead of 1:83. But think you and many miss, 1st the t5 trannys come in something around 100 versions. I did a quick check in my AAMCO reference guide. Would you be surprised to know there are actually 21 different t5s for the Mustangs and I just did a quick look at Camaros and there seemed to be as many or more. 1352-246 Ford 1994 Mustang 5.0 V8 WC Y 3.35 1.99 1.33 1.00 0.75 1352-238 Ford Mustang 3.8 V6 WC V 3.35 1.93 1.29 1.00 0.72 1352-208 Ford 1992 5.0L Mustang WC 3.35 1.99 1.33 1.00 0.68 1352-209 Ford 1992 2.3L Mustang WC X 3.97 2.34 1.48 1.00 0.79 1352-015 GM 1983 Camaro/Firebird 2.8 V6 E 3.50 2.14 1.39 1.00 0.86 1352-054 GM 1984 Camaro/Firebird 2.5 L4 K 3.76 2.18 1.42 1.00 0.72 1352-061 GM 1984 Camaro/Firebird 2.8 V6 E 3.50 2.14 1.39 1.00 0.78 1352-071 GM 1985 Camaro/Firebird 2.8 V6 P 4.03 2.27 1.49 1.00 0.76 1352-245 GM 1994 Camaro/Firebird V6 WC Z 3.75 2.19 1.41 1.00 0.72 1352-246 Ford 1994 Mustang 5.0 V8 WC Y 3.35 1.99 1.33 1.00 0.68 1352-247 GM 1996 Camaro/Firebird V6 WC Z 3.75 2.19 1.41 1.00 0.72 Lots of these configurations seem to be quite the jump from 1 to 2. As well the more robust t5s that were into the Camaro and Mustang are far from inexpensive. Not to get into there is way more work than the A833 based on the documentation I have seen from guys like Don C. No more than for Mustang (see above) and unfortunately there are t5 splits that are absolutely terrible. The another ratio inbetween your referencing is often to compensate for lower hp and torque engines. I realize there are lots of higher hp engines running t5 transmissions but even some of those, you may be very surprised to actually look at the specific splits. Yes you can start spending money and changing the gears in the t5. On the A833 there is no issue running behind a flathead mopar. I have run an a833 behind a flathead for several years. On the stock Mopar 3 speed as a reference, the splits are 1st....2.57. 2nd...1.83, 3rd...1.01 point
-
You are spot on with the work involved but there is nothing that is not normal to ANY swap involving a non stock engine and or trans swap, at least in my 50 yrs experience. Easiest way is to remain stock, just depends on ones skill levels. Nice truck, if mine, would keep original drivetrain, old Mopar flatheads are great engines.1 point
-
Gregarious, I am struck by so few "attaboys!" Even 'tho I'm way past wiring issues on my car, I enjoy seeing you workmanship and your work ethic. We need more "hands on" young guys and you are a great example. Keep up the good work, keep us posted and,....keep us honest! Good job and,.. atta boy!1 point
-
Shxxx, bugger, damn, sorry.1 point
-
I thought you had a repair manual for the vehicle. The operation is described in the accessories section starting on page 286.....1 point
-
the cable is the ground for the motor. the card board thingy appears to be what is left of the diverter from the heater. on my 51 it is above the transmission hump. diverts the heater air to the left and right1 point
-
I wish I had asked this question back in 1994 when I built my first shop. If I had, I would not have needed to build my second shop. My new one is a 2 bay shop made to house a 2-post lift. I went with the 2 post so I could pull the suspension without interference or the need for additional lifts. Got to admit, I may still get a 4 post sometime in the future (easiest oil change, vehicle stacking). Figure out who's lift you are going to buy and ask them about building requirements before you build. My lift folks told me that I needed 14' of clearance from the top of the slab to the ceiling and that the slab will have to be at least 5" thick. Once again, your lift company will have the specs. The company I bought mine from installers - two guys working about 8 hrs, using lots of tools I did not have. I am glad I paid them to do it. My shed has drive (or tow) through access to the lift. I plumbed air from the compressor in one of my other sheds to the new one. Plan on where you want the compressed air and how you are going to run the lines (not PVC). I put a 240 V plug on each end of the shed (middle of the shed, between roll up doors) so that a welder could be run where ever it is closer. I also installed electric plugs every 10' on the side walls, about 4' up from the slab. That way plugs are about work bench high, and I don't have to bend over to plug something in. If you can afford to build your shelving now, plan them out as well. Make sure they are heavy (and large) enough to hold tools or parts. Leave access to the electric plugs. I put in LED lights. They were not that expensive. Finally, decide how much of your new shop (and shelving) will be converted to general storage by your wife and kids (guess how I know this one...).1 point
-
another item I did not see on your list is an air compressor and plumbing the air about the shop with multiple drops. If this is in your mind, I would suggest a small independent building out and away from the shop to place the compressor so to remove the noise of the away from house and work area...I have mine out back and plumb my air into the building...I have a huge water separator on the output of the compressor and water separators at the four air tap/drops inside the shop with built in drains. As for the lift, I went with the four post as I can move it about if for some reason I should need to. As for lighting, I will be moving away from florescent soon and install the LED's....much better light, and hopefully less trouble. I admit I have had good luck with my fluorescent but prices of tubes is going up and up for any that have any working life to them.1 point
-
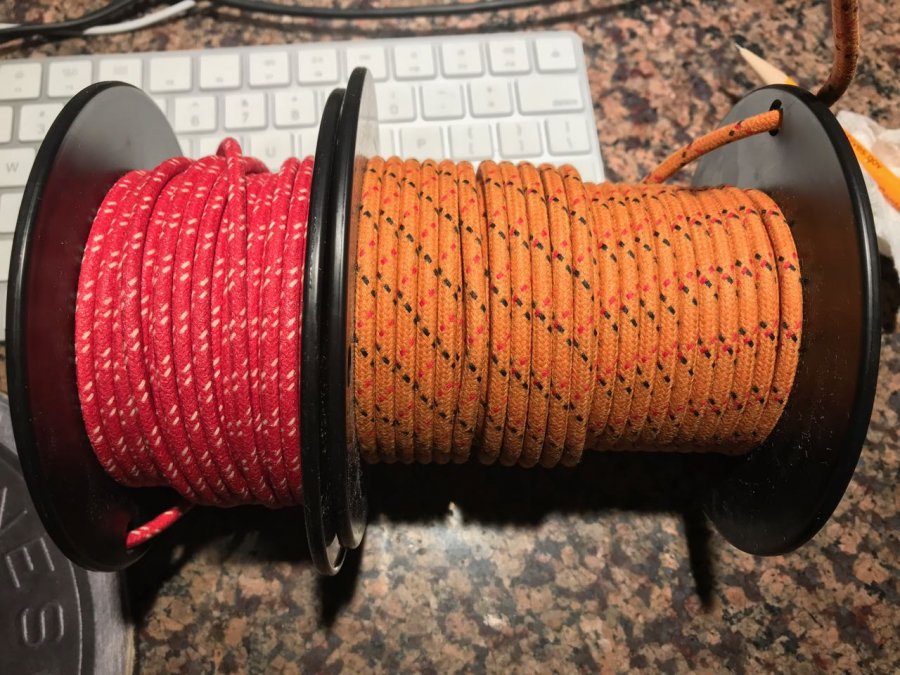
Just got another couple of 50' spools of 12 and 14 ga cloth wire from Tom's Engine Barn. It's like buying candy! So many choices!
 1 point
 -
The fact you are on a site like this one, means you have an interest in the art of creation. Metal fab, engine building, wiring/intruments, upholstrey, suspension geometry, paint, metal treatment, and even glass.......There are alot of trades in that there truck, finding one that really does it for you is gonna go a long way if you really go after it. Metal Shaping Engine Building Automotive painting Frame building/suspension Automotive electronics and wiring Transmissions and Running gear Automotive Testing and Racing To have a complete fabrication shop only means you have to love a few of the trades....the rest are friends of yours. To have everything needed to do a vehicle front to back in a home shop, one would have to invest a ton. I sometimes feel understanding someone's trade and respecting their investments and abilities is as important as respecting your own abilities. When I see someone's super cool ride, I know its his, but I also know he made some friends along the way who helped build it. Oh damn....I think I just ranted....sorry about that. 48D1 point
-
Moparcoupe. I listened to your voice message last nigh. According t my Borg warner tans and diff catalog the early type 16t and the late 15t are interchangeable and this is indicated for the WT243-10 idler gear and they also reference the various MoPar part numbers ( 952244, 853887, 666923) I have attached the page from the catalog for your reference so the 16t and 15t canbe used. Look at the cross sing just before the part number wt243-10 and there is a staement with the cross sign as the reference point. This is another reason for collecting the various catalogs and for members to get copies to have for reference material. Rich Hartung Desoto1939@aol.com1 point
-
Shawn; If you do the disassembly (recommended if you plan on doing the assembly) take pictures every step of the way. There are location specific bolts and washers on the front timing cover. Group your removed hardware in sandwich bags marked with a sharpie. Clean all removed bolts and hardware with a wire brush. You may need a ridge reamer to remove your pistons. You will need a piston ring expander to install new rings on your pistons. You will need a piston ring compressor to install the pistons in the cylinder. You will need a valve spring compressor to R&R the valves. You will need a good set of feeler gauges to measure and set your piston ring gap. You will need feeler gauges to set your valve lash. As already mentioned plasti-gage is required to check bearing (mains and rods) clearance. You will need a puller to remove the front crankshaft hub. You may need a large socket (measure your nut for the correct size) to remove the nut that secures the front hub to the crankshaft. Click on my photobucket link below and go to the engine album. Lots of pictures that may help you there. Dont be arfaid to ask questions as you proceed. I sent my cam to Earl Edgertion in California for a new profile. Cost about a big buck and a half 4-5 years ago. I installed shiverlay valves in my engine. My Desoto long block is bored .030" over and is now 255 CI.1 point
-
Johnny 5; The link you posted is for a furd V-8 flathead. Not sure if that technology will work on a Mopar flathead 6. Pictured below is a picture of a relieved Mopar flathead engine block. I shot this picture on my last visit to George Asche. I do not have any additional information on this engine.1 point