st63 Posted June 24, 2014 Report Share Posted June 24, 2014 I wonder if anyone can help me with some brake light wiring questions. I finally decided to add an extra pair of brake lights to my stock 41 Plymouth P-12 coupe. It originally only had the single, trunk mounted light, which just doesn' cut it in modern traffic...too many times people don't notice me braking. I added two NOS 6 volt "Guide Lamp" style lights with red lenses on the rear bumper, and connected the wiring to the existing single brake light wire. I installed 6 volt, 20 watt halogen bulbs. It worked fine initially, but eventually blew the single 30 amp fuse in the main lighting circuit. Following some on-line tech tips, I tried re-routing the hot wire from the brake light switch directly to the solonoid on the starter, and installed a 20 amp in-line fuse. This bypasses the main light circuit and keeps the central fuse from blowing, but when I tested the brake lights for several minutes I noticed that the ammeter now jumps way to the positive side and the brake light housings get so hot they literally start to smoke! Is this an issue with the halogen bulbs themselves, or is re routing the hot wire to the solonoid a bad idea? Should I just ditch the halogen bulbs and go back to regular (dim) bulbs, and/or switch the wiring back? Maybe I'm the dim bulb here..... Quote Link to comment Share on other sites More sharing options...
greg g Posted June 24, 2014 Report Share Posted June 24, 2014 (edited) OK watts total divided by volts = amps, so it looks like your fuse is OK for your load, assuming there is no extra excessive resistance in the circuit. What gauge wire did you run to the aux lights? should be 12 or 14. The stuff they sell in auto parts places is for 12 V applications which draw by virtue of the above math half the amps of 6V so you need thicker wire to extend the 6V. But you could have converted the stock lamps to dual element bulbs one for running and brakes by swapping the bases from single wire to dual wire by simply buying and swapping out the basses. Just pull the base wires, and spring out of the rubber doodad and swap it into your stock fixture. Then you can use you guide units for rear signals, to do front signals do the same swap to dual element pigtails. Since the bulb pins are not indexed, you need to assure the dims and bright elements are aligned to the proper job. I am running 35 watt tail lights and 55 watt brake lights in my stock tail light lenses and fixtures. While the P15 lenses are larger than what you have they seem to handle the heat w/o any problems. Make sure your wires are properly sized and your connections are soldered, wire nutted or butt connected and the connections are solid. Also assure your fixtures are well and properly grounded, and if your car does not have one make a ground strap that runs from the fire wall to the frame or engine, this will assure you ground path is conducive to new circuits. How large are the guide light fixtures you used? And yes the new pigtails are wimpy 12v stuff, but since they are close to the load and short they usually are OK. My amp gauge does jump to positive but at about 20 amps when I apply the brakes. What is going on is the circuit triggers the VR to boost production from the genny to put back what is taken out by the brakes lights. Edited June 24, 2014 by greg g 1 Quote Link to comment Share on other sites More sharing options...
greg g Posted June 24, 2014 Report Share Posted June 24, 2014 (edited) ok here is the pic of the pig tail some how when I did editing the image got rejected. Edited June 25, 2014 by greg g 1 Quote Link to comment Share on other sites More sharing options...
greg g Posted June 25, 2014 Report Share Posted June 25, 2014 Also consider running a dedicated ground connection from the body (firewall) to the frame or engine. Chances are that will make all your stuff work better. but running dedicated ground wires from the fixture to the body is also a good idea for high load elements. 1 Quote Link to comment Share on other sites More sharing options...
st63 Posted June 25, 2014 Author Report Share Posted June 25, 2014 Thanks Gregg, that's very informative. I should have mentioned that the original tail lights have already been adapted to a dual contact pigtail to accomodate turn signals, which is why I added separate units for the auxillary brake lights. I used 16 gauge wire for the new lights, which I thought would work. Maybe I should try 14 gauge The Guide lamp units are the B-31 style, late 40s vintage, about 4 inches long. These are designed to ground through the base of the fixture, but maybe I should add a separate, dedicated ground as well. I like your idea of running an additional dedicated ground from the firewall to the frame too. As for running the hot wire from the brake light switch directly to the solonoid, do you see a problem there? Quote Link to comment Share on other sites More sharing options...
greg g Posted June 25, 2014 Report Share Posted June 25, 2014 I have been running a dedicated power wire to the brake lamp switch since 08 with no ill effects. the wire has an inline fuse. were it me, I would swap feeds so that the guides are the flashers, this would mitigate the heat issue, less heat with a flashing bulb, then put the brakes in the stock lamps. simple to do by switching wires. 1 Quote Link to comment Share on other sites More sharing options...
st63 Posted June 25, 2014 Author Report Share Posted June 25, 2014 Thanks for the input, I'll give it a try. Sounds like your brake light switch is wired just like mine, so I'll leave it as is. I may experiment with some 6 volt led bulbs to see if that mitigates the heat issue as well, as the guide lamp fixtures may be a little too small to handle the heat of halogen bulbs. Quote Link to comment Share on other sites More sharing options...
Young Ed Posted June 25, 2014 Report Share Posted June 25, 2014 16 gauge is the OEM spec for lights so you should be ok there. 1 Quote Link to comment Share on other sites More sharing options...
carmen142 Posted June 25, 2014 Report Share Posted June 25, 2014 Can you please post a few pictures of you brake light system? Thanks Carmen 1 Quote Link to comment Share on other sites More sharing options...
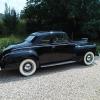
st63 Posted June 26, 2014 Author Report Share Posted June 26, 2014 (edited) Thanks for the input on wiring gauge Ed...I'd hate to have to run another whole set of wires! Carmen, I'll post a photo of how I've run the wiring to the brake light switch with an inline fuse set up....Hopefully Gregg will confirm that it's a good setup, as it sounds similar to what he described. I'll include photos of how I mounted the extra brake lights. I used vinage 40s lights, so it looks like it belongs there. Edited June 26, 2014 by st63 Quote Link to comment Share on other sites More sharing options...
greg g Posted June 26, 2014 Report Share Posted June 26, 2014 OEM wattage OK for 16 gauge on running lights. If you are sticking with the higher wattage bulbs, I would upgrade the wires also. You are only talking in the trunk lines. IMHO. 1 Quote Link to comment Share on other sites More sharing options...
st63 Posted June 26, 2014 Author Report Share Posted June 26, 2014 I think I'll follow your advice there...the in fuse holders came with 14 gauge wire, so I may as well upgrade to 14 gauge for the rest of the wiring to the brake lights....it's a fairly simple circuit to re-wire. Quote Link to comment Share on other sites More sharing options...
st63 Posted June 27, 2014 Author Report Share Posted June 27, 2014 Carmen142, here are some photos of how I mounted the auxillary brake lights. It pained me to drill holes in the top of those bumper guards, but it really is the best location for the lights for visibility purposes. Since my car is a driver and not a show car, I chose safety over everything else, but at least I used 40's vintage guide lamps so they look period correct. I may look for some larger vintage lamp housings, since these can get hot if I use a halogen bulb in them (but so does the single O.E. housing). They work fine with incandescents or led's though. The under the hood photo shows how I installed a fused line directly from the hot lead of the brake light switch to the solonoid. The second fused lead is going to be connected to an NOS accessory backup light assembly and switch I'm putting on next week. Quote Link to comment Share on other sites More sharing options...
desoto1939 Posted June 28, 2014 Report Share Posted June 28, 2014 I put a 6 volt third brake lite in the rear widow of my 39 Desoto. It is a light bar that is held in position by two suction cups. I also have turn signal wired into the light. So the light is high up and the people behind me can see the light in the rear window. It is very bright and also does not hinder my view when looking out the back window. Rich Hartung Desoto1939@aol.com 1 Quote Link to comment Share on other sites More sharing options...
Solution st63 Posted June 28, 2014 Author Solution Report Share Posted June 28, 2014 Good idea...if my current setup doesn't help with visibility, I may look into one of those as well. Thanks.. Quote Link to comment Share on other sites More sharing options...
carmen142 Posted June 28, 2014 Report Share Posted June 28, 2014 Thanks for the pictures. I can understand how yu feel about drilling into your bumber, but they do look correct. Wiring is one thing that I just don't understand. I to rather have safety in my ride. Once again thanks. Carmen Quote Link to comment Share on other sites More sharing options...

Recommended Posts
Join the conversation
You can post now and register later. If you have an account, sign in now to post with your account.